5 Tips to Take Your Outdoor Spaces to the Next Level

Summer is here! If you like hosting backyard barbecues, pool parties, cocktails on the back patio, or generally entertaining family and friends outdoors, you’re probably thinking about giving your exteriors a good spruce.

The process of elevating your outdoor spaces, landscaping, and hardscaping isn’t as daunting as it may seem—with just a few simple steps you’ll be well on your way to a beautiful outdoor space that you can enjoy all summer long.

1.  A Good Scrub Goes a Long Way!

“Don’t underestimate the power of a good cleaning,” said Rebecca Mahanes with LandTech, a landscaping and pool contractor serving Central Virginia.

If your hardscape is looking a little dingy from red clay stains (thanks, Virginia!), moss, or mildew buildup, you should start your spruce with a power washing. And you don’t need to spend a lot of money renting a high-powered gas power washer, either.

“Hardscape power washing tools are available at most garden centers and department stores, and they do the job just fine,” Mahanes said. “You can use the same tool to give your wood surfaces, like porches and decks, a good thorough cleaning as well.”

2.  Get Down to the Details

The next step is to address the little things that can make a big difference. If you have a patio or walkway made of stone pavers, it’s time to refill the joints with polymeric sand and make sure your edging is firmly in place so those stones don’t begin to slide and spread. This will help prevent weed growth between the pavers, and make your stonework look fresh. If you have cracked or broken mortar in your hardscaping, remove and replace it. You can DIY this project, or call a mason to come and help you out.

3.  Deck the…Deck!

After a long, damp winter, wooden decks and porches can begin to look weathered and splintery, even if they are structurally sound. Touch up those spots where the paint or stain has faded or chipped. For the deck boards, there are special products available at home and garden centers for making wood surfaces look good as new—or better! They’re a little thicker than paint, and fill in the cracks between the wood grain, smoothing over any rough areas and creating an improved walking surface. 

“When it dries, it can even be power washed for easy future cleaning!” said Mahanes. 

4.  A Bright, Fresh Look

You may consider replacing your patio furnishings for a quick but impactful splash of color. Check out the new seasonal options for pillows, cushions, umbrellas, and outdoor throw rugs. There are plenty of fun colors and patterns to choose from that are sure to be instantly eye-catching. 

Looking for something a little bigger? Think about adding a fire pit! You can build your own or purchase ready-to-go backyard fire pits and fireplaces of all sizes and shapes.

5.  Perfect Plantings

Simply adding a few patio pots with brightly colored annuals can really liven up an outdoor space. If you’re looking to take it a step farther, new edge plantings like shrubs and flower beds can really add variety, color, and elegance to your landscape. 

Looking for plants that the deer won’t eat? 

“For shrubs, plant boxwoods,” Mahanes said. “For deer-resistant perennials, plant daffodils, iris, peonies, hellebores, lavender, foxgloves, ferns, and heuchera, to name a few.”

It’s worth noting that for some of these, the deer don’t eat them because they are toxic, so do a little research before planting if you have young kids or pets.

You don’t have to spend a fortune to refresh your hardscape this season. Any one of these little improvements can make for a great outdoor project and go a long way in sprucing up your backyard. So fire up the grill, get the marshmallow sticks ready, call the neighbors, and let the good times roll!  


Grafting Apple Trees

Grow Your Own Apples By Grafting!

Who doesn’t love snapping a juicy bite off a crisp fall apple? For me, it’s one of the luxuries of autumn in Virginia. Right now, the United States produces about 200 different varieties of apples, ranging in color, size, sweetness, and purpose. Some are best for pies and baking, others for applesauce, some are great for cider and pressing, and, of course, many are great for snacking. However, at one time there were more than 20,000 varieties of apples!

It may surprise you to learn that you cannot just pluck a seed from your favorite apple, plant it, and produce a tree that bears the same fruit. You’ll get an apple tree, but the apple it produces could bear no resemblance to the one you got the seed from. This is because apples are “open pollinated.” This just means that the flowers of the apple tree are pollinated naturally, by pollinating insects, wind, etc., which can get pollen from any other apple tree. So, if you get a seed from a Red Delicious apple and plant it in the ground, the fruit that the seed produces will be 50-percent Red Delicious, and 50-percent something else. Naturally over time, each new generation of apple tree produces something further and further away from its parent. 

So how do we ensure the preservation of specific apple varieties, and control the genetics of our apple seeds so that they continue to produce the exact apple we want? The answer lies in a process dating back several thousand years called grafting. 

To learn more from an expert, I spoke with local orchardist John Hoskins, who has been successfully grafting trees for many years. He has over 800 individual trees and 40 different varieties growing in his orchards. He explained that apple grafting starts with two essential things: a root stock, and a scion.

The root stock is, of course, the lower part of the tree that includes the roots. It doesn’t matter what type of apple tree the root stock comes from. Root stock is chosen for qualities such as drought resistance, anchorage (how stable is it in the ground), and disease resistance. The root stock also determines how high the tree will grow. 

The scion is the top part of the tree. This is the part that will bear fruit and contains the genetic makeup of its parent. Orchardists select the scion solely on what type of apple they wish to produce. 

According to Hoskins, anyone can learn to graft apple trees. The process is straightforward, and simply requires practice to master. It goes something like this:

STEP 1: The root stock will need to be ordered in advance from a nursery. In the old days, crabapples were often selected for root stock because their qualities were desirable, and they were easy to come by. This is also an option if you would prefer not to go through a nursery. Your root stock should be about the diameter of a pencil, or only slightly larger.

STEP 2: The scion wood can also be ordered from a nursery, collected from a tree you wish to preserve, or from a tree that bears the type of fruit you want to grow. It’s best to collect the scion wood in winter while the tree is dormant. You’ll want to take a cutting with only about three buds above the cutting and, again, about the diameter of a pencil. After collection, store the scion cutting carefully by wrapping the cut end in a damp paper towel, placing the paper towel end into a plastic bag, and saving it in the refrigerator until spring. 

STEP 3: Early spring is the best time to graft your tree. With a grafting knife, carefully take two angled slices about an inch long off the bottom of the scion wood, so that you have two flat cuts coming to a point. 

In the top of the root stock, make a downward slice directly into the center of the wood, about an inch deep. 

Then, like a puzzle, you will slide the point of the scion wood into the gap that you cut into the root stock. The cambium, or the very edge of the live wood, just under the bark, of the two trees should line up. The place where they join is called the “graft union.”

STEP 4: You’ll need to care for your new tree until it is strong enough and ready to be planted. It is important to prevent the wood from drying out. Wrap the graft union in freezer tape to lock in moisture. 

New trees should be stored out of direct sunlight. The root stock should be placed in damp peat moss and wrapped in a plastic bag until the buds above the graft union begin to show growth. Any new buds below the graft union should be quickly removed so that all the energy from the roots is directed to the tree above the graft. Once new growth can be seen, the tree can be transplanted outside!

You need at least two apple trees to produce fruit, but the more you have, the better chance you’ll have of thorough pollination and a good harvest!  

WHY GRAFTING IS IMPORTANT TODAY

Apple grafting is a critical part of preserving heirloom apple varieties and developing new ones. Many people use it as a means of preserving a tree they loved in childhood, from a grandparent’s farm. Earlier, we said that America produces about 200 apple varieties, but at one time, there were more than 20,000. So, what happened?

Well, apples were not really produced for eating until the 1920s or ’30s. Before then, apples were produced for sugar and fermented cider. During westward expansion in the 1800s, settlers were offered 100 acres of land if they would commit to establishing homesteads and settlements on it. In most cases, they were required to plant fifty apple trees over the course of three years to prove that they were established. About this time, an enterprising man named John Chapman, who you may know as Johnny Appleseed, began planting hundreds of acres of apples across the unexplored west, selling the seedlings, and even selling land planted with apple trees, to frontiersmen. They would cultivate apple orchards and, as new apples were discovered with desirable qualities, nice colors, etc., they would be preserved. 

But in the 1920s and ’30s, as apples became popular for eating and mass production and nationwide shipping fell into popular demand, large companies began selectively growing only a few types of apples that kept well in storage and didn’t bruise easily. Countless varieties of heirloom apples were lost. 

Orchardist John Hoskins says that there has been a push back against mass production with the return of small farmers, apple grafting workshops, and a growing community of heirloom apple enthusiasts. Now, “Fruit Explorers” (that’s really what they’re called!) are out there searching for hundred-year-old apple trees to collect cuttings and preserve varieties. They conduct research to try to identify the tree, and as a result, long-lost apple varieties are coming back into popular cultivation, and the art of apple grafting is being rediscovered.


Stormy Weather Iris Gardens

A Kansas City, Missouri, native, Shana Gammon has been around irises her whole life and the familiar has become her passion. Gammon is the owner of Stormy Weather Iris Gardens, a private house garden that sits on a quarter acre within Lynchburg City limits.

Consisting of five beds and 200 different varieties of tall bearded iris, the garden officially opened to the public in 2017.

“I started doing floral photography in 2006 or 2007,” Gammon said of how the garden got its start. “I exhibited nationally and worked with hospitals around the country,  providing photos for their galleries and so on. With four children, it was easier to grow what I wanted to photograph rather than travel around to shoot. Irises were one of the flowers I started growing at that time and they became one of my favorite flowers.”

Stormy Weather Iris Garden grows irises in every color and color pattern, from Plicata and Broken Color irises to Amoena and several Space Age varieties.

“All are tall bearded, but each is different,” said Gammon.

As if walking among a sea of multicolored irises weren’t special enough, Stormy Weather Iris Garden is also one of two Historic Iris Display Gardens in Virginia, with the second being Tufton Farm at Monticello.

“I love history, so joining the Historic Iris Society was a perfect fit for me,” explained Gammon. “One of the requirements is that you have to have at least 15 historic iris varieties in your garden and the garden should be open to the public. We have more than 15 historic varieties but we also have many newer introductions.”

To qualify as a historic iris, the iris must have been introduced to the American Iris Society 30 years ago or earlier. 

For Gammon, sourcing which irises to grow in the gardens is one of the highlights of operating a historic iris garden.

“I’ve worked hard over the years to establish a collection that is unique and something you won’t see anywhere else in Central Virginia,” she said. “My collection is from private and commercial growers from around the United States. We have some varieties from well-known hybridizers, but I also like to reach out to hybridizers within local clubs around the county and collect their varieties as well. They haven’t received as much recognition nationally, but their varieties are beautiful.”

Last year, Gammon obtained varieties from a hybridizer in New Mexico and, in the previous year, she obtained several varieties from a hybridizer in Wisconsin—varieties that are unique to their collection and that won’t be found anywhere else in the area.

Home gardeners looking to expand their own iris gardens or dip their toes into planting irises for the first time can look to Stormy Weather Iris Gardens for their rhizome purchases. Their annual rhizome sale is the third weekend in July, which runs on Etsy.

“Each year we have sold out within a few hours,” Gammon said. “This year will be the first year we will be shipping nationwide, so order early!”

Stormy Weather Iris Gardens is state licensed and inspected for rhizome delivery, and their Etsy shop can be found on Etsy by searching “Stormy Weather Iris”.

To visit Stormy Weather Iris Gardens, simply email stormyweatheriris@yahoo.com to schedule a visitation time. They will begin scheduling in the first week of April and visits are free. Irises usually start blooming toward the end of April and their Open House runs the first two weekends in May with peak bloom typically around Mother’s Day.


Rain, Rain, Go This Way

Rainwater becomes plant fuel with rain chains

utters and drains along a roof are one of the most important elements to maintain and take care of in a home. When water is effectively guided to the ground, your home’s roof, attic, or interior can be spared from damage. While most homes in the United States have a metal downspout that carries rainwater away from the home, there are additional downspout options that can be implemented on your home that are functional, beautiful, and effortlessly water your garden.

The History of the Rain Chain
Rain chains originated in Japan and are still used in many Japanese homes to keep water runoff away from roofs and foundations. Originally called kusari-doi, rain chains attach to gutters and guide rain down to the ground or to a water harvesting receptacle like a rain barrel. 

Rain chains can be DIY-ed by feeding a weather-resistant chain through copper or aluminum cups that have had holes added to them for drainage. They can also be store-bought, are incredibly affordable, and can be found in a number of different designs—from simple cups to pineapples to owls. Either way, they add a unique charm that “regular” metal downspouts just can’t offer.

Why Choose a Rain Chain?
If you’ve been considering harvesting your rainwater or have plans for a zen rock garden in your backyard, a rain chain can effortlessly guide rainwater to your desired location. 

If you don’t harvest your rainwater, you can use a rain chain to guide the water to a rock garden, planter, or fountain. Rain chains also work well as added garden components if you don’t want to entirely redirect the rain flow. Decorative rain chains can channel water into a large planter for the thirstiest plants in your garden.

Store-bought rain chains come in a variety of colors and finishes, though most are made of copper or metal. This level of customization will allow you to add a tiny pop of color or whimsy to your home.

Best yet? A rain chain could be added along the gutter channel without removing the existing downspout. Of course, your home’s unique gutter system will determine if that’s actually possible. However, many rain chains can be added by simply using tin snips to open a small hole in the gutter where the rain chain can be hung. 

There’s something to be said for the steady trickle of rain down tiny copper barrels to make you instantly feel like your home is an oasis.  


Gardens the Restore

The Herbs and Flowers You Need to Create a Stunning, and Healing, Medicinal Garden

Herbal medicine predates written language and recorded history. Archaeologists have found evidence of herbal medicine usage as far back as 60,000 years at research sites in present day Iraq. Now, we have chemically synthesized medicines that, without a doubt, save lives and cure disease, however, our modern medicine doesn’t nullify the value and importance of natural medicine. In fact, some of our most powerful drugs are still derived from plants! Did you know that two common drugs used in fighting childhood leukemia come from Madagascar periwinkle?

The plant has been used by indigenous peoples for ages to treat diabetes, however it was discovered to have cancer-fighting properties in the 1950s. We have not yet figured out how to synthesize these chemicals, so we still use the plant extract itself to make these life-saving medicines, reminding us that science is amazing, but sometimes you just can’t beat nature.

As a matter of fact, there are MANY modern medicines that come from plants, or that were developed because of our understanding of plant science. And traditional herbal medicine is still practiced today in much of the world. But you don’t have to be an expert or consult a mysterious medicine woman to add herbal medicines to your cabinet. Here are a few safe and simple herbs you can incorporate into your health and wellness routine:

For Insomnia: Chamomile, Lavender, Valerian Root
All three of these herbs have long been used to reduce tension and settle the mind and body in preparation for sleep. Valerian Root is especially trusted as a natural sleep aid. Drinking a hot tea in the evening of any one or more of these herbs is a great way to treat yourself to a little R&R.

For Pain: Feverfew, Ginger, Turmeric
If you suffer from chronic pain or frequent headaches, or deal with muscle soreness after a workout or a day on your feet, these options may help to relieve your discomfort. They’re great options to try for anyone looking to lessen their use of over-the-counter pain medications. Ginger is known to have anti-inflammatory properties, as well as a host of other health benefits. Feverfew, as you might guess, is used to reduce fever, but also helps curb pain from rheumatoid arthritis and toothaches. Turmeric is a powerful anti-inflammatory and has shown in some studies to be as effective as Ibuprofen in pain relief. It’s also easily incorporated into the diet in juices, smoothies, soups, or curry.

For Energy: Ginseng, Peppermint, Ashwagandha
All three of these herbs have been shown to improve energy, brain function, focus, and physical performance. Peppermint is probably the easiest to grow in your home garden and is great when used as an essential oil in a diffuser, as studies suggest that simply inhaling the scent of peppermint sharpens your focus and enhances your mood. Ginseng is popular for athletes and is commonly found in supplements and beverages. Ashwagandha is truly ancient and has continually proven to have a powerful effect on cognitive function, alertness, and even reaction time.

Powerhouse Herbs to Keep on Hand

There are a few herbs that are just good to have around, as they can address all sorts of ailments and issues. This is only a short list. In fact, most medicinal herbs have more than one use, and it’s a good idea to get an herbal guide or do some research if you’re interested in knowing more!

Ginger is one of them. I have frequent migraines, and I keep ginger in my kitchen, purse, and my desk at work, to deal with the resulting nausea. It’s also known to be hugely helpful for expectant mothers dealing with morning sickness. I prefer to eat dried ginger (you can find it at almost any grocery store), ginger chews, or cook with fresh ginger. But it is also available in supplements and teas. Even my kids enjoy the chews and get one any time they complain of an upset stomach.

Echinacea is very well-known and is used for building up the immune system. If someone in your family is already sick, giving this to other household members may help prevent them from catching the bug. The root of the plant is especially powerful. It’s also good for relieving a sore throat.

Oregano is not only delicious, but it’s also a great herb to grow in your garden, as it is antimicrobial, meaning it fights fungal, viral, and bacterial germs. It’s also high in antioxidants.

Bee Balm/Bergamot is charming in the flower garden and is also a wonderful herb with many benefits. Like oregano, it is antimicrobial. It also soothes cough, skin irritations, and stomach cramping. 

There are so many more valuable herbs that can play a role in your family’s health. Don’t be afraid to give nature a try! Afterall, it has sustained us for thousands of years.

As spring approaches, it’ll soon be time to get your herbs in the ground! Visit the medicinal garden at Old City Cemetery for inspiration as you plan and plant your own medicinal garden at home.  

Please note: While the above herbs are generally considered safe, allergic reactions and drug interactions are always possible. It’s important to consult with your doctor and conduct your own research before adding an herbal regiment to your wellness routine.


Sugaring in Virginia

Learn the Ancient Art of Tree Tapping for Syrup

The cold seasons may feel like a time of stillness—a pause in life and production. Our gardens are often bare, the ground is hard, and the winter hues of gray and brown may dampen our motivation to get outside. But here in Central Virginia, the trees are soon to be ripe for the harvest. No, not the fruits or nuts of summer, but of sweet, sticky syrup.

Humans have been tapping trees and harvesting sap to make syrup (“sugaring” as it has been called) as a food and medicine source for centuries. As spring approached, Native Americans would venture out and establish “sugar camps,” where they would wait for the sap to start flowing, and then harvest it to make maple sugar. The sugar was used as a food source, but also as a valuable trade commodity.

The best time for tree tapping is February and March, when the trees are moving energy (in the form of sugar) up and down their trunk in preparation for spring growth. Ideally, temperatures rise above freezing during the day, but drop below freezing overnight.

All trees produce sugar, but not all of it is good for syrup, or even human consumption. Of course, there is the maple (the Acer family), famous for the table syrup we buy at the grocery store and enjoy on our breakfast pancakes. But in Virginia, several tree species can be enjoyed for their sugary syrup production. Birch, pecan, and walnut trees are just a few other popular choices for tree tapping.

The Process

Thanks to Mother Nature and gravity, tree tapping is a simple, straight-forward process that can be enjoyed by the young, old, and in between. All you’ll need is a drill, spile (a small metal spigot), hammer and collection bucket (ideally one with a lid to keep hungry critters out).

You’ll want to drill a hole into the tree at a slight upward angle, using a drill bit big enough to fit your spile or tap. Most spiles are about 3⁄8 an inch in diameter. Drill a 2.5-inch-deep hole into the tree at a comfortable height for you.

The shavings when you pull the drill out should be light brown in color. If they’re dark, it could mean that the sap wood in that spot isn’t healthy, and you should consider relocating your drill hole. Traditionally, the south side of the tree is considered best for tapping, and results in higher yields, especially if you can place your spile under a large branch. But don’t worry too much about the exact location. If you choose to tap the same tree every year, you’ll need to move the tap at least six inches to the side of last season’s hole.

Using a hammer, tap the spile gently into the hole. You can order a spile online, or use something you have around the house, like clean metal tubing. However, the spile is the ideal tool for the job, and provides an easy way to hang your collection bucket. Once the spile is in place, you may see the sap flow immediately!

Hang your collection bucket from the spile or place it on the ground to catch the dripping sap. You can use just about anything, from five-gallon buckets to milk jugs.

Collection and Syrup Making

The next step is refining the sap into syrup. It’s easy! You’ll just need a pot, a good thermometer, and something to put your syrup in when it’s all done.

Simply boil the sap until the water evaporates and it reaches seven degrees above the boiling point. Of course, your boiling point changes depending on your elevation, so you may need to look it up. Here in Lynchburg, the boiling point is about 210.65-degrees Fahrenheit. Boiling the sap can produce a lot of moisture, so many people like to boil the sap outside on a grill or fire. It should take around three to four hours to boil down.

When you’re ready, pour the syrup into canning jars, or whatever vessel you’ve chosen to store it in. Nothing to it!

Sugaring is a great skill to add to your list of practical homesteading knowledge. Everyone in the family can participate, and when all is said and done, you get to enjoy a sweet treat passed down through the ages.

If you’re interested in learning more, do a little research on tapping other tree species! For example, birch tree sap is also used for sugar and syrup, but more commonly for beverages, glazes, and marinades, and medicinally as an antioxidant and great source of vitamins and minerals.


A Place for Growth

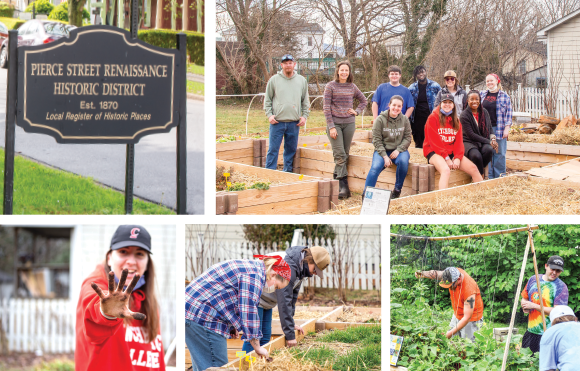
Take a walk down Pierce Street and you will find some pretty remarkable history. You may also find some gardeners and fresh produce.

At 1301-1303 Pierce St., the Pierce Street Community garden sits behind the old Calloway Store.

The garden is part of the Pierce Street Gateway, an organization that is seeking to preserve the history of Pierce Street and renew the community and neighborhood. The garden has become an integral part of the Pierce Street Renaissance District.

The two blocks of Pierce Street hold the homes and stories of many brilliant people. As the smallest of Lynchburg’s seven historic districts, it is recognized more for the people that resided there than its historic architecture.

At its start, an old Civil War hospital was run out of Pierce Street. The district was also the home of Anne Spencer, the renowned Harlem Renaissance Poet; her son Chauncey E. Spencer, a pioneer of the Tuskegee Airmen; and C.W. Seay, the first Black city council member and vice mayor of Lynchburg. There are so many others who left a mark not only on Lynchburg history, but on our nation as well.

Ghislaine Lewis, the director of Pierce Street Gateway and a founding member of the garden, knows that Pierce Street consisted of more than just the famous people.

“What you find on Pierce Street, if you look at housing records, is a lot of people who were educators and a lot of people who were seamstresses and businessmen and women who really helped to shape the African American community here in Lynchburg,” explained Lewis.

Photos Courtesy of Ghislaine Lewis

The Pierce Street Garden exists for the current residents of Pierce Street, while the Pierce Street Gateway exists to honor the residents of the past.

The idea for the garden began to take shape when Lewis spoke with Nina Salmon, a Pierce Street board member, about the gateway’s strategic plan. Salmon said they really wanted a garden.

Starting the garden became part of Lewis’ Lynchburg Leadership project. She was joined by six other members to form Team Big Hearts and, in 2021, the team established the garden behind the Calloway Store, one of the first Black-owned grocery stores in Lynchburg.

Currently, there are no grocery stores near Pierce Street, making it a food desert. This means that people do not have access to fresh, affordable produce—but with the garden they do.

“Food options are becoming really limited in the neighborhood. One of the big impediments when you’re talking about poverty is always access to food, particularly access to fresh food. It’s really important that people have access to fresh food,” Lewis said.

Before anything is planted, neighbors are asked what food they would like to see grown. Once grown, fresh produce is distributed to the neighbors’ houses every Saturday, and they can come into the garden at any time to get what they need.

On Saturday mornings, neighbors and volunteers—those who are charged with the ongoing garden maintenance—can be seen weeding and watering. Whitney Chauta, volunteer and head gardener, says there is a lot that goes into maintaining the garden.

“You have to decide what plants would do well in this setting, how much you should grow, making a schedule of when to start seeds and when you can move plants outside, and how to make the most of the space by doing some companion planting,” Chauta detailed.

According to Chauta, gardening is a very rewarding process, too.

“There’s a feeling of satisfaction when you work with your hands and can see the effects of that growing in front of you. Gardening is a never-ending learning experience.”

Eventually, Chauta would love for one of the neighbors to take over.

“I want it to be a true community garden. I want the people that live nearby to take charge of it and make it their own,” she said.

Both Lewis and Chauta expressed that one of the greatest pleasures of the garden is simply seeing the neighbors enjoy it and take part in it.

“I think the biggest joy is if you pop by on a Tuesday and you see someone getting something from the garden. Or if you come in on a Saturday morning and realize that there’s stuff that’s gone. That means somebody came. Somebody’s come in or a family’s come in and taken food. That’s been really important for us,” Lewis explained.

Chauta told a story of how she was in the garden and saw some strawberries that needed to be eaten before they went bad, so she offered them to a man passing by.

“His face lit up and he told me this story from when he was a little boy and he got into his aunt’s strawberry patch and ate all of them and how she wasn’t too happy about that. That’s the sort of thing I love—the history of a place, and the stories of a neighborhood that continue living on in the people still there. I think it’s a really positive place, in the way that it reminds people of good memories.”

Lewis conveyed that the goal of the garden and the Pierce Street Gateway is for the memories and history of the people of Pierce Street to continue to grow.

“We want to be able to create a hub to be able to tell the stories of Pierce Street—not just the stories of the famous people, but the stories of the ordinary people.”

To learn more about the Pierce Street Gateway, garden or make a donation visit www.piercest.org.


Photos Courtesy of Ghislaine Lewis


A Garden Oasis

Create a calming landscape with low-maintenance plants

Imagine stepping into your yard in the early morning with a cup of coffee in hand. The steam from your mug gently rolls into the thin layer of fog that has settled over the space.

It’s that perfect time of day when the crickets have ceased their nightly chatter, but the birds have yet to rise. It’s quiet and calm.

You deeply inhale the crisp morning air, open your eyes, and take in the stunning landscape before you. You’re not overwhelmed by the weeding that needs to get done, or the plants that are overgrown. Why? Because you’ve created a calming landscape with low-maintenance plants, so you can continue to enjoy peaceful moments just like this.

If this type of restful scenario is exactly what you’re looking for at home, we have rounded up a few native plants, upright perennials, and ornamental grasses that are inspired by nature and guaranteed to create a no-fuss garden oasis right in your backyard.

Upright Perennials

Perennials are plants that return year-after-year with no need to replant. When you’re planning your low-maintenance garden oasis, look for sturdy perennials that grow well in our zone—7a.

Russian Sage
Russian sage has the same stunning pale green foliage that common garden sage has, but it’s accompanied by gorgeous purple flowers. A full sun perennial, Russian sage is deer resistant, drought tolerant, and pollinator friendly. It also grows in pretty much any soil type and requires zero maintenance—win, win.

Because this is a relatively tall plant, consider how your overall garden will layer and plant these toward the back or up against your walls or fencing.

Bloom Time: Early summer to fall
Height: 2 – 4 feet
Spread: 2 – 4 feet

Autumn Joy Sedum
Autumn Joy Sedum is considered a succulent because it stores its water in its leaves and prefers dry, poorly fertilized soil, making it the perfect no-water, low maintenance plant!

When the flowers bloom, they start out pink and turn into a beautiful bronze color as the weather cools. Because it blooms fairly late in the season, it’s a great cool weather nectar source for pollinators.

Bloom Time: Late summer to fall
Height: 18 – 24 inches
Spread: 18 – 24 inches

Daffodils
You’re undoubtedly familiar with these cheerful yellow beauties. They’re a landscaping favorite along roadsides and cityscapes because they’re a “plant it and forget it” type of flower.

To stick with a more pastel or neutral color palette for your calming oasis, opt for white or coral varieties rather than bright yellow.

Bloom Time: Spring
Height: 18 – 24 inches
Spread: 12 inches

Ornamental Grasses

Ornamental grasses are not only low maintenance, attractive additions to your landscape, but they are excellent at providing food and shelter for birds.

Pink Muhly Grass
This grass is a showstopper due to its pink pillowy plumes.

Plus, it blooms in late summer to fall, so it’s a great option for introducing subtle color late in the season.

Pink muhly grass is less invasive than other ornamental grasses, so you can keep it relatively contained within your planned landscape.

Bloom Time: Late summer to fall
Height: 3 – 4 feet
Spread: 3 – 4 feet

Blue Oat Grass
Blue oat grass is an easy-to-care-for ornamental grass with a mounding habit, which means it stays self-contained. With steel blue blades of grass, it will add a serene color to your garden oasis.

And while the color doesn’t typically arrive until fall, you will still benefit from gorgeous beige and golden colors starting in June.

Bloom Time: Fall
Height: 2 – 4 feet
Spread: 2 – 4 feet

Maiden Grass
Maiden grass boasts a graceful form on a large frame.

With coppery flower heads that appear in early fall and become silvery white in the winter, it’s a landscape addition that provides visual interest almost year-round.
Maiden grass can become very tall, so only plant this ornamental grass if you have the space.

Bloom Time: Fall to winter
Height: 3 to 8 feet
Spread: 3 to 5 feet

Whether you pace yourself through planting to build your garden oasis over time, or jump right into a complete garden at once, these perennials will put you at ease and allow you more time to simply enjoy your beautiful landscape.


Mushrooms on a Mission

Mushrooms are a strange, complex, and often delicious gift from nature. Fleeting and particular, foraging for them in the wild serves as a great way to get the family engaged in an outdoor treasure hunt. But there’s another way to access these tasty morsels—and help out an important cause along the way.

Here in Virginia, many delectable and highly prized mushroom varieties grow right under the forest canopy. There are over a thousand varieties of edible mushrooms out there. But, before we go any further, it is important to note that many mushrooms are not edible (most, even), and are in fact very dangerous. NEVER eat a wild mushroom unless you are absolutely certain that it is safe for consumption.

With that out of the way, let’s get down to business. When and where can you find these edible wild mushrooms?

In Virginia, certain varieties of mushrooms can be found all year, but there are a few that seem to be most highly prized among hunters and connoisseurs. Mushrooms are a fungus and they tend to grow on decaying organic matter, like logs and leaf-littered forest floor, in damp areas or just after a rain. And while the fungus that produces the mushrooms is usually very large, healthy and active underground, the fruiting bodies that we eat don’t last long, so it’s important to get out there as soon as the rain stops, but before the air/ground dries out!

It may be a little late in the season for morels, but if you’re looking for this coveted mushroom, here are a few tips:
• Hunt when the air and soil temps are not too cool, but not too warm: about 60 – 70 degrees during the day, 50 degrees overnight.
• Wait until after a good rain storm or two, and look for an area of recently disturbed or burned forest.
• Morels love decaying yellow poplar, ash, elm, a nd oak. They’re also known to pop up around spicebush.
• And a great tip for ALL mushroom foraging: find a friend (or make a new one) with experience hunting these and other mushrooms! They can help you find good hunting grounds, and help you identify true morels.

Chanterelles are a different character. Unlike the morel, they love to emerge in warmer weather, and can be found all through the summer. Their yellow/orange color makes them easier to spot on the forest floor, and, like most mushrooms, they can be found in moist, shaded areas with lots of healthy organic matter. Fallen logs and leaf litter are good signs for finding chanterelles. A great place to spot these delectable mushrooms would be along creek beds and places where ephemeral streams form after showers. They tend to grow individually, or in small clusters, but where there’s one, there’s usually more. Look closely, though, and have your identification guide handy. Chanterelles have a poisonous look-alike called the jack-o-lantern. The biggest difference between the two is the gills on the underside of the mushroom head. The chanterelle has pale-colored false gills, which look more like wrinkles, whereas the jack-o-lantern mushroom has true, deep gills similar to the color of the mushroom head. The jack-o-lantern also grows in heavier clusters, and has a deeper orange color all over, whereas the chanterelle has a paler stem. Not to mention, the jack-o-lantern glows in the dark!

When you find your prize, it’s best to snip the mushroom at the stem rather than pull it from the roots. This way, the fungal system underground can continue to grow and produce more mushrooms. You’ll want to bring along a basket for collection, or something in which you can place the mushrooms so they can breathe and not crush one another.

But wild foraging isn’t the only way to enjoy these colorful culinary treats. We caught up with Bethshan McLeod, who along with her husband, James, serves as the director of Providence Veterans Farm and Mission Mushrooms in Concord, VA. Their non-profit has found a unique way to finance their critically important cause: mushrooms!

That’s right, the McLeods oversee an operation employing veterans who grow and sell top-quality mushrooms and mushroom grow kits. Their mission is to serve the families of service members who have experienced trauma during service. Military trauma tends to affect the entire household, and leads to high rates of divorce, mental health struggles, unemployment, and other problems regularly faced by these incredibly important members of our community. Mission Mushroom seeks to strengthen these families, and stop the spread of generational trauma so that service can continue in a healthy way, one mushroom at a time.

Their 90-acre farm offers four transitional homes for those in need, as well as opportunities for engagement, trauma healing, and mentoring. Bethshan said that mushrooms and farming are a natural fit for trauma recovery because of the intrinsic healing and calming qualities of gardening and agriculture. They also have two highly specialized mushroom growing facilities designed to grow specific mushroom varieties, particularly oysters and lion’s mane.

If you’ve been reading this as someone who doesn’t particularly care for mushrooms on their plate, you’re in good company with Bethshan! But she likes the ones they grow at Mission Mushroom because unlike most commercially grown mushrooms that are grown in manure outdoors, theirs are grown on a non-manure, non-chemical substrate in an indoor, controlled environment. They are never chemically treated or sprayed, and don’t even need to be washed before they’re cooked!

Mission Mushroom can be found at both the Downtown Lynchburg and Bedford farmers markets. They also have an online store offering a monthly subscription box! Every month, you’ll get a few pounds of mushrooms delivered to your door, and you’re helping out a really important cause in the process.

Mission Mushroom also offers an at-home grow kit. Visit their online store, choose the type of mushroom you’d like to grow, and have the kit delivered to your home. It’s a tiny version of their operation at Providence Veterans Farm, and you can grow about a pound to a pound and a half of your very own mushrooms. After the mushrooms are all gobbled up, Bethshan says the mycelium left over in the substrate makes excellent fertilizer! Just break up the grow bag, toss it into your garden,
and it’s a gift that keeps on giving.

Who knew the mighty mushroom could be the vehicle for inspiring healthy bodies and minds for warriors and their families right here in our community?

No matter how you come by them, if you’re looking for a fun new way to spice up your dinner plate, mushrooms are a great place to start.


Garden Can Do

A Comprehensive Guide to Hot Water–Canning

Canning is one of those old-world skills that feels a little unnecessary until you’re left with an end-of-the-season bumper crop of tomatoes, beans, or other garden produce that you can’t stand to throw away—then, it’s something you really wish you knew how to do. The good news is, it’s really not that hard to learn.

Once you do, you’ll have healthy, safe food for your family that you can store up for the winter, allowing you to enjoy the fruits of your garden all year long.

There are two home canning methods: hot water–canning and pressure canning. Hot water–canning can only be used on highly acidic foods because the acid prevents the growth of dangerous bacteria, including botulinum, which causes botulism. Many fruits contain high levels of acid, and pickled veggies and tomato sauces can be safely hot water canned. As a rule, don’t use the hot water method for anything with a pH higher than 4.6, and always do research before hot water–canning.

We highly recommend visiting the New London Cannery in Forest to jump in on a canning session. They offer their knowledge to the public starting in mid-summer, while guiding you through the canning process with the produce you bring in. They do charge a small fee of $1 per 28 oz. can, and $0.75 per 14 oz. can, but at the end of the class, you walk out with your very own properly preserved produce. It’s well worth it.

In the meantime, here’s a jump-start guide to hot water–canning:

The Supplies
Two Large Pots: To start, you’ll need a big, deep pot with a tight-fitting lid. You don’t have to have an official canning pot, but you’ll need an aluminum pot that’s deep enough to completely submerge your jars with at least an inch of water above the lids. You will also need a second large pot (no lid necessary) to boil your empty jars before the canning process begins.

Rack: The rack keeps the cans in place when boiling and holds the bottoms of the glass jars above the bottom of the pan. If they sit on the bottom, the jars will overheat and crack.

Jars & Lids: Glass jars like the ones made by Mason and Ball come in all shapes and sizes, and you can reuse the jars again and again! That said, you should never reuse the lids; always start with a clean, new lid. You should also never recycle antique jars, store-bought pickle jars, or other collected glass vessels for canning.

Tongs: The jars will be extremely hot when lifted out of the pot, so get yourself a set of canning tongs, which are specially designed to hold onto those jars.

The Steps
1. Boil your empty jars in the large pot that you aren’t using for canning. The lids and bands don’t need to be boiled, but the jars will need to be fully submerged in boiling water for about ten minutes.
2. While the empty jars boil in the other pot, place the rack inside the canning pot. Then, fill the canning pot with water and bring to a simmer. Keep the simmer going as you complete the next steps.
3. Pull your boiled jars out of their bath and dry them. While they are still hot, fill them with your recipe! Leave about a half inch of empty space above the product.
4. Give the product a little swirl with a spoon or spatula to release any air bubbles.
5. Thoroughly wipe down the rims of the jars so that no food residue remains.
6. Place the lids and bands, screwing them snugly but not too tightly.
7. Place the jars into the rack in the canning pot. The jars should be fully submerged and covered by at least an inch of water. Put the lid on the pot.
8. Bring the pot to a boil and allow the jars to bathe in the bubbling water for at least ten minutes.
9. Remove the pot lid and allow the jars to rest in the hot water for another ten minutes.
10. Pull the jars out of the pot and place them on a towel or rack to cool. Do not open or adjust the lids; they’ll need to sit for about a day.
11. Once the jars have cooled after about 24 hours, check to see if they were sealed properly by unscrewing the bands and pressing down gently on the lids. If the lid is taut and doesn’t spring back up when you remove your finger, it has sealed correctly! If the lid does pop back up, the jar didn’t seal. In that case, you’ll want to place the jar in the fridge and eat the contents within a week or two.

Properly sealed jars can be placed in a closet and stored for up to a year! Remember, food safety should always be your Number One concern when preserving your harvests. Do your research to find safe recipes when using the hot water canning method, and always check for signs of botulism. If you see the jar lid bulging, if the jar is under pressure when you open it, or if the food smells or looks bad, it’s best to toss it.

Happy canning! Let us know if you come up with any delicious ways to preserve those bountiful harvests this season.