2021 Lynchburg Idea House
For only the second time in its history, Virginia’s Historic Garden Week was cancelled last year when COVID-19 came calling.
This year, however, the show will go on after months of careful planning. “We knew doing Historic Garden Week in the way we’ve done in the last 87 years was not going to work in 2021,” said Karen Cauthen Ellsworth, director of Historic Garden Week and editor of the guidebook.
Presented by the Garden Club of Virginia, Historic Garden Week will offer 30 tours organized and hosted by 48 member clubs during the week of April 17-24. The nation’s only statewide house and garden tour has contributed an estimated $518 million to state and regional economies in the last 50 years.

A photo from the Lynchburg archives titled, “1924 Ladies.” Location unknown.
While some clubs are still hoping they may be able to provide indoor house tours, each club is ready to make this year’s tour entirely outdoors. They’ve lowered ticket prices, created timed ticketing, and are requiring masks.
Ellsworth expects enthusiasm for the tours to remain high. “Gardens have given people a lot solace in this upside-down, topsy-turvy world,” she said.
The only other time the weeklong festivities were cancelled was during World War II, Ellsworth said, noting that funds were sent to London to help restore gardens damaged in bombing raids.
The Garden Club of Virginia has since extended its mission and goodwill to other friends in need, Ellsworth said. After Hurricane Hugo, a donation was made to replant trees in Charleston, South Carolina. After Hurricane Katrina, money was sent to the New Orleans Botanical Garden to rebuild its greenhouses.
The roots of Historic Garden Week date to 1927, when a flower show organized by the Garden Club of Virginia raised an impressive $7,000 to save some of the trees planted by Thomas Jefferson on the lawn at Monticello.
Today, tour proceeds primarily fund the restoration of Virginia’s historic gardens and, since 1996, to provide graduate level research fellowships. In celebration of the Garden Club of Virginia’s 2020 centennial, funds were also pledged to support Virginia State Parks.

Annual Meeting of Garden Club of Virginia in Lynchburg on May 18, 1926.
During the past year, funds were distributed to Poplar Forest for restoration of the roundabout driveway and the creation and restoration of Reveley Garden at William & Mary.
The formal tours began in 1929, benefitting gardens at Monticello, Beatrix Farrand’s Green Springs Garden, Bacon’s Castle, Lewis Ginter Botanical Garden, and the State Arboretum in Winchester, among many others.
The Garden Club of Virginia’s horticultural programming and flower shows inspire one of Historic Garden Week’s greatest attractions, the world-class floral arrangements by club members featured on tours. An estimated 2,300 will be created for Historic Garden Week this spring.
Another plan upended by COVID-19 was a Garden Club of Virginia centennial celebration with renowned floral arranger Paula Pryke of London. The organization is working on having her do a virtual event this year. “We’re definitely trying to find the silver lining in all of this,” Ellsworth said.
Since 1920, the Garden Club of Virginia has grown from eight founding clubs to 48 clubs with more than 3,300 members. The efforts of these volunteers, along with the generosity of nearly 150 private homeowners across the commonwealth, make Historic Garden Week possible.
The Lynchburg Garden Club was founded in 1923 and started participating in Historic Garden Day in 1932. In 1953, the Hillside Garden Club was founded and the two joined together to support Historic Garden Week.
Normally, garden tours include tours of the four to five houses on the tour, but because the pandemic may force an outdoor-only focus this year, the group decided to capitalize on the change by emphasizing sustainable lawns and gardens. “We’re trying to educate people about what they can do in a small space to help our environment and our state,” said Jeanna Chapman, co-chair of Lynchburg’s Historic Garden Week.

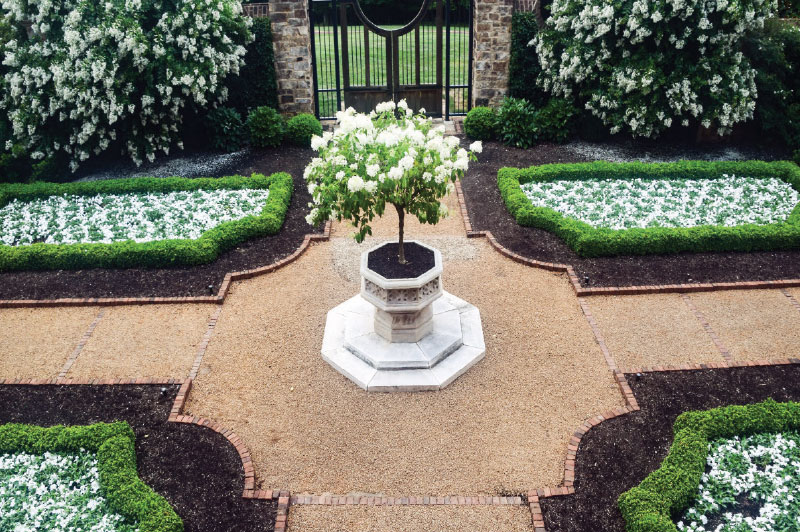
Garden of John and Jill Fees, one of the homes on Lynchburg’s 2021 Garden Day tour. Photos by Amanda Smithson.
Homeowners at the four houses on the tour are getting certified through Blue Ridge Conservation, a partnership between the Lynchburg and Hillside Garden Clubs started in 2019 to make Central Virginia more pollinator-friendly. A demonstration on how to plant a pollinator garden will be held at Irvington Springs Farm on Irvington Springs Road.
Several precautions are being taken to keep visitors safe. Tickets will be for sale for $25 online at VAGardenWeek.org, rather than for pickup, and will be offered as either morning (10 a.m. to 1 p.m.) or afternoon (2 to 5 p.m.) tours to allow for social distancing. There will be no day-of ticket sales.
Lynchburg has always been supportive of Historic Garden Week, Chapman said, noting that sponsors help defray the costs. The Bank of the James, for example, contributes $5,000 annually.
An added benefit of this year’s ticket will be the inclusion of local restoration sites. In Lynchburg, for example, visitors will also have free admission to Poplar Forest, Point of Honor, the Anne Spencer Garden, Old City Cemetery, the Miller-Claytor House, and the gardens at Sweet Briar College. “Lynchburg is special in the state in that there are several restorations sites,” Ellsworth said.
Tickets include admission to the following four private properties in Lynchburg:
1221 Fox Hill Road, John and Jill Fees, owners
This English Country estate, completed in 2013, combines stately architecture and the function of a working farm.
A recently added folly, an ornamental building, is nestled on the left as visitors enter. Farther along the bricked driveway are manicured lawns, a commanding stone forecourt, and a view of the residence. The gardens are filled with fruit trees, evergreens, and numerous native species. The family keeps bees and chickens, a large greenhouse, and maintains kitchen, vegetable, and floral cutting gardens.
1116 Running Cedar Way, Drs. Tim and Sarah Hellewell, owners
Built in 1983, this Federal Revival gem is a traditional Virginia Piedmont home, featuring Flemish bond brickwork, a Doric-columned entrance porch, and arched windows. The homeowners are committed to sustainability and biodiversity. The lawn has been pesticide- and herbicide-free for more than a decade, and the owners continue to reduce areas of manicured lawn to support pollinators and wildlife. Thirty-three solar panels on the rear roof provide all the power the property needs from March to October, while a fenced compost pile enriches the soil that sustains the vegetables growing on the back porch. Garden beds include a mix of old and new varieties of ornamentals and native species.
4113 Peakland Place, Dr. James E. and Elizabeth Foster, owners
Located in the heart of Boonsboro, this recently renovated Colonial Revival home was built during the early twentieth century suburban expansion of Lynchburg. The exterior is brick, painted in soft white. The neutral façade, weathered gray slate roof, and bluestone terraces counterbalance vivid greens and vibrant plant selections that provide year-round color.
A commanding front lawn framed by pyramidal evergreens and low boxwood contrasts with the casual entertaining spaces behind the house, including hidden nooks, a fairy garden, stone terraces, and a Williamsburg-style potting shed. A cascade of seasonal blooms begins with camellias and is followed by azaleas, peonies, magnolia, and hydrangeas.
4108 Peakland Place, Dr. Samuel and Mary Omotoye, owners
This charming English Country manor–style residence was built in 1928 in the midst of Virginia’s English Revival architectural and landscape movement. To emphasize a rural setting, previous owners added a circular drive and a walled cottage garden to provide a transition to the multiple side and rear gardens original to the property. The front beds have undergone a recent transformation with the addition of numerous American boxwoods. Colorful perennials, such as poppies, delphiniums, and irises, soften the brick exterior. In the rear gardens a terrace, fashioned with salvaged flagstones from downtown Lynchburg sidewalks, juxtaposes the natural earth tones of the brick and stone house with the lush green extending to the rear of the property.
Pollinating insects are in trouble! Almost daily you hear continuing reports of declining numbers of insect and bird populations. There is one thing we can do to help that is actually pretty simple—many of us are already halfway, if not almost, there.
Under the direction of Lynchburg’s Blue Ridge Conservation (BRC) it is easy to create a pollinator garden and certify it as a “pollinator-friendly habitat.” BRC is dedicated to supporting the biodiversity and sustainability of the natural environment. They have worked throughout the region and are now encouraging the citizens of Central Virginia to sign up for their truly local garden certification program.
Their online certification application directs you through a process that can be completed in only six simple steps. Below is an overview:
1. Provide food. It’s important that you choose only plants from BRC’s native plant list for the certification. Our local insects and wildlife need plants that have evolved in this region. This is particularly true when they are raising offspring!
The plants that provide nesting sites and food for insects in the larval stage are called “host” plants. Most of the time it takes one specific plant to feed one specific insect—commonly called a specialized relationship. (Think monarchs and milkweed for example, or fennel and parsley for swallowtail caterpillars.) The more diverse your host plants, the more insect variety you’ll find in your garden later.

You’ll also need plants that provide nectar in the summer. European honeybees will collect nectar from a variety of plants, but native bees have more specific needs. Asters and goldenrods are only two of the power-packed nectar sources for our local insects. Make an effort to provide nectar plants throughout the summer into late fall.
Refer to the native plant list (located on the BRC website with the application), do some homework and choose plants that feed the most insects and bees.
2. Provide a water source. It doesn’t have to be elaborate. A saucer, or even a dog bowl, with water and unsubmerged stones for the insects to sit on while they cool themselves is enough to do the job. If you’d like to attract birds into this lush habitat you’re creating, consider a moving water source; add a running water sound from a trickling fountain and you’ll be serenaded by songbirds.
3. Provide shelter. This where you can get really creative or be extremely simple. Your choice! You could make an elaborate bee hotel or simply leave a small pile of sticks somewhere on the ground for insects to use for a home. If you just want to check the box and not think about making something, BRC has solitary bee houses for sale on their website. Most of the things that we throw away as lawn debris would provide habitat if we only thought differently about them.
4. Safeguard your habitat. Once your garden is planted you have to take some precautions to keep it safe and healthy by reducing the use of pesticides and herbicides around your home. It’s also necessary to fight invasive plants that crowd out the native plants our pollinators require to thrive. You can identify invasive plants on the Department of Conservation Resources website: www.dcr.virginia.gov/natural-heritage/invsppdflist.
5. Remit payment. Finish filling out the application with a $20 fee that purchases your own “Certified Pollinator Habitat” metal sign. You can proudly show others you are helping to support the pollinator population in Central Virginia.
6. Submit application. With a few small steps in your garden, together we can help make Central Virginia “bee aflutter,” one pollinator garden at a time.
The most difficult time of year for me as a gardener is the window between winter and spring, when the planting season is tantalizingly close, but the ground is still too frozen, and the last frost of the season has not yet come and gone. That’s when I’m itching to get out into my garden and get my hands into that dark soil. But I can’t. Not yet.
Conveniently, right around the time that I start to get worked up into a gardening frenzy, it’s time to start seeds indoors!
A lot of folks believe that growing from seed is too challenging and not worth the effort. However, with a little knowledge, anyone can grow from seed. Once you
get the hang of it, you’ll never go back.
Here are the advantages:
Starting from seed is more cost-effective than purchasing transplants from garden stores. A seed packet contains dozens (even hundreds) of seeds, each one a potential plant. And in the right conditions they can be stored for years. This means that your single $1-$5 purchase can produce a bounty of vegetables over multiple growing seasons.
When it comes to live plants, most garden stores only stock a small variety. You’ll find regional staples: tomatoes, peppers, zucchini. But there are hundreds (maybe thousands) of interesting and unique varieties of veggies to try.
And finally, growing from seed is more sustainable.
2020 brought to light a host of concerns and uncertainties—a big one was food security. As a result, more people than ever were trying their hand at home gardening for the first time. The ability to grow your own food is an essential skill. But knowing how to grow from seed is the bedrock of sustainable food. Also, when you grow from seed you can purchase from ethical companies who are open about their seed acquisition and development processes.
Without further ado, let’s get to the dirt of the matter:
First, you’ll need some seeds. Seed shopping is one of my favorite activities. I adore seed catalogues! I have a dictionary-thick stack on my coffee table. The best part?
They’re usually free!
I’ve included a list of my favorites. Of course, there’s also nothing wrong with taking a trip to your local garden store, or even a big box store, and picking your seed packets right off the shelves.
Start by reading the back of a seed packet (or the description in the catalogue), which should contain everything you need to know. It will help you figure out when to start your seeds—which is very important. On average, most crops can be started indoors about six weeks before the last frost. In Zone 7a, our last frost date averages around April 16.
Next, choose a location and gather your supplies. You’ll need plenty of space and a safe, level surface for your seedlings that won’t be bumped. You’ll also need someplace warm once the seeds have germinated. Supplies include seed-starting mix, something to plant the seeds in, labels for identification, and plenty of light and water.
Seed-starting mix is actually not “dirt” in the strictest sense of the word. It usually doesn’t contain any actual soil, but instead is loaded with compost, peat, and other things that hungry young plants need to thrive. You can purchase it at a local garden store, or make it yourself. I personally like those seed pods that come with the seed-starting trays available in garden centers. They’re cheap, easy to work with, and they do a great job of containment, at least in the beginning. The trays are also really easy to move and help with drainage. But you can use anything such as plastic cups or yogurt containers. But make sure to poke plenty of holes in the bottom of whatever you use.
Now, it’s time to plant! In each seed pod or container, open a hole in the soil to the appropriate seed depth, and drop in a seed. You may choose to plant a couple of seeds in the same container, and thin them out once they start to grow. Cover the seeds lightly with the dirt, and water gently. Make sure to label your plantings. I use plastic spoons and a Sharpie.
Most seeds germinate best in dark environments.
They actually don’t need sunlight at this point. Set them somewhere away from direct sun, in a darkened area if possible, and keep the seeds watered, but not soaked. Make sure that water does not collect at the bottom of your seed containers or in your tray. Seeds that stay too wet can grow mold and won’t thrive. This watering approach should continue as your seedlings sprout and grow.
Check on them daily. Once you see little green sprouts, it’s time for a change of scenery because now they’ll need a nice bright location. Of course, access to sunlight is ideal, although extremely warm temperatures are not required. Average temperatures of between 55 and 70 seem to be perfect.
While we’re on the subject of light, everyone knows that light is vital to plant growth. This is especially true for seedlings.
While a sunny, temperature-controlled area may work to produce healthy seedlings, the reality is you probably don’t have enough natural light to get your seeds off to the best start. To solve this problem, you can purchase grow lights (which can get expensive) or you can create your own, more affordable lighting by simply using a fluorescent shop light with one “warm” white bulb, and one “cool” white bulb. You’ll want to suspend your lights about three inches from the tops of the plants. You can do this by purchasing an adjustable fluorescent light stand, or by simply hanging some chain or wire from above. Move the lights upward as the plants grow, but keep them close so that the seedlings can soak up all the energy they need. Ideally, the lights should be on for at least 16 hours a day.
As your plants grow, they will need more nutrients. The first set of leaves that appear are called cotyledons and are not considered “true leaves” because they’re actually a part of the seed or embryo. They’re typically very simple-looking. Soon, however, your plants will start to develop true leaves, which look a bit more crinkled and unique. Once the second set of true leaves form on your plants, it’s time to give them a boost. Use a liquid vegetable fertilizer, but mix it to half-strength. Water your seedlings with it about twice a week.
This is also the time when you will want to thin your seedlings to one plant per pot. Choose the one that looks the healthiest and carefully pluck the other. As they grow, you may need to move them into larger containers.
Eventually, the day will come when your little seedlings are ready to be transplanted outside. Of course, the real world is much more unpredictable than the comforts of the nursery, so they’ll need to be prepared. “Hardening” is the process of preparing seedlings for the outdoor environment and is a very important part of growing from seed. In fact, if this step is skipped or not done properly, all of your hard work could be lost. About two or three weeks before your transplant date (which will be noted on your seed packet) begin to set the seedlings outside on calm weather days. Place them in a shady location and bring them back inside in the evenings. Don’t allow them to be subjected to wind, extreme temperatures, or direct sun.
Each day, expose them to just a bit more sunlight, and continue to water, though not as rigorously as before.
Once your seeds are used to full sun, transplant your seedlings into your prepared garden beds by digging planting holes a bit wider than the root ball of the plant. Remove the plant from its pot, careful not to damage the roots too much.
Then, set the plant into the hole, and cover lightly with soil. Water them into their new homes, and monitor them in the days and weeks to come. Use stakes and cages to support tall growing plants as they clamber toward the sunlight and begin to produce tons of delicious fruits and veggies for you and your family to enjoy!
Anyone who follows home décor trends on social media and beyond will already know: bolder, more saturated colors are edging their way into a world of all-white kitchens. Sometimes it’s subtle—a hint of an interesting hue on the kitchen island. Other times, more in-your-face with a bright paint choice all over.
Tracy Kearney, a certified kitchen designer at Cornerstone Cabinets and Design in Forest, says while white is still the cabinet color of choice for clients in Central Virginia, they are starting to hear more requests for color—a movement she believes may have stemmed from the pandemic.
“I believe it’s because people are trying to flip their moods, increase their energy levels, and add a little more fun in the home,” Tracy says. “Because the home has now become the safe haven.”
The cabinet colors people choose are largely dependent on their individual personalities, she says—but in general, blues and greens have been their top “pop” color request. “I have been doing a lot of designing for wellness and living healthy,” she says. “We are trying to bring the outdoors in.”
For those who are less adventurous and can’t quite commit to a bold cabinet option anywhere, Tracy says they will suggest using a contrasting neutral color, such as Cityscape by Sherwin Williams, somewhere less pronounced, like the kitchen island. Or, choosing a color for just the lower cabinets has also been a popular way to add contrast to the room without overdoing it.
Alongside the introduction of color, Tracy has seen unique cabinet textures become popular as well, tying into a natural, outdoor-inspired aesthetic. “The textured melamine finishes have the look and feel of real wood, but they offer a more modern style. Plus they are water resistant, as well as a cleanable and stain-proof surface. Something that can be more desirable in today’s world,” she explains.
They are also getting ready to introduce some weathered wood looks to clients. “Getting back to those earthy tones and going after the wood grain texture more so than the color,” Tracy says. “I think this is also going to be a popular option for kitchen islands.”
Accenting these unique cabinet colors and finishes is the hardware, which Tracy calls the “jewelry” of the finished product. Right now, satin brass and black are their most popular hardware finishes.
She says when it comes to choosing a more saturated cabinet color: “The contrast is really important with the hardware. We don’t want to lose the hardware in the cabinet color.”
Regardless of where you end up on the rainbow of options during your next new build or renovation project, Tracy’s consistent piece of advice to clients is this: remember to make it your own—“I always advise people to do what brings them the most joy. Nowadays, it really is all about joy.”
The world has always been fascinated by smart homes, smart describing a home’s automated technology. Walt Disney dreamed of what the world could look like with his Carousal of Progress. We’ve seen the future portrayed by the Jetsons, Marty McFly, and 2001: A Space Odyssey. While pop culture may have missed a few details, smarter homes certainly are more accessible than ever.
“I remember realizing when we would see more ‘smart’ technology come to the average consumer,” TechdHome owner Tony Pennix said. “I saw this advertisement for a smart fish tank that you could control with your phone or a web browser.”
With a background in engineering and IT, Pennix worked at the University of Virginia initially, servicing and programing academic buildings. As a side gig, he began setting up systems for his friends before transitioning over to his own consulting business last year.
“My friend said he hated adjusting the thermostat when he left his house and wanted to know if there was a way he could program it,” Pennix said. “So I sat down with him, explained how a hands-free system would work, and scheduled a time to set it up.”
According to Pennix, the market is saturated with smart products ranging anywhere to lightbulbs to ovens to mirrors.
“The most popular thing that people want is a security system,” he said. “They see advertisements for Ring all the time and go, ‘Oh, I want that.’ But it’s my job to help them decide what they want and what the best product is.”
Pennix said every system does something different—so it’s important to ask a lot of questions.

“Like, do you want alerts every time there’s movement? Sometimes, that’s not what people want. Do you want a spotlight to shine? Do you want to change the batteries in your system every few months? Then I make recommendations based on what a customer is looking for.”
If you want to transition to a hands-free smart home, Pennix said the best place to start is your WiFi connection.
“Nearly all of these systems run over the internet,” he said. “You want to make sure you have a great router and provider. That will make all the difference in the world when setting up a system.”
Next is research. Pennix said you want to find companies with a reputable reputation before making a purchase.
“You will get what you pay for,” Pennix said. “If you buy a $5 camera, chances are they may be selling your information. You also have to decide whether you want to pay for a subscription to keep your information or if you just want to have access to it.”
Besides home security, Pennix said the second most popular smart product he sees in homes are speakers—Google products are popular and so is Amazon’s Echo.
“Your smart speaker can do so much more than just tell you what the weather is or how traffic is in the morning,” he said.
“Not only can it tell you the weather, but you can set it to adjust your thermostat or turn on the fans to help with air circulation or maybe open the curtains to let some sunlight in.”
Pennix said that’s why consultations are important; customers get more bang for their buck.
“You can usually set up a system, but sometimes you don’t know how to work it to the fullest extent. That’s why I like to add things like adjusting the blinds or turning on the lights when you get home to add extra things to a smart home package.”
So, what’s the next trend we can expect to see in homes over the next few years? Pennix believes our gadgets will only continue to impress by adapting to the home they are in.
“I think we’re going to be all about the artificial intelligence and machine learning to give customers a more curated experience based on their needs,” Pennix said.
In the season of quarantines and temperamental weather, many of us find ourselves looking around and wondering how to freshen up, or even totally overhaul, the spaces where we are now spending so much time.
It’s a desire I understand well. My husband and I have owned Penny Lane Properties for the past 13 years and have renovated and restored thousands of square feet in the Lynchburg area, most of which started out in partial or complete disrepair. Along the way, we have learned to envision spaces and design them in beautiful ways. I have also learned that while many people know what they like when they see a finished space, they don’t often know how to start creating it themselves.
Enter interior designers, who are available for many types of projects and budgets. That’s good news for those thinking the best thing to happen to 2021 might just be a stylish space upgrade.

Here are a few reasons to consider hiring an interior designer:
Elevate Your Personal Flavor
Consider this comparison: You wouldn’t go to a restaurant and expect to cook your own meal. While your home is certainly your own, bringing in an expert to maximize its potential and your vision for it is a bit like hiring a home chef whose flavor and palate align with your own.
“Choose a designer who resonates with your design style, but also one you connect with on a personal level,” said Tera Janelle of Lynchburg-based Tera Janelle Design. “The best designs come from really wonderful designer-client relationships!”
A Listening Ear
One of the greatest benefits of using a skilled designer is that they not only see a space for what it could be (which is often limitless) but they are also pseudo-psychologists when it comes to listening to your hopes and dreams for the space and scaling them to reality, timelines, and budgets. Hiring an interior designer is a bit like hiring a translator, taking the pictures in your head and bringing them to life in the real world. So, speaking the same language from the onset is critical!
Foresight for Your Desires and Deadlines
In addition to acting as a translator for your design dreams, an interior designer is also the logistics manager for your renovation, taking the job of lining up the many steps needed off your shoulders.
“Troubleshooting the inevitable road bumps in a project, a good designer saves you from expensive errors and project delays, relieves the stress of decision fatigue, connects you with talented craftsmen, coordinates a project, and creates for you a beautiful, functional home,” Janelle explained.
Finishing Touches, Technically Speaking
As Janelle explains, designers select beautiful finishes, but that is only a small piece of their role.
“But many, many more hours in the design of a project are spent on the nitty gritty details of technical drawings and floor plans, selecting vendors, troubleshooting, tracking and meeting deliveries, scheduling trades, and managing installations. A designer can handle the minute details so you can focus on the fun parts, while ensuring the end product is well worth your time and investment.”
Johanna Calfee is the owner of Penny Lane Properties and Realtor with Lauren Bell Real Estate. Starting this issue, she will begin contributing regular Home content to Lynchburg Living. As the former editor of Lynchburg Living for seven years, this is welcome and familiar territory for Johanna. Welcome back!
If you weren’t big on sanitizing surfaces before the COVID-19 pandemic, we can be certain you are now.
But how can we ensure that the products we’re using to help keep us from getting sick aren’t going to cause more harm than good?
Many of the legacy cleaning products found on store shelves are ones that we grew up using because maybe our parents or grandparents taught us to, but Derek Hart with Lynchburg Organic Cleaning said many of those products use harsh chemicals such as acids and ammonia.
“In Windex, the purpose of ammonia is to help liquids evaporate quickly so it doesn’t leave streaks. But it’s also really harmful to breathe,” Hart said.
The main factor that prompted Hart to start using organic cleaning products for his company was because his staff was using the cleaning products five to seven hours per day.
“If they’re going to be breathing it in that many hours per day we wanted to use something that was safe and not harmful and wouldn’t cause any breathing problems,” he said.
Of course, it’s worth noting two points: most of us aren’t spending this much time cleaning each day (or at least hopefully not) and there are circumstances where certain cleaners might be warranted. But for everyday cleaning, especially around small children, it’s never a bad idea to look for some less-toxic alternatives.
Here are a few suggestions Hart gives to help keep your home sparkling clean, while staying as “green” as possible:
Hypochlorous Acid—
This is a substance that white blood cells produce to fight off infections. It’s also an active ingredient in electrolyzed water, which is used for green cleaning and is made when electricity is used to change salt, water and vinegar into a cleaner with no harmful fumes, chemicals or residues.
One of these products you can buy is Force of Nature, Hart said.
“We use a commercial version of that since we go through so much of it, but Force of Nature is a brand that makes at-home disinfectant cleaner that you can use and it is not harmful,” he said. “We use it in every house as our main product.”
Dish Soap—
It’s not just for dishes, but can also be used for soap scum or grease and is safe because it’s typically used on eating utensils, pots and pans. Dish soap can also be used outside of the kitchen and in the shower, Hart said.
“We usually mix it with vinegar and water to create something that suds up really good,” he said. “It works really well at breaking down soap scum.”
Magic Eraser—
This is another favorite for bathroom cleaning because it is unscented and doesn’t emit harmful fumes. It also breaks down soap scum.
Squeegee—
Hart suggests using one of these on your shower doors in the bathroom after each shower to help eliminate water stains.
“A lot of times you have to use some sort of a harsher chemical to get water stains off of glass shower doors and just a lot of elbow grease and effort, but if you just add that squeegee step in, it dries off the glass shower doors after each use,” he said.
The squeegee also comes in handy while cleaning glass. It’s a myth that paper towels or newspaper does the best job, Hart said, but a squeegee is what professional glass cleaners use.
Frequency—
Don’t save deep-cleaning chores for once a month. Instead, make sure to wipe off countertops daily so you don’t have to do the heavy duty cleaning down the road.
“With the houses we clean every two weeks, typically there’s not a lot of effort that goes into cleaning their homes because we keep up with it on a regular basis,” Hart said.
He also said to clean stove tops as soon as the surface has cooled and you are finished cooking. For this task, he suggests safely using a razor blade to scrape off hardened residues.
“I would always recommend wiping that down after you’ve cooked and if you’ve spilled something because if you burned something on it, it’ll just stay there for quite a while and it’s hard to get off,” he said.
Check It Out!
The Environmental Working Group’s Guide to Healthy Cleaning is a good resource to help you figure out how your cleaning products compare to others when it comes to toxicity. Just type in your product and see what grade it gets, along with a detailed explanation. Visit: www.ewg.org/guides/cleaners.