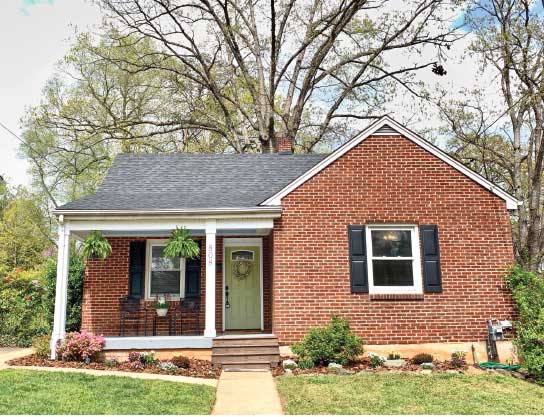
Festive Flowers & Greenery

Creating Your Own Holiday Arrangements
Photos by Ashlee Glen

While faux garlands certainly have their place in our modern-day homes every December, it’s nice to experiment with some natural décor to help us connect with nature—from foraged greenery to fresh florals.

We asked Heather Smith, of Fleur by Heather, to help us out with a few DIY arrangements, and she didn’t hesitate to say yes. Heather is not only an accomplished wedding florist with a delightfully undone style, but she also absolutely adores decorating for Christmas.

Before you start flipping through, take her mantra to heart: “Don’t overthink it. Just experiment with things. And have fun!”


Natural Mantel

The mantel is often the focal point of the living room, making it an ideal place to focus your time and attention during the holiday season.

Heather says first, before emptying your wallet on supplies, take a walk outside. “Forage, with permission if it’s not your property, for as much as possible. There are plenty of pine and magnolia trees around this area,” she explains.

Once you have gathered greenery, Heather recommends sorting your pine into larger and smaller cuts. Use the larger pieces for your base. “Then, start filling in and layering with smaller pieces of pine,” she says. On top of the pine, use magnolia leaves as accents to give the green base more texture and depth.

With your greenery in place, it’s time to add color and get creative. “If you are already utilizing a theme, carry it over to your mantel and accent pieces. It can be whimsical, old Christmas, or modern. Let your imagination run wild!” she says, but adds that if you truly want a natural look, items such as pine cones and berries help achieve that aesthetic. She also chose to incorporate simple white florals into the design to help break up some of the green.

Finally, the big question—how long will this natural masterpiece last? “Hardier pines, not traditional pine trees, and magnolia will last a good while without water. You can put any fresh florals into water tubes,” Heather explains. “Since those are added after your greenery is set, they’re easy to pull out, trim their ends and refill as needed.”

You Will Need:
Foraged
Pine Boughs,
Magnolia Leaves
and Pine Cones
Faux Berries
Holiday
Accent Beads
Florals
(From Local Farm
or Grocery Store)
Whimsical
Accents
Candles or Candlesticks


Floral Centerpiece

While anything goes in terms of holiday color schemes these days, Heather wanted her arrangement to follow a more classic red-and-green style with a simple design. “This is not too big and can be used on most dinner tables,” she says.

Creating your piece starts with your container. Heather chose one that is waterproof, matte black, and rectangular.

For those not particularly comfortable creating arrangements, Heather suggests using water foam (soaked overnight for a few hours) to ensure that everything stays in place. Use floral tape to secure the foam inside your container. If filling your container with water, she says remember to add a packet of floral food and change out the water every few days.

When gathering your florals, Heather says most grocery stores around the holidays carry roses, carnations or lilies that look great in Christmas arrangements. Stores will also carry filler flowers such as berries or foliage.

As with the mantel, begin by arranging your various pieces of greenery. “While doing this, I’m thinking ahead to where I may place flowers. This will determine how much greenery I’ll put in each designated section of the container,” Heather says. “Always make sure that you cut your stems at an angle, so they go into the foam easily or, if using just water, that they are able to absorb as much water as possible.”

With your greenery and florals in place, use accents such as pine cones and berries to fill in the gaps. Keep everything close knit or let your greenery spill over the sides—the arrangement style is up to you!

You Will Need:
Waterproof Container
Oasis Water Foam
Floral Tape
Holiday
Accent Beads
Florals
(From Local Farm or Grocery Store)
Foraged Pine, Magnolia
and Pine Cones


Simple Accent

Perfect for an end table, entryway table or bathroom, this smaller arrangement gives off just the right Christmas flair and could even be a fun project for older kids.

You don’t need much and the possibilities are endless. Heather used a few small cuts of pine, two flowers, some pine cones, and glass beads as accents. Use floral tape to create a grid inside the cup or container. This will help you as you arrange the different types of materials in such a small space.

One thing to keep in mind: “Be mindful of pieces that may be too tall or heavy for a smaller container,” Heather says. “You don’t want them to add unnecessary weight that would possibly cause the arrangement to tip over.”

You Will Need:
Fun Container
or Cup
Floral Tape
Holiday
Accent Beads
Florals
(From Local Farm or Grocery Store)
Foraged Pine
and Pine Cones


Thank You
We are grateful to Belong Here, local Airbnb consulting business, for letting us use one of their newest rentals for this shoot. The “Lady Anne” is a 5200-square-foot historic home located on Rivermont Avenue, and it had plenty of fireplaces for us to choose from! Learn more at belonghere.co.


Pump Up Your Patio

Is a too-small patio putting a damper on your parties? Or is the blazing afternoon sun making you sweat during that 5 p.m. beverage? It might be time for an outdoor space overhaul.

“You have to balance aesthetics with function,” says Rebecca Mahanes of Land Tech Group.

First, she says they usually address space issues. “The big thing is being able to have space for furniture and people to gather,” she says, adding that many standard new builds only provide a small concrete pad in the backyard. Their team will start by using pavers or concrete to make an area large enough for the homeowner’s entertaining needs.

Another common complaint that prevents patio usage—the sun. “In Forest, where a lot of newer homes are being built, there is not a lot of shade,” says Mahanes. “Pergolas are becoming more popular.” The slats or some type of fabric can provide the extra shade homeowners need to feel comfortable. Not only does it look good, it’s typically a very economical addition, she says.

Whether you have an unlimited budget or just enough money for one cool feature, we hope you can gain some ideas from this stunning project Land Tech completed a few years ago in Forest’s Ivy Lake neighborhood:

Overall Aesthetics:
It’s always trendy to have your outdoor entertaining area blend into its natural environment. Here, Mahanes says the homeowners wanted a rustic look. A stacked stone retaining wall adds to that vibe as well as the A-frame metal roof over the kitchen area.

In-Ground Hot Tub:
This custom in-ground hot tub has a water feature that runs on a pump and flows into the spa. It’s partially raised so that guests who don’t want to get in the water can still socialize with those who are.

Fire Bowls:
These run on gas/propane and can either be turned on with a wireless antenna or lit with a match. “I love these because they create a warm ambience,” says Mahanes. “It’s not just about having the space but also having the nice lighting at night.” Landscape lighting is another way to create a cozy atmosphere.

Outdoor Kitchen:
These are a highly popular addition to outdoor areas right now. Mahanes says those who seek one out always want a grill, but many are also starting to request smokers, such as a Big Green Egg. Outdoor kitchens function best if they are covered well and have enough counter space to operate like an indoor kitchen.

Fire Pit:
“This home’s fire pit is really the centerpiece that ties the whole area together,” says Mahanes. She adds that there’s about a 50/50 split between wood burning and gas fire pit installations. “People who like the smoky smell choose wood for the camping ambience. Those who choose gas just want to come out, turn it on and be done.”


A Warm Welcome

A rustic, yet refined, home where self-expression is EMBRACED
photography by Heather Kidd

A record player rests atop a faux fur throw with a vintage record player at the ready. “I collect vinyl—it’s soft, and I like the sound,” Ellen Dorman says of the display on her entry console table. Indeed, softness seems to be a dominant theme in the Dorman family home: everything feels warm and inviting in this space, from the earth tone walls to the abundance of soft throw rugs to the natural wood furnishings. It’s the kind of home that welcomes you the instant you walk through the door.

The front hallway is a vignette unto itself, offering family photos from a few falls ago hanging in charming old window panes beside whimsical paintings of roosters, flowers and cows—a carefully curated homage to what the Dorman family holds dear.

Despite the open floor plan and lofty ceilings, the neutral palette helps the Dorman home feel cozy and intimate. And although her home is dressed in neutrals, it doesn’t feel dull or one-note thanks to Ellen’s expert application of layering techniques. Here, beiges, greys, and creams exist harmoniously beside bountiful textures: wood, textiles, and stone. Stone serves as a stand-out feature that ties together the kitchen and living room of the home.

The muted color scheme works overtime. Not only does it offer warmth, but it also serves as the perfect foil for Ellen’s vibrant gallery walls. Her thoughtful design choices work to draw the eye to these focal points. Each room serves as a sort of gallery revealing vivid expressions of cherished memories preserved in time. From the staircase to the family room wall to the children’s playroom, you’ll see handcrafted collections of family portraits, pastoral symbols and other meaningful moments, each one depicted in brilliant colors.

The layered neutrals, which consist of grays and browns—such as Colonnade Gray, Foothills, and Stone Lion by Sherwin-Williams—are very different from the colors Ellen used in her previous home. “Our last house was completely colorful,” Ellen explains, sharing that she painted every room a different color after living with white walls for many years. “It was a rainbow house!” she adds. When building this home, however, she decided to use a neutral palette instead. “I knew I wanted neutrals so I could easily change out the art… that’s where I bring in color,” she explains.

The Dormans left their earlier (and colorful) home several years ago in search of a halfway point between husband Erik’s workplace in Lynchburg and Altavista Combined School, where Ellen taught art. After spending over a year driving around, attending open houses, and scouring real estate listings, they came upon Evington’s Hickory Hill neighborhood, which ended up being the ideal place for their family.

“It feels like you’re outside of town, but you’re still close to everything—and this lot was woods, and I really wanted a wooded lot,” Ellen says. “We love being outside.”

Surrounded by woodlands, Ellen’s two children are free to play outside to their hearts’ content. Here, they have the chance to engage in good, old-fashioned play: building forts and constructing teepees are just a few of the ways that Ethan and Elliott have fun on the three-acre property. The family often gathers around the fire pit, and the boys play in what Ellen jokingly refers to as their “dirt pile.” She explains that when they were constructing the patio and fire pit, she asked the contractors to flatten out a mound of earth where she had intended to install a swing set. She reconsidered when she saw how much fun the boys had just playing in the dirt. “I thought, ‘Shoot, I’m not gonna ruin that. Let ’em play in the dirt!’” she laughs.

Ellen takes an equally easy-going, child-friendly approach with the interior. For example, the dining room finds itself in regular use, not just on holidays. It’s not your typical dining room. A roll of brown craft paper runs down the center of the table, and instead of traditional dining chairs, stools, poufs, and benches serve as seating. “This isn’t a ‘formal dining room’ unless we’re entertaining at the holidays and whenever we have family over,” she explains. Instead, the room serves as a convenient place for the kids to dabble with colored pencils and paint and engage in art making. And it’s not just for the kids: “Anybody’s allowed to scribble, doodle, or leave notes here!” says Ellen.

The table itself, worn with paint splatters and carved markings, is a remnant from the former Patriotic Peacock art studio in Downtown Lynchburg, where Ellen spent time as an art instructor. It should come as no surprise, then, that Ellen, who spent 13 years teaching art for Campbell County Public Schools, encourages creativity and has designed this space—and this home—as a safe place in which to foster self-expression. “A lot of these pieces tell a story,” Ellen says, such as the family room’s end tables, which were fashioned from wood from her family’s farm in Charlotte County. Although Ellen grew up in Altavista, the farm holds special meaning. As the birthplace of her father, it’s a true homeplace, where the family still gathers for summer cookouts and the traditional Fall Stew event.

Ellen celebrates family life through her artwork—this was even the theme of her senior art exhibit at Emory & Henry (and a few pieces from that show hang upstairs). Even the family pet— a beloved English bulldog—has made it onto a gallery wall in the family room. With its deep leather couches and abundance of throw blankets, the family room feels just as inviting as all of the other spaces, and this is intentional. While Ellen appreciates the modern design aesthetic, she finds the straight lines to be “too stiff. To me they’re not as inviting, and I wanted my home to be user-friendly,” she says.

And user-friendly it is, indeed. Equally rustic and refined, the home epitomizes the Danish concept of hygge—loosely translated as extraordinarily cozy and comfortable. Featuring a stacked stone fireplace that’s topped with rows of candles, the space summons the feeling of sumptuous mountain ski lodge, which is fitting since the Dormans love to spend time in the mountains and on the slopes.

The wing chairs that flank the fireplace belonged to Ellen’s grandmother; the desk is another heirloom piece. This combination of heirloom furniture, original artwork, and natural finishes creates a home that not only tells the story of their family and their history but also serves as a reflection into what they hold dear: memories, comfort, and each other.


Fall Home Checklist

Before the mercury drops, mark these items off your home to-do list

Heating & Cooling

Change your air filter monthly. “One of the leading causes of break downs are dirty air filters,” says Brandon Brown of Browns Heating and Air. He suggests setting a reminder on your phone for the first of the month to change filters. This will help your system work better and easier overall.

Line up a full system maintenance. This will clean your system inside and out. “A normal home HVAC system runs more than a car does per year and needs to be cleaned and maintained like a car needs its oil changed,” says Brown.

Fill gas or oil tanks. Do this now, “before cold hits and prices go up,” Brown says. It’s also a good idea to check on your gas logs and get them serviced if needed.

Have your ducts professionally cleaned. Brown says this is suggested for older systems that have been installed for a while. “This gets rid of all dust, dirt, mold spores and toxins in the duct system you breathe,” he says.


Exterior Upkeep

Check your roof for damaged shingles. According to All Phase Roofing and Construction, while roof damage happens throughout the year, the rough winter seasons in Lynchburg can be especially tough on your roof. Repairing damaged shingles now can prevent leakage once snow starts falling.

Clean and repair your gutters. This task needs to happen after all of the leaves have fallen and when temperatures are still above freezing. “If you [miss] cleaning gutters in the fall, you may have issues going into winter,” says The Brothers that just do Gutters on its website. “These issues are not always evident in the winter because your gutter is frozen, but during the first thaw they’ll show. The excess debris in your gutters that was not cleaned prior to winter will result in a sort of debris popsicle within your gutter system.”

Check around your windows and doors for air leaks. If needed, seal the leaks with caulk to keep out the cold air.

Inspect and clean your chimney to prevent fires. Statistics show dirty chimneys cause approximately 22,000 house fires each winter. Have a certified professional inspect your chimney annually, and make sweeps or repairs.


Miscellaneous

Store unused lawn care equipment. Local realtor and home renovation expert Dan Vollmer says whether it’s a mower or a trimmer, you should drain all of the gas before you put the equipment away.

Remove and store window screens. This is something else Vollmer does to prevent future, often costly, repairs. “Sometimes the weight of snow can stretch them out,” he says.

Replace smoke detector and CO detector batteries. According to the National Fire Protection Association, house fires occur more in the winter than in any other season, and heating equipment is involved in one of every six house fires.


A Tradition at Risk

Recognizing and Defeating Boxwood Blight

Sometimes heralded as the “Aristocrat” of hedging topiaries, boxwoods have held the limelight as a favorite shrub for centuries. They are prized as a slow-growing, easy-to-maintain ornamental that looks as picturesque in tidy, trimmed rows of historic, formal gardens as it does gracing the porch steps around farmhouses and community buildings.

For many home gardeners, boxwoods are a timeless American tradition, recalling sentiments of days gone by. In fact, they arrived in what we now call the United States sometime around the 1650s, before it was even an independent nation. Many European immigrants traveling to the New World carried boxwood cuttings with them, and they made a strange new place feel more like home. But these highly cultivated bushes actually have an even longer history as a decorative landscape plant. Archaeologists have discovered evidence that boxwoods were trimmed and shaped to adorn the pyramids of the ancient Egyptians in 4,000 B.C., making it the oldest known ornamental shrub in the world.

There are over 200 varieties of stately and versatile boxwoods, each with their own unique shapes, leaf characteristics, and growth potential. Unfortunately, all of them are vulnerable, some more than others, to a fast-acting and deadly disease known as boxwood blight.

Boxwood blight spread rapidly through Europe in the ’90s, ravaging centuries-old historic gardens. Finally in 2011, it made its long-dreaded arrival in America, first in Connecticut and North Carolina. Today, it exists in almost every state, and has taken a toll on the gardens of homeowners and historic estates alike.

A “blight” in plant science is a rapidly progressing fungal disease that causes chlorosis (loss of green coloration), browning, and if untreated will lead to the death of plant tissue. For boxwoods, the fungal spores that cause the blight are highly transferable, very sticky, and can be spread from nurseries, plant clippings, and even contact, before the bush is showing symptoms. The pathogen thrives in warm, wet environments, and spreads most rapidly from July through September, though it can be spread and contracted all year long. The most noticeable symptom of boxwood blight is sudden and fast-acting defoliation, or the loss of leaves.

This defoliation is exactly what alerted Lynchburg resident Lisa Richards to the problem in July of 2016. Richards installed English boxwoods around her home as soon as it was built in 1995. She had some small ones, and some as big as eight feet tall. Unfortunately, she was one of the first in the region to deal with the devastating effects of boxwood blight.

It all started when she purchased some new shrubs from a big box retailer in order to fill some holes in her landscape. She planted the young bushes and mulched heavily. The very next day, she noticed that two of her boxwoods had begun to turn brown and lose leaves. Of course, at the time not much was known about boxwood blight, so Richards assumed that the mulch was the guilty culprit. She went out of town for a few days, and when she returned home, she found that the defoliation had spread.

“It looked like someone had taken a blow torch to them,” said Richards. She spoke to a friend who suggested that the blight may have been responsible for the damage, and when Richards sent samples out to the state lab for testing, her suspicions were confirmed. She contacted professional horticulturalists who came to her property, dug up all of her boxwoods, and even removed and replaced the existing soil. “They wore hazmat suits and did everything they could to contain it,” Richards explained. “But a squirrel, a dog, or a neighbor can carry the spores from one yard to another.”

Richards ultimately lost 60 boxwoods in total, and now, there are very few healthy ones left in her Boonsboro neighborhood.

Horticulturalists have responded to the threat of boxwood blight with a tremendous effort to develop a whole new selection of bushes that don’t fall prey to blight, or even other serious boxwood problems, such as leafminer insects. While the classic English varieties with their tightly packed, oval-shaped leaves are extremely vulnerable to blight—and American varieties are also at great risk—many Asian cultivars are more disease-resistant.

Saunders Brothers, a family-owned nursery in Nelson County, is one of the largest providers of boxwoods and topiaries in the southern United States. They had the blight on their radar long before it came to our shores, and once it did, they began conducting extensive research into identifying and propogating the most disease-resistant boxwood cultivars possible. In fact, since Richards replanted her landscape with Green Beauties from their nursery, a Japanese cultivar genetically bred to stand up to the aggressive blight, she says that her yard looks wonderful again.

In addition to offering many of the well-known Asian varieties, Saunders Brothers has developed what they are calling “NewGen,” which are bred to closely resemble the English classic, but have a strong resilience against blight, and hold up to leafminers even better than some of their resistant contemporaries.

Boxwood blight thrives in wet, rainy conditions with temperatures between 60 and 77 degrees. As we enter into late summer and early fall, conditions for the growth and spread of blight are ideal. Saunders Brothers has really been a driving force behind defeating boxwood blight, and the tips we’re about to share have come straight from Bennett Saunders himself.

If you believe you have a plant that has become infected with blight, consider these practices to rid the disease from your yard, and prevent it from spreading:

• If you live in a rural area, the best way to get rid of blight once and for all is to burn the infected plants on site. Fallen leaves and stems carry the disease and can be easily transported by people and animals, so avoid moving it as much as possible. A flame torch will do the trick.

• If burning is not an option, wear disposable gloves, and carefully gather all infected plants into plastic bags before transporting them to the landfill. Be sure to contain the material to prevent spreading as you drive through town.

• After you have removed the diseased boxwoods, avoid replanting in the same spot for at least a year. The fungal spores can survive under the soil, but grow weaker and die off as time passes.

• Thoroughly clean and sanitize all of your tools and clothing after working with infected materials.

If you’re looking to add boxwoods to your home landscape, here are some great planting tips to help ward off diseases and keep your boxwoods healthy and happy for a very long time:

• Plant Selection: Choose a disease-resistant variety. Saunders Brothers’ website offers a complete list of options that will stand up to blight and leafminers. (See box at bottom of page.) If you purchase from a local nursery or big box store, ask if they participate in the extension agency’s boxwood sanitation practices to ensure you are not purchasing infected plants.

• Proper Planting: Choose a spot with good drainage, where rain water doesn’t pool up or linger. Dig a hole twice as wide as the root ball of your new boxwood, and allow the top of the root ball to sit about two inches above the soil surface. This elevation will need to be maintained over time to ensure proper drainage.

• Mulching: Saunders said that the importance of mulching cannot be overstated. In addition to a host of other benefits, mulch minimizes the splash of spore-contaminated rain water onto the leaves of nearby plantings. Rain water transfer is thought to be the most common way that the blight spreads. Mulch also creates a physical barrier between infected, fallen leaves and healthy plants. Light layers of mulch should be added every year, preferably in early spring. Choose a well-aged mulch option, and surround your plant with mulch of about one inch deep.

• Watering: Soak the root zone of the new boxwood thoroughly as soon as planting is complete. Then water on an as-needed basis to help it through periods of drought.

With proper sanitation practices, stronger boxwood varieties, and a little common sense, boxwood blight can be eradicated from your yard and your neighborhood. Eliminating this disease is the best chance we have at preserving existing boxwood plantings and continuing the tradition of boxwoods in the landscape. Doing your small part in your home landscape will have great and lasting effects on the state of boxwood health in your community.


Tons of helpful tips and information, as well as interesting boxwood and boxwood blight facts, can be found at the Saunders Brothers website, www.newgenboxwood.com.


What’s Up With My Houseplant?

Troubleshooting common problems in the off season

Images of houseplants abound on social media outlets today. We’re encouraged to have conservatory corners, living walls and plants hanging from our ceilings en masse. But achieving that indoor green look is sometimes easier said than done. To help you succeed, we’ve compiled a list of the top mistakes plant lovers of all skill levels often make.

Bad Lighting
This may be the number one issue plant collectors face. Every plant has to be grown in the right location in your home or it is a waste of time and money. Low light means no direct light should reach your plant. A low-light plant has to live a few feet away from a direct light source and can survive in mostly artificial light. A high light plant needs at least three hours of direct sun daily.

A Too-Small Pot
New plants should be transplanted into fresh pots that are at least two inches larger than their current pot’s diameter. It’s also a good idea to repot with new potting soil. If the plant hasn’t had proper care then problems are less likely to develop with a root and leaf washing and new soil. A pot with a drainage hole is best. Cover the drainage hole with a stone to prevent soil from washing out the bottom. When your plant starts to look top heavy or there is no more room in the pot, you need to transplant it again. As a rule, transplant in spring when the growing season is beginning again.

Improper Watering
Most folks have a tendency to overwater house plants, especially in the winter. It’s a good schedule to check on your plants weekly by using your finger. If the soil feels damp to your touch an inch deep into the pot, you are probably fine and can skip the chore this week. If it’s dry to the touch, time to water. Don’t attempt to trick your plant by leaving water in the saucer for it to water itself later. Plants sitting in water often get rotten roots. Also, to know how much to water, it’s helpful to know where your plant originated. For example, a tropical plant will be used to drowning rains with periods of dry spells but desert plants—such as cacti, succulents and euphorbias—need less water.

Lack of Nourishment
If you don’t transplant your plant and give it new potting soil regularly, you can be sure it will need some supplemental feeding. Grow sticks are easy; just add to the pot and they are time-released. I use a small amount of compost (one cup per 18-inch diameter pot) on top of my houseplants just like my garden plants. Concentrated liquid fertilizers are an easy choice and go a long way. I also have found my fiddle leaf fig performs much better on a weekly diluted concentrated fig food.

Overlooking Pests
Mealybugs, whiteflies and spider mites are the most common intruders. Mealybugs look fuzzy and leave a shiny sap on the surface of the plant. Whiteflies fly around the plant when you disturb it. Both mealybugs and whiteflies can be treated by washing the plant thoroughly with an insecticidal soap—either homemade (4 cups of water, 1 tsp of dish soap) or store bought. Wash all parts of the plant in the shower, from the tops and bottom of leaves to the stems and stalks. It wouldn’t hurt to get new potting soil as that could also be infested. Spider mites make a web and will quickly kill a plant. If you have a particularly bad pest problem, neem oil is effective, but I would be cautious using it inside and it has an unpleasant odor.

Misting the Wrong Plants
There is no cookie cutter answer here so again, do your research. Tropical houseplants may love misting. If you have a fern in your master bathroom and it gets misted when you shower, adding more mist may be overkill and it may suffer from rot. Plants with fuzzy leaves, such as African violets, hate misting. The incredibly popular fiddle leaf fig also is not a misting fan. Neither is your jade plant.

Not Enough Humidity
Leaf curling, yellowing and brown edges on leaves can all indicate a lack-of-humidity problem. How can you fix this if your plant isn’t a mist lover? Make a humidity tray! Place a saucer or baking sheet filled with stones and water underneath your struggling plant. As the water evaporates into the air the plant receives additional humidity. Just like we get drier skin in winter your plants may like a humidifier in the room too. Grouping your plants for display in your home also increases humidity levels as the plants transpire into the air.

Temperature Trouble
Move your houseplants away from large windows and doors that are not only cold to the touch but also drafty. Also keep them away from your fireplace and heat vents. You may find you need to move your plants to a different room of your house to help keep them well. During the winter, wipe their leaves top and bottom with a damp paper towel if they get dusty. This will help them photosynthesize better in that season’s lower light.

Forgetting to Share
When you really get the passionate about plants, you’ll want to have more of them! A lot of house plants should be divided when transplanting. Some sprout easily from cuttings placed in water, such as Swedish ivy (Plectranthus australis), for example. Others like to be stuck into continuously damp soil to grow new roots. Do the research and figure out what your plants need. You’ll know you are a bona fide plant lady (or gentleman) when you have house plants you are propagating and caring for on every surface possible in your home as well as sharing “plant babies” with your friends.


Growing the Perfect Peaches

There are few things so satisfying as a cool, juicy peach, picked at the height of summer. That first bite, breaking through the tender orange skin and sinking into the sweet gold on the inside. For me, it’s an instant flashback to childhood, splashing along mountain creek beds in the heat of July, with peach juice running down my chin.

Though sometimes apples outshine them, peaches actually grow quite well in our region. There are several orchards that offer the option to pick-your-own, such as Gross’ Orchard in Bedford, which advertises its peach season from June 15 through September 10. (And if you wander into the nearby Mountain Fruit and Produce before they’re sold out, you can even treat yourself to Mrs. Joy’s famous peach ice cream or peach hand-pies, made from the orchard’s fruit.)

However, if you are so inclined to grow your own peaches, it can be done. With a little patience, home orchards can be incredibly rewarding, and fun to tend. Fruit trees, peaches in particular, can be a bit finicky. Thankfully, I didn’t have to look far for growing tips and tricks. My husband is a professional arborist, and owner of Meyer Arboriculture, and he is full of useful information. Here are Nick’s best practices for growing peaches.

Terms To Know
Cling: These are typically early season varieties. They are called “cling peaches” because the flesh of the peach is still clinging to the stone (pit) in the middle. There are also “semi-cling” varieties, where the flesh detaches more easily.

Freestone: The fruit of a freestone peach has completely detached from the stone (pit). They often have that bright red color in the very center surrounding the stone, and they typically fruit in late summer. These are generally preferred by consumers for snacking and preserving.

Dwarf & Standard: Most fruit trees come in both dwarf and standard sizes. Dwarf trees usually stay in the 10- to 15-foot range and are ideal for the home orchard. The fruit is easier to access, and they can produce prolifically, despite their smaller size. Standard trees can grow very big and tall, and also fruit very well, but may require a ladder for access.

Pick Your Variety
There are over a hundred varieties of peaches available to the home orchardist, and a plethora of things to consider when choosing the specific variety you would like to grow. Peaches can be grown in zones 4 through 9. Here in zone 7, we actually have a great climate for peaches, so your selection process can focus a bit more on flavor and less on hardiness. However, if you’re looking to plant in one of the more outlying zones, you’ll want to choose a variety engineered to withstand extreme heat or cold. We do have a few pests and diseases that target fruit trees, such as fireblight and leaf spot, so consider disease-resistant varieties. Some great choices for our area are Contender and White Lady.

Most peach varieties are self-fertilizing, meaning you only need one tree to produce fruit. However, planting more than one tree could improve the pollination, and production, of fruit. And of course, you’ll have more peaches.

Choose Your Location
Peaches like a lot of sun, and a fertile, well-drained soil.

The location of your trees will impact their productivity, as well as their vulnerability to disease. Choose a spot in your yard that gets full sun at least six hours a day. You’ll want to take space into consideration. Dwarf trees will need to be spaced about 12 to 15 feet apart, while standard size trees will need more room, about 15 to 20 feet.

Soil drainage is critical to growing healthy trees. Test your soil drainage by digging a 1×1 hole, filling it with water, and monitoring how long it takes for the hole to empty. Measure the depth of the water, wait 15 minutes, and measure it again. Then, multiply the difference by 4 (because 15×4=60, or 1 hour), and you’ll know how much the soil will drain in an hour. If it is less than an inch or so per hour, you may want to consider a new location, or take additional measures to improve soil drainage. Wet roots can cause rot and encourage bacterial growth.

Peaches also prefer a slightly higher pH, so consider testing your soil prior to planting. You can pick up an inexpensive test kit at any garden or home improvement store. You’ll want a pH of around 6.5 or 7. Once you determine the pH of your soil, you can raise it if necessary by adding garden lime or peat moss. There are products and tips available to lower pH as well.

Plant Your Tree
Once you’ve chosen your location, you’ll need to carefully plant the tree or trees. Planting is arguably the most important part of long-term tree health, and planting it correctly can save a lot of heartache down the road.

Dig a hole twice as wide as the root ball or pot of your tree, and only about two-thirds as deep. Around the edges of the hole, use your shovel to loosen the soil. This will help the roots spread out into the compacted earth. Remove the peach tree from the pot and loosen the roots, spreading them away from the trunk. Any roots that appear to be circling the root ball or trunk can (and should) be clipped to avoid girdling (when a tree’s roots wrap around the trunk and ultimately choke it). Generally, all of the roots should be laid out to spread like fingers away from the tree.

At the cellular level, root wood and trunk wood are very different. If trunk wood is below the surface of the soil, your tree will be a magnet for disease and rot. For this reason, planting depth is critical. The root flare, or the spot on the base of the tree where the first root shoots off of the stem, should be planted two inches above the existing soil level. Remember why we dug our hole two-thirds the depth of our pot? This is why. You’ll want to plant the tree on a subtle mound. If needed, toss some loose soil into the hole in order to elevate the tree.

The graft union (where the rootstock meets the scion) should also remain above the soil when planting and growing fruit trees. As long as the above instructions are followed, this will occur naturally, as the graft union is several inches above the root flare. You can identify the union by looking for a bulge at the base of the tree with a visible line running through it.

Give your newly planted peach tree a nice soaking, and then make sure the tree gets water every day for the first week. After that, water a few times a week for the first month, then leave it to nature to handle the watering, unless you get a particularly dry spell.

Continued Care
When the peach trees start to bloom, it’s a good idea to thin the blossoms so that there is only one flower every six inches or so.

This will reduce the overall number of fruits, but will result in a yield of larger, healthier peaches with better flavor. Consider contacting a professional arborist to help with this part if you are unsure of the proper pruning technique.

In healthy soil, fertilization is really not necessary until your fruit trees are ready to produce fruit. This will be when they are about two or three years old. Ask your nursery about the age of the trees available. Usually, potted trees available for purchase are about a year old. You should also avoid fertilization until at least six weeks after your trees have been planted. If you do decide to fertilize, and give your trees a boost just before the fruiting season, apply a balanced, nitrogen-rich fertilizer in early spring.

Peach trees are very vulnerable to a number of pests and diseases. It is highly recommended to spray the trees a few times a year with fungicides and insecticides in order to prevent stunted growth, poor production, structural failure, and tree death. There are products available in most garden centers, but be sure to read the label carefully and completely. It never hurts to call a professional arborist, either.


A Room with a View

…and another room with a view, and another, and another…

Photography by Woody G. Watts

Bill and Marianne Pecoraro may not be full-time residents on Smith Mountain Lake, but for 35 years this community has been their home away from home. Listen carefully as you proceed up the unpaved road leading to the house, and the crunching gravel under the car tires creates a gentle drumroll of expectancy. Pulling up, the lake can be seen on either side of the modern structure like an embrace. And, when the majestic front doors open to welcome you in, the word “breathtaking” finds new definition. With stunning views of clear lake water and mountain peaks from nearly every room, it’s easy to miss the simple elegance of the home itself.

While living in Connecticut, Marianne’s family may not have discovered the gem of Smith Mountain Lake were it not for her brother. An avid fisherman, he had visited a few times for guided fishing excursions. Once her parents were able to vacation on the lake—all eight kids in tow—Marianne’s mom knew they had to own a piece of this little paradise. “Once they bought their Dixie Acres house in 1984, my parents moved to Charlottesville to be closer to the lake,” Marianne says. All the siblings (along with their various friends and significant others tagging along) visited frequently. “Because the house had only two bedrooms, we always fought for who got to sleep inside,” she recalls. “But even if you relegated to sleeping in a tent outside or on the garage floor, it was still a great time.”

It wasn’t long after Marianne’s parents purchased their cabin that her boyfriend Bill became one of its frequent visitors. College students at the time, but certain of a future together, the couple became more enamored with the area with each visit and talked of having their own place someday. Seventeen years later, in 2002, that youthful dream became reality. “We were able to find a house across the lake from Marianne’s parents,” Bill says, “so we got to enjoy the family fun, and we never had to sleep on the garage floor again!”

Bill and Marianne reside just outside of Richmond in Moseley. Bill has a veterinarian practice and Marianne is an occupational therapist. They are a vibrant, outgoing pair, and the 15 years of weekly summer trips to the lake with their three kids were filled with bustling lake activity and boisterous laughter. But through the years, as their boat glided away from their quiet cove to circle the lake, Bill’s eyes would stop on a nearby disheveled property that sat on a prominent point down the creek.

“There was this older red A-frame house,” Bill recalls, “and every year I watched it go into greater disrepair. But the view of the ‘V’—a well-known mountain feature—was phenomenal.”

After more than a decade of witnessing further decline and eventually thinking the owner may be overwhelmed by the property, the Pecoraros asked a local realtor friend to approach the owner about selling. At that time, however, he told her he wasn’t interested.

About three weeks later, they received a call from their realtor friend, saying, “You’ll never believe who just walked into the office and wants to sell.”

“We literally went in the house just once after we bought it in 2018—it was moldy and dilapidated,” Marianne says. “But you could still see how nice it was in its heyday—and, of course, the view was gorgeous. But we were so excited to build our own unique dream house.”

To design their vision, the couple hired resident architect Eric Buck. And when it was time to bring those plans to fruition, local builder Phil Floyd (Floyd Enterprises) was tasked with the project, which lasted a year and a half. According to Bill, “We thought carefully about making every space purposeful, knowing this would be our empty-nest haven, as well as a place for our kids to start their own traditions with our future grandchildren.”

The Craftsman-style home has four bedrooms and four and a half bathrooms. On the main level, a large combined great room and kitchen space visually open onto the lake, as the back-facing wall is almost completely glass. Upstairs, another bedroom over the garage with three full-size beds awaits friends and extended family. The couple created a spacious downstairs area with their adult kids in mind. “The large rec room and bar are perfect for our kids to hang out long after we go to bed,” Marianne says. “The most important thing for us was to have plenty of outdoor living space, because we’re typically outside from our morning cup of coffee to when we go to sleep.”

The home’s main level features a huge screened porch with a dining table, seating area, and fireplace, which serves as a three-season living area. Adjacent to the screened area and attached to the master bedroom, another covered porch makes for a picture-perfect area for the couple’s quiet morning coffee talk—rain or shine. Downstairs, a spacious patio for additional dining and lounging leads to a propane firepit to gather with friends and family. A hot tub is tucked against the house nearby, adding another water element to lake living.

Every room in the home is beautifully designed—clean and unpretentious, with thoughtfully placed lake-house décor for a laidback feel. “We were very intentional about the placement of every room and window,” Bill says, “because the whole house is really all about the views.”

Now empty nesters (their kids are 27, 22, and 18), Marianne and Bill are more often alone in their lakeside sanctuary than with their children, but they’re definitely enjoying this new season of life on Smith Mountain Lake.

Bill describes their love for this community. “After 35 years, this place continues to be my heaven on earth. Hearing the birds, watching the water change color and texture—it’s so peaceful.” Marianne adds that being at the lake grounds her. “We slow down here,” she says. “And, because we’ve been coming for so long, we have so many amazing memories.”

Now, with their new dream home complete and new memories to be made, they can start writing their next chapter of life on Smith Mountain Lake.


Lettuce 101

A Guide to Growing Your Own Greens

Conventional nutrition advice is very clear: Leafy greens should be a big part of our diets. But, let’s be honest, sometimes the green options at the grocery store just don’t look appealing, are noticeably nearing their expiration date, or, as we’ve seen in recent years, are part of a widespread recall.

If you’ve considered a DIY approach, there’s good news. You can grow a number of lettuce varieties at home with very little effort. Not only will you save money, homegrown lettuce also is more nutritious because it has more Vitamin A the closer you eat it to harvesting. And it’s not too late for you to try this out in 2020. The growing season for lettuce can be in the spring or fall. I would suggest a fall planting in mid-August, with the latest planting in mid-September to avoid a mid-October frost.

To start, first you need to find a seed vendor. Two of my favorite sources are Johnny’s Seeds and Southern Exposure Seed Exchange. Southern Exposure is located in Central Virginia so their growing and cultivation information is always right on target. Whether you’re ordering online or buying from a local nursery, be sure to read the cultivation information so you can grow your varieties successfully.

Then, there are many types of lettuce to choose from. This includes head, leaf, and cut-and-come-again forms. If you are curious, but are not quite ready to “dig in” just yet, go buy some of the great fresh lettuce mixes available at the Lynchburg Community Market or the Forest Farmers Market. Ask the grower which varieties they grow and make yourself a list to try.

Next, there is some simple soil preparation. Work or hand-till a small plot (about 4’x4’ is enough room) about 8-10 inches deep if the soil is not compacted. If it is a new bed, you need to prepare the soil 12-18 inches. But if you’re just not into all that work, you can take a hoe with a wide blade and make several rows side by side. Then, fill the rows lightly with the well crumbled soil. Slowly sprinkle in your seed over the soil that’s been returned. Then barely cover the seed with dirt.

I usually do this by hand. Next, take the backside of your blade, or your hand, and lightly pat the soil.

Finally, water lightly, wait and get ready for fresh greens. Lettuce grows quickly, so you will see seedlings in 7-10 days. When’s it’s time to harvest, I recommend using scissors rather than pulling it. Wash leaves in a sink full of cold water and salt, which will repel any bugs hiding amongst the leaves. Rinse and dry in a salad spinner.


Farmhouse, Refined.

BRINGING A POPULAR STYLE INTO MODERN TRENDS
Photos by 434 marketing

A century ago, farming was a dominant industry and private endeavor in our country. And farmhouses, well, that’s where farm families and workers lived. Function over form dominated these homes in structure and design. Wood was cheap and easy to come by for construction and furnishings, and shiplap preceded the sheetrock walls of today. You could say that the “farmhouse style” of the day was simple, intentional, and purposeful. There was little “fluff” because, frankly, there wasn’t time for it. >>

But about seven years ago, an HGTV show out of Waco, Texas, brought farmhouse back with a bang. We were all scrambling to find vintage, chipped pieces (or create them), and “shiplap” quickly became a household word. Every nook and cranny of our homes reflected this movement. If there was a blank space on the wall or empty corner on a counter, it had to be filled with a collage of word art, and galvanized metallic accents—the more we accessorized, the better!

“Joanna Gaines definitely set the farmhouse tone, but we all have been overplaying it,” explains Katrina Morris, owner of The Morris Manor and a new home décor shop inside James T. Davis Paint and Design Center called Katrina & Co. “Social media has also taken it to a whole new level, as we all compete to show that we live in a farmhouse—if it’s old, we wanted it, and if it was wood, we painted it.”

Currently, in our desire to embrace it, this trend has become a bit exaggerated. Simplicity of style and vintage charm have given way to clutter and visual stress. “Anytime you do too much of a good thing,” Morris says, “you lose the meaning and the beauty.”

It’s time to reign in this style, modernize it, and create a look and feel that is timeless.

Reframing the Farm

So, how can we retain the appeal of the farmhouse style and apply modern sensibilities?

According to Morris, “We need to edit the space. The key is to create focal points where, when you come into a room, you notice one or two key pieces.”

Examples include a tray with loved items corralled on it or one large—and meaningful—art piece. “Retaining clean lines and incorporating some texture and a few vintage items really refines this trend.”

Think beauty plus function. If you love a sliding barn door, go for it. Just install it in the right place and not at every doorway. Identify farmhouse attributes that mean something to you and provide purpose within your lifestyle. If you went a little crazy with painted furniture because you really liked it, keep some of it—your coffee table, desk, or media table, for instance. Otherwise, consider returning wood furnishings to their raw origins. And all that stuff? As another popular TV personality puts it, hang on to what brings you joy, and let go of the rest.

Create a Modern Mix

“What’s really exciting now is the modernization of the farmhouse trend,” Morris says. “It goes beyond editing the overkill to applying a fresh approach.” She explains that the current—and enduring—movement is to combine vintage with contemporary. “Blending raw and painted woods with clear, acrylic furniture and integrating gold or brass fixtures immediately elevates this style.”

Picture your antique farmhouse dining table surrounded by Lucite chairs, or your overstuffed leather sofa flanked by sleek acrylic end tables. In lieu of galvanized metals, gold accessories deliver visual impact and a bling of sophistication. Think high-contrast paint, too. Farmhouse style is typically awash in white, so try adding elements of deep blues or even black to add impact and pop. Morris elaborates, “The metallic tones of today’s gold and brass is the same as previous fashion eras, but the style is very different. We’ve gone from the ornate 1990s faucets to industrial goosenecks and bridge faucet styles of the 20s and 30s.”

Modern farmhouse is refined, functional, timeless. According to Morris, “Items in our homes should be collected because we love them and then displayed in a clean, simple way.”

Pieces are quality and long-lasting, typically getting more beautiful and loved over time. “And no matter the style or era of home you have—from Victorian to mid-century to new build—these elements work.”

So, let’s harken back to the days of the pioneers, with their purpose-driven abodes, and then amp up the style (because, let’s face it, most of us don’t farm our land anymore). Embrace the vintage and add chic accents.
But most importantly, make it beautiful (to you), so you love where you live.

Katrina Morris is an interior designer, social influencer, and DIY expert. In addition to her blog, TheMorrisManor.com, she has recently launched her own home decor shoppe within the James T. Davis Paint and Design Center. The line, Katrina & Co., is a curated selection of decor items and interior design inspiration, all chosen by Katrina herself. Visit her website at www.themorrismanor.com and follow her on Instagram @themorrismanor. Shop the line in person at 3416 Candlers Mountain Rd, Lynchburg, located inside James T, Davis Paint and Design Center.

During the Pandemic…

“Now more than ever, home has become our safe haven and refuge. It plays a vital role in our well-being and should be filled with the people and treasures we hold most dear.” – Katrina Morris, The Morris Manor and Katrina & Co.


Doing Modern Farmhouse Right

with Rebecca Boles
Photos by Ryan and Kelly Portnoy

How did you find your design style?
I’ve always loved interior design—but I never studied it. My mom always had a country-styled home and she was really intentional about adding what she loved. It was cozy, but not cluttered. So, I’ve always loved things that make my home feel like my space. My style has definitely evolved, and I think having access to social media to get inspiration is really helpful. I’ve tried to find things that caught my eye and then figure out why I love it.

How would you define the typical farmhouse style?
It’s definitely shifted from its original intention of rustic simplicity and repurposed wood. Now, I think people tend to go overboard with too many antiques and too much distressed stuff—everything made out of pallets, for example.

What do you suggest for refining farmhouse?
For me, a modern farmhouse style has a very welcoming feel—warm and inviting. There’s a mix of rustic and modern. Our home marries modern farmhouse with a calming, cottage feel. Clean lines, lots of white, and some coastal colors with warm undertones. We have natural wood pieces that serve as an anchor to the farmhouse style. Regardless of where you are on the farmhouse spectrum, I believe everyone needs to intentionally style their home in a way that makes them comfortable and happy.

Rebecca Boles is a wife and mother of four with a passion for interior design and healthy living. Her and her husband, Jeremiah, designed and built their home. Follow along with her on Facebook (@modernfarmhouselove6) or Instagram (@modern_farmhouse_love).