This fire cider recipe will help you stay well this winter
The winter months are full of festive gatherings, holiday cheer…and icky colds and bugs. To keep your family well this holiday season, whip up a batch of traditional fire cider!
Fire cider is an herbal tonic that helps boost immunity and aids in digestion. As scientists have uncovered in recent years, there is a direct connection between gut health and overall wellness, and fire cider is a concoction that’s brimming with antimicrobial, anti-inflammatory, and antioxidant properties.
Originally created in the 1970s by herbalist Rosemary Gladstar, fire cider recipes have been iterated on and adapted ever since. While there is a base recipe that you should consider sticking with to ensure you get the most cold-fighting properties, you can always customize the recipe to your tastes. And, while fire cider has only been around for a few decades, the idea of consuming apple cider vinegar—one of fire cider’s primary ingredients—for its health benefits has been around for centuries.
Keep a batch of fire cider in your pantry (or other cool, dark space) all winter long, and either drink two ounces every day or simply keep it on standby for when the coughs and sneezes arrive in your home.
Ingredients
1/2 cup fresh ginger, grated 1/2 cup fresh horseradish, grated 1 yellow or white onion, chopped 10 cloves garlic, crushed or chopped 2 jalapeño peppers, chopped 1 lemon, juice and zest 2 tbsp. rosemary, dried (or several sprigs of fresh rosemary) 1 tbsp. turmeric, ground Apple cider vinegar 1/4 cup honey (plus more to taste)
Instructions Add ginger, horseradish, onion, garlic, peppers, lemon zest, lemon juice, rosemary, and turmeric to a quart canning jar. Cover the mixture with apple cider vinegar by about two inches.
Place a piece of natural parchment paper or wax paper under the canning lid and close—the parchment will keep the vinegar from touching the metal, which could cause it to rust. Shake well. Store in a dark, cool place for one month and shake daily.
After one month, use cheesecloth to strain out the pulp, pouring the vinegar into a clean jar. Be sure to squeeze as much of the liquid as you can from the pulp while straining. Add 1/4 cup of honey and stir until incorporated. Taste your cider and add another 1/4 cup of honey, or until you reach desired sweetness. Fire cider should taste hot, spicy, and sweet.
Decadence in Appalachia
The Shack is Serving Up Tradition and Elegance in Staunton
Chef Ian Boden knows that to live in Appalachia you have to respect the land.
Tucked into the Shenandoah Valley between the Blue Ridge and Allegheny mountains, Staunton, Virginia, is known for its stunning mountain vistas and small-town charm. It’s also known for harsher winters and short growing seasons.
“The [Shenandoah] Valley and Appalachia are a melting pot, and are the original melting pot of the US,” explained Boden, chef and owner of The Shack, a modern cuisine restaurant in Staunton that has become synonymous with local, farm fresh food. “It’s not just Scots Irish, either, which is what most people think of. There was a huge wave of Hungarian, Russian, and Polish immigrants who settled here. All of the things that I associate with cooking, and that I grew up with, resonate here.”
Photo by Sera Petras PhotographyPhoto by Sera Petras Photography
Boden, whose heritage is Russian and Hungarian Jew, is a two-time James Beard–nominated chef who saw The Shack as a way to connect with his roots.
“The Shack itself was kind of built out of frustration,” Boden laughed. “I first opened the Staunton Grocery in ’06 and ran it for about five years, and made all of the mistakes you’re supposed to make as a chef. I moved to Charlottesville and was a chef at another restaurant, but after doing things my way for so long and developing what hospitality and a restaurant should be like, doing that for someone else was challenging. So, I reopened the space under its new name, The Shack. It had 14 seats when it first opened, and we only turned the dining room once a night. I was the only one in the kitchen.”
Photo by Sera Petras Photography
From 2013, when The Shack reopened, to today, the dining experience has remained fairly consistent. The restaurant, with its small footprint and minimal seating, still only services a handful of tables at a time. But now, they turn the dining room twice a night instead and Boden has help in the kitchen.
Photo by Sera Petras Photography
“On our third night in service, Joshua Ozersky, who at the time was a regular food contributor with Esquire, came in,” Boden recounted. “He said, ‘You’re stupid if you change [The Shack] from the way it is.’ And so I didn’t.”
Photo by Sera Petras Photography
The Shack is mesmerizing from the moment you step foot into the space, which is roughly the size of a double car garage. Black and white photos line the walls—of families huddled together in kitchens or proudly standing in front of their homes—and you get a sense that you’re walking into someone’s home kitchen rather than a restaurant that serves four- and five-course meals with wine accompaniments to match. Your journey continues as you sit down at an unassuming table and your server expertly walks you through the evening’s dinner menu, which changes weekly. Ingredients like whippoorwill peas, sunchokes, and fermented Aleppo chilis are included in their rundown, cluing the diner in that they’re about to experience a true culinary masterpiece—and it makes return guests thankful that Boden listened to Ozersky’s advice almost a decade ago.
Photo by Sera Petras Photography
Guests have the option of choosing a four- or five-course menu. The dinner typically begins with an off-menu amuse-bouche—a small, special treat from the kitchen to awaken your palate—and ends with an off-menu dessert like truffles infused with seasonal fruits or carrots cleverly disguised as candied gels. In between, guests can customize their dining experience, with each course having two options for them to choose from. The entire meal takes roughly two hours from start to finish, and it’s both an exquisite culinary experience and an education on what makes the Shenandoah region’s food so special.
“This time of the year, we are finishing the last harvest for the region—the last hard squashes and pumpkins,” Boden said, detailing what guests may find on a winter menu. “Because of the way we cook, we are putting up, preserving, freezing, canning. The whole dining room is full of fruit right now that we are processing for the winter. When produce is inexpensive and plentiful, we make the most of it and preserve it for winter. Just like they did back in the day.”
Photo by Sera Petras Photography
Boden, with his Russian and Hungarian heritage, along with his wife, whose family is from the foothills of the Appalachian Mountains, treat The Shack’s menu as an amalgamation of the two cuisines, both of which have a big emphasis on “making do” and preserving for later.
“Fermentation and preservation are a huge part of cooking in the Valley,” he said. “Because the growing season is short and the winters are cold and harsh, it’s important to preserve.”
Photo by Sera Petras Photography
Even in the winter, when gardens are dormant, guests can still experience the local flavors that are unique to the region because of how diligently The Shack team stores up for the colder months. The menu remains colorful and varied, with produce, fruits, and vegetables that diners wouldn’t expect to find on a menu in December. The ten pounds of excess rhubarb that was harvested in May may find its way to the winter menu as a rhubarb dashi—savory, acidic, and bright. Rockfish, straight from local waters, might be lightly pickled and grilled alongside preserved vegetables and butter poached fingerling potatoes. Or truffle mushrooms may get worked into a matzo dough and served alongside guinea hen stew for a soup that will warm both body and soul.
Photo by Sera Petras Photography
“One of the important things, as far as people dining here, is to have a connection with what we’re doing,” Boden said.
Photo by Sera Petras Photography
That connection—with food and with the land that grows it—is what makes The Shack a true joy to experience. At The Shack, you may eat ingredients that are out of your comfort zone, but somewhere in the back of your mind, your memory lets you know that the flavors are familiar and they’re inviting you on a journey.
A Loving Space to Be
The Loving Co. combines community and coffee
Walking up the few steps and through the door to The Loving Co., adjacent to Riverviews Artspace, it immediately feels like stepping into the home of an old friend. Breathing out an audible exhale while looking around and taking in the soothing surroundings, I felt the sense of community right away. The walls are covered with artwork, every flat surface has something beautiful to peruse from various vendors such as handmade jewelry, plant-based bath and body care, keychains and stickers, mugs, and vintage clothing plus there is ample, comfortable seating just waiting to envelope you. Choose your tasty drink or snack from the large coffee bar where you’ll find a wide selection of teas and coffee drinks that differ from your traditional coffee shop. How about a salted honey latte or perhaps a mango milk tea?
The Lovings
The Loving Co. is a Black, women-owned business run proudly by four local Lynchburg ladies, the Lovings: matriarch Victoria and her three daughters Ceana, Taylor, and Ashley ranging in age from 22 to 36. Inspired by their love of conversation, they kept coffee as the conversational drink, added local small businesses within the shop, and made a space to host community events such as jazz nights and paint and sip; or you can rent the space for a shower, brunch, book club, business meeting, etc. Wednesday nights are open for business and known as Insomnia Nights at The Loving Co. where they have everything from music, movies, and games or customers can feel free just relax and read a book.
The Loving women were raised with an appreciation for art and they enjoy drawing, painting, photography, and writing. Taylor Loving shared, “At the Loving Co. we can show our love for art while supporting local artists as well. We know of other young artists that may not have the opportunity to showcase their talents. We decided to focus on women, people of color, and young artists to have this space to showcase or sell their works.”
At a Glance: The Loving Co. 901 Jefferson Street, Downtown Lynchburg (434) 485-8262 Find them on Facebook and Instagram
Dishing up exquisite portions of food and art, ElectricCoArt, Bistro & Market brings a big city vibe to the “World’s Best Little Town”
Tucked away from the heat of a typical Virginia summer day, and with an ice-cold carafe of water on the table in front of me, I sat with a passionate group of people who are on a mission to elevate Bedford’s art and food scene—all under one roof.
Surrounding our interview group is art—lots and lots (and lots) of art. From large, multi-colored abstracts to traditional pastoral landscapes to shelves displaying the most detail-oriented, whimsical sculptures I’ve ever seen. Almost every empty space in this historic, magnificent room is filled. It’s hard not to be inspired here.
“People walk in and say, ‘I feel like I’m in New York City or Downtown Philly.’ They will pick a city and fill it in. And that’s our goal,” said owner Wendy Witt.
ElectricCoArt, Bistro & Market Owner Wendy Witt and her partner, Bill Mauser. Photo by Ashlee Glen.
The vision for ElectricCo started forming when Witt, a real estate agent, had the Depot Street building listed for sale.
“We just started daydreaming about what this building could be,” she explained, adding that her partner, Bill Mauser, had been looking at vacant commercial spaces to put his blacksmith forge.
Once the couple made the move to buy the space, they had the end goal in mind—a maker’s market, art gallery, and restaurant. Naming the business was easy and was pulled straight from history—the ElectricCo building was constructed in 1895 as the original Bedford Electric Department and it functioned that way until 2000.
Photo by Ashlee Glen
Getting to their end goal, however, didn’t unfold quite like they thought it would and ended up happening in stages.
“We wanted to open up everything all at the same time, but we soon realized that wasn’t going to happen. The market was first and was the easiest,” Witt said.
In June 2021, their makers market opened to the public. It’s located on the lower level of the two-story building, with its own separate entrance, and features a little bit of everything—pottery, candles, jewelry, clothing, and more. Witt says local makers and artisans, who had been working at home during the pandemic, jumped at the chance to have a spot to showcase their goods.
Next came the art gallery, located upstairs. Witt and Mauser didn’t have much experience in this arena and weren’t sure how easy it would be to find artists who wanted to display their work in a new Bedford gallery. They were stunned by the initial feedback.
“It went so much easier than we expected.
As we started talking to artists, they told us, ‘oh my gosh, we are dying for a place to show’ or they were even looking for a second location to show,” she explained. “We got a lot of compliments from artists about how the place looks and feels.”
The front of the gallery is where visitors can peruse—and purchase if they choose—a wide variety of local and regional artwork, and artists swap out their pieces often so there is always something new to see. Keep walking to the rear part of the gallery, and you’ll find a larger, more comprehensive showing from a featured artist that typically stays on display for about six to eight weeks.
With the market and gallery underfoot, the restaurant seemed straightforward—a completion of their business model trifecta. It was going to be a relatively simple eatery, a limited kitchen offering some select sandwiches. But just like an artist who lets their imagination guide them on a canvas, the restaurant idea started taking a different direction when renovations began.
“We didn’t expect the demo of the building to open up the spaces as much as they did. The kitchen went from two small, dark rooms to a big open kitchen. We started knocking out walls, removing sheetrock, found windows that were hidden,” Witt said. “The whole vibe just changed.”
And the more the environment changed, the more their expectations for the restaurant expanded. Witt and Mauser’s limited kitchen concept had morphed into a full-service, fine dining experience.
Photo by Ashlee Glen
“Then, Chef Thomas and we came together, so it’s like it was all supposed to happen,” Mauser added.
The “cupid” in this serendipitous introduction, according to Witt, was the man who installed the restaurant’s kitchen equipment. One interview later and Chef Thomas Schmidt was hired to lead the way for ElectricCoBistro, which opened to the public in April.
Schmidt, a Blacksburg native who now lives in Lynchburg, graduated with honors from the Culinary Institute of America in New York. His resume includes the Sanderling Inn on the Outer Banks and the Willow Grove Inn in Orange, both of which are highly rated in the culinary world.
“After that, I broadened my foundation into some other things and then the opportunity to come back to fine dining arose with ElectricCo and I jumped on that and couldn’t be happier,” he said.
Creating a forward-thinking, upscale menu in a small town comes with its challenges—one of them being, you don’t want to scare people off.
“So it’s only about this much intimidating,” Mauser joked, holding up his thumb and forefinger.
Schmidt quickly jumped in to add, “You want it to be friendly, somewhat familiar. So people won’t go, ‘what is that?’ Our ingredients are all recognizable and everything is from scratch.”
There’s a lot of fusion-style cuisine. Schmidt has enjoyed pairing many well-known dishes with flavors inspired by Asia, France, or Germany. For example, one of their top selling appetizers is prosciutto risotto balls stuffed with mozzarella and topped with a Southwestern marinara and Mexican cheese. Schmidt’s recipe for ahi tuna with Asian slaw and sushi rice further highlights his love for international flavors.
Their chicken marsala is also a huge hit with customers, along with the bistro’s grilled salmon entrée.
“We have a few things on the menu that are standbys because they are so popular. Ultimately we will probably have a base menu, but we will always be switching things out,” Schmidt said.
The menu is dynamic, just like the art on the walls and Schmidt doesn’t have to work too hard to find inspiration for new dishes—he just looks around.
Photo by Ashlee Glen
“When the art is always changing, you want the food to change too,” Schmidt said. “You want it to be as special as the art.”
Those two elements, art and food, play delightfully off of each other here at ElectricCo—creating a special experience not only for locals but hopefully lots of out-of-towners as well.
“We want art lovers from New York to Atlanta to come up here to our area, from Roanoke to Lynchburg,” said Witt. “We want to create an art scene in this region and be part of that.”
Photos by Ashlee Glen
Beautifully Blended
Vibrant, nutrient-rich smoothies to jumpstart your day.
Recipes & Photos Courtesy Millie’s Living Cafe
There’s nothing more beautiful than a brightly colored smoothie that’s packed with healthy fruits and proteins. And the best part? Making them is a breeze. Simply toss all ingredients into a blender, blend until smooth, and you’ll have a delicious and healthy beverage to start (or end) your day with. Thank you to Millie’s Living Cafe for sharing their recipes with us!
Pumpkin Smoothie 1 1/2 cup banana 1/3 cup ice 1 cup cashew or almond milk 4 tbsp pumpkin puree 2 tbsp maple syrup 2 tsp vanilla extract 1/2 tsp cinnamon 1 tsp pumpkin pie spice Dash of salt After blended, top with So Delicious Cocowhip and cinnamon
Summer Sunrise 1 frozen pack dragon fruit 1/2 of a fresh mango 1/2 of a fresh pineapple 1/2 tbsp agave 1 cup coconut water
Protein Smoothie 3/4 cup blueberries 3/4 cup bananas 1 tbsp almond butter 1 scoop protein (i.e. Garden Of Life Vanilla Plant Protein) 1 1/4 cup cashew or almond milk
Pups & Patios
Dog-Friendly Restaurants and Breweries In and Around Lynchburg
It’s that time of year again, when the sun is warm, the rosé is cold, and the temperature is simply satisfying…that’s right, patio season is upon us. Lynchburg residents are lucky to have seen an increase in outdoor hanging and dining spaces in the last few years from downtown to several surrounding counties. An added bonus to some of these tasty spots? You get to bring your leashed, four-legged, furry friend so you never have to worry about dining (or drinking) alone.
My Dog Duke’s Diner My Dog Duke’s Diner often fills up quickly inside but the covered patio is a cozy spot rain or shine to hang with your best friend. They close after lunch so go early to enjoy their Strawberry French Toast or Chicken and Waffles with a boozy adult milkshake or maybe a mimosa flight. Your pup may get lucky and snag a stray piece of bacon, but if not he will still enjoy the sights and smells of this delightful downtown spot.
El Jefe Stretch your and Fido’s legs with a walk up the Bluffwalk to El Jefe, where your pet will be welcomed to hang on the patio of this fun and funky tequila and taco spot. Take in the stunning views, enjoy the excellent service, and kick back with a gourmet taco or some of their delicious nachos. The Spicy Cucumber Margarita pairs well with a nice cold cup of H2O on the rocks for your pet.
Bootleggers Down a few steps, also on the Bluffwalk, is the patio at Bootleggers. Take your pooch for a Southern Belle Burger and parmesan truffle fries and live with no regrets. Enjoy a beer or bourbon with river views and people watching as an added bonus. Elevated bar food with excellent attention to detail and dogs? We’re in.
Three Roads Brewing Bring your thirst to this spot as they serve up only icy cold brews and no food, but they do often have a food truck (such as local favorite Ferguson Family Provisions). Follow @3roadsbrewingco_burg on Instagram to catch them on a night where they have live, local music. Added bonus: your pet can come inside or hang outside, so rain or shine, this is your spot.
The Water Dog What’s better on a balmy Sunday afternoon than heading down to The Water Dog on Jefferson Street to grab a dozen oysters and one of their 36 craft beers? Only the fact that not only can you bring your dog to relax with you at the large outdoor bar and seating area, owner Dave Henderson highly encourages it. As a lifelong dog owner and lover, Dave appreciates that his Labradors don’t know the difference between work and play and he wanted to build a place for people and pets to gather that embodied that spirit. Dave wants everyone, including your furry friends, to feel welcome and at home here. Don’t mind if we do.
Grey’s on Fifth The ever-changing menu at Grey’s on Fifth and the inventive, delicious dishes are the reason most people constantly return to (and crave, and dream about…) this celebrated 5th Street spot. But when spring rolls around their lush, garden-like patio is a lovely spot to hang with your animal. With zero pretension, just fantastic, fresh food and some of the best staff around, you and your bestie are going to make this place a weekly tradition.
Beale’s Brewery Don’t sleep on Bedford, y’all. If you haven’t cruised West to enjoy Beale’s Brewery yet, consider this your sign. While this quirky spot can be enjoyed all year long, it’s an exceptional place to hang with your entire family outside. Yes, it’s a brewery but they have a great spot for kids and a kids’ menu. Pro tip: Get the soft pretzel with beer cheese and the Brunch Stout, just don’t let your pup dig for the Beale’s Gold buried treasure that gave the brewery its namesake.
Apocalypse Ale Works A local brewery with heating and air conditioning, an outdoor beer garden, plus a stage for live music? Let’s go! These Forest folks always welcome supervised children and leashed dogs so pack up the car and bring the whole family to this spot that has become a regular hangout for the young and young at heart. Rotating food trucks such as Carbon Catering Co, Hill City Smokehouse, Upper Crust Pizza, and Hill City Eats can regularly be found serving up delights to go with your craft beer that’s made on the premises.
Burg Burritos One of the newer patios around town, Burg Burritos does one thing and they do it exceptionally well: Burritos. And what could possibly be better than a burrito? Sitting outside on a gorgeous day eating a burrito with your dog while sipping a soft serve margarita. Is this heaven? Wait, there’s more. These guys will actually MAKE A Grrr-ito for your pooch! Fido just needs to decide if he would prefer beef and cheese or chicken and cheese. Mind blown.
Yellow Submarine Come for trivia night and the delicious subs, stay for the warm service and super dog-friendly accommodations. These people are pet lovers and invite you to bring your pet to dine outside on the patio or on the screened in porch. Parched pooch? Not to worry, the folks at Yellow Submarine already have dog bowls outside.
The American Flag Cake
Patriotic Patisserie That is Sure to Impress Photos by Ashlee Glen
Celebrations are often synonymous with some type of food. Consider the Thanksgiving Turkey, the Christmas Ham—or the spicy chicken wings folks like to eat on Superbowl Sunday.
But there are some special days that are often lacking in the food department. Some of our most beloved celebrations have yet to properly be associated with a special food. Yes, I am looking at you, Independence Day. The 4th of July was meant for so much more than watermelon and hot dogs!
I would like to see this fantastic Flag Cake recipe get a permanent place on America’s birthday table. It’s delicious, surprisingly easy to make, and its dramatic appearance will make your guests gasp when you bring it out. Also, if you don’t have time to decorate, let your guests help out. It’s fun!
I like to serve this cake with a sweet strawberry drink called Saft. Saft is a homemade, fruit flavored syrup with Swedish origins. Mix some of the syrup with water to make a refreshingly sweet, all-natural alternative to Kool-Aid.
AMERICAN FLAG CAKE Serves: 18-20 People
Cake
2 1/4 sticks (255 grams) of unsalted butter, softened
3 cups sugar
6 large eggs
1 cup sour cream
2 tsp vanilla extract
3 cups (385 grams)
all-purpose flour
1/3 cup corn starch
1 1/4 tsp kosher salt (reduce to
1 tsp if using table salt)
1 tsp baking soda
Icing
4 cups heavy cream
1 tbsp sugar
Decoration
1 pint blueberries (for the number of rows you see in the photo,
you need 72 berries)
1 1/2 pint raspberries (for two long and two short double lines
you need 128 berries)
Directions
Heat the oven to 350 degrees. Butter and flour an 18 x 12 x 1 1/2 inch sheet pan.
In a stand mixer with paddle attachment, cream the butter and sugar until it looks light and fluffy. Reduce the speed and mix in the eggs, one at a time. Add the sour cream and the vanilla and beat another minute until smooth.
In a separate bowl, mix together the flour, corn starch, salt and baking soda. You can sift the dry ingredients if you have the patience, but lightly beating with a hand whisk works, too.
Now, slowly mix the dry ingredients into your stand mixer bowl until just combined.
If you will be serving the cake directly in the pan, just pour the batter into the buttered pan. However, if you are planning to turn out the cake and serve on a board or tray, use a sheet of parchment paper in addition to greasing and flouring the pan.
The batter will be fairly thick, so spread it evenly into the pan and smooth the top with a spatula. Bake in the middle of the oven until a toothpick comes out clean, or about 25 minutes.
When the cake has cooled completely, whip the cold heavy cream along with the sugar on high speed until thick and spread over the cake.
Decorating with berries can be as simple or complicated as you make it. If you go for perfection you may want to set aside around 30 minutes and use a ruler to space the rows of blueberries and raspberries. If you prefer a quicker, more rustic approach, strawberries cut in half make a good alternative to raspberries and you will be done in
10 minutes.
SWEDISH SAFT Makes: About 1 Pint
Ingredients
1 lb. fresh strawberries, hulled and halved
1 1/4 cup sugar
1 lemon, juiced
1 1/2 cup water
Directions
Add strawberries, sugar, and water to a heavy-bottomed saucepan. Bring to a boil, then reduce to a simmer. Cook until the sugar has dissolved then turn off the heat. Add lemon juice. Let the mixture cool before straining it through cheesecloth to remove the strawberry solids. Store in a snap-top bottle in the refrigerator. Will keep for one month or longer.
To enjoy a glass of saft, mix 1/4 cup of the syrup with 1 cup water. Ice is optional!
We All Scream
For These Top Local Ice Cream Shops
You know you want it. Everyone does. Especially on a hot, sunny summer day. Sweet, creamy, smooth, velvety, cold, crunchy, fruity, chocolatey—however you enjoy your ice cream, Lynchburg has plenty of outrageous options.
As a self-professed foodie who is always checking out new additions to the local restaurant scene (and who also happens to have a sweet tooth), I was asked by Lynchburg Living to pick my top five ice cream spots in town and highlight their top treats.
Check out my recommendations on the following pages—and be sure to visit these spots this summer!
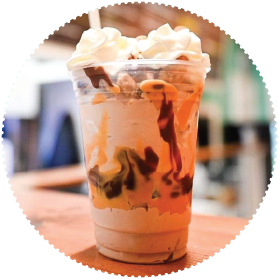
The Crazy Mason Milkshake Bar (pictured above) Graves Mill Shopping Center, 18013 Forest Rd., Forest
The Scoop: This newest addition to the Lynchburg sweets scene is the store’s fifth location and is just as described—crazy! Touted as an “ultimate dessert destination,” their milkshake-filled mason jars are topped with indulgences such as Pop-Tarts, cake, fruit, doughnuts, maybe even a waffle—the choices are endless! But they don’t stop there. The menu hosts other artistic desserts, ice cream sandwiches, unique monthly specials, and even funnel cakes.
Creams of the Crop: Exclusive to the Lynchburg store, I recommend you try the Heart of Virginia Shake. This delectable delight begins with strawberry and cake batter ice cream with a red marshmallow swirl that was custom-designed for Lynchburg, Virginia. It boasts a vanilla frosted rim rolled in red candy hearts and then topped with a Virginia-shaped sugar cookie, crushed blue rock candy pieces, fresh strawberry, an apple slice and whipped topping. (Perfect for IG!)
The Scoop: MayLynn’s serves out sweets from a food truck at its founding location in the Boonsboro Shopping Center, where you will usually find a long line of folks ready to beat the heat with a few cold ones. If you prefer to head downtown, grab a shake and enjoy a stroll on the Bluffwalk. Also important to note: both locations serve up non-dairy options so there is nothing holding you back from enjoying some MayLynn’s.
Creams of the Crop: I personally love their Frozen Banana (a frozen banana dipped in chocolate and then rolled in either sprinkles or nuts) because I can get away with thinking it’s healthy-ish! My family also thinks the Peanut Butter Bliss is pretty decadent and delicious—and it’s one of the most popular items on the MayLynn’s menu! It’s what these guys call a “stacker”— chocolate ice cream, Reese’s Cups, peanut butter, and hot fudge are stacked into one tasty treat. The stackers come in all sorts of varieties and combinations, and you can even customize your own. (Don’t mind if I do!)
The Scoop: If you have not been to this super special spot in Wyndhurst yet, what are you waiting for? The owners say their goal is to make the best ice cream in Virginia—and they do it by using only the freshest and finest ingredients and making many of their “mix-ins” in-house. You’ll also notice some very innovative flavors and flavor combinations. For example, the Bee My Honeycomb contains honeycomb they make in-house with a precise recipe they have developed. Bee My Honeycomb was named best new flavor of 2020 in a national contest sponsored by the North American Ice Cream Association.
Creams of the Crop: While flavors often sell out and change frequently, I love when we can catch “It’s All Greek to Me” on the Outside the Cone menu. They start with homemade baklava with layers of phyllo dough, chopped nuts, and honey from local Dry Branch Apiaries. Chunks of baklava and a sea salt Greek caramel swirl are then wrapped into their vanilla ice cream. (Drooling!)
Mister Goodies 21556 Timberlake Rd., Lynchburg Find on Facebook
The Scoop: At Mister Goodies, you get all the nostalgia of a carnival ice cream stand, without the price of admission. From the street, you can’t miss the huge ice cream cone on top of the building with bright lights showcasing ice cream, soda floats, cookie sandwiches, apple dumplings, banana splits, and much more. In addition, they offer lower-sugar and lower-calorie options. This year, Mister Goodies added homemade hard serve to the menu, something that was not available in the past.
Creams of the Crop: The aficionados behind Mister Goodies are so passionate about what they do—and Lynchburg Living readers definitely notice. Mister Goodies is a consistent winner in the Best Of Awards, even winning Gold for Best Frozen Dessert last year. With so many tasty menu items, it was hard to narrow down a favorite, but I just love the Strawberry Dole Whip. And believe it or not—it’s dairy- and gluten-free and vegan. The Dole Whip also comes in several other flavors such as mango, pineapple, and watermelon. (If you know, you know.)
The Scoop: The great folks at Rookie’s started out in Forest and now have a second Lynchburg location off of Rivermont Avenue (conveniently located next to Rivermont Pizza—a match made in heaven, if I may say). With a selection of delicious handmade ice cream sandwiches in classic combinations such as chocolate chip cookie with vanilla ice cream or sugar cookie with strawberry ice cream (my personal favorite), you really can’t go wrong. They also serve vegan and gluten-free options and tasty coffee if you’re in the mood for something warm.
Creams of the Crop: Not really feeling a sweet sandwich? You can always just enjoy Rookie’s traditional cookies paired with ice-cold milk. Or for something different, we like the Affogato al caffe from Rookie’s. I choose the Nutella ice cream as my base; it is then drowned in hot espresso, resulting in a magical amalgamation of sweet and bitter, cold and hot. (Trust me.)
For the Love of Rice
I love rice. It does not matter if it is brown or white, short grain or long grain, boiled or fried—or puffed! I love the versatility, the taste, and how quick and easy it is to make. I eat rice several times a week and always keep multiple varieties on hand.
And it appears I am not alone. According to data from UNICEF, rice is the most important food crop with regard to human nutrition and caloric intake, providing more than 20% of the calories consumed worldwide by humans.
Rice is the seed from a grass plant, related to other grasses such as wheat, oats, and barley. It completes its entire life cycle within six months, from planting to harvesting. The rice grain is made of three main layers: the hull (or husk), the bran and germ, and the inside kernel (or endosperm).
Once the protective husk is removed, the rice grain becomes what we call brown rice. Because it still contains the rice germ and outer bran layers, brown rice contains more fiber and vitamins than white rice.
Gentle processing removes the germ and bran layers from the grain to expose a white starch center. The polished white starch center is what we know as white rice.
It was hard to pick my favorite rice recipes since rice plays a part in so many wonderful dishes, but these two are very different and great in their own ways. Enjoy!
Scandinavian Rice Pudding with Cinnamon Sugar
This rice pudding makes for a great breakfast and is traditionally served in a bowl with milk and sprinkled with cinnamon sugar. It’s easy, fairly quick, and filling enough to be a meal!
Servings: 4-6
Ingredients
2/3 cup of short-grained rice, such as Arborio
1 tsp. kosher salt (I like Diamond Crystal brand)
4 cups whole milk
3 Tbsp. unsalted butter
1 Tbsp. sugar
1 Tbsp. cinnamon sugar (2/3 sugar and
1/3 cinnamon) for sprinkling on top
Instructions
In a thick-bottomed saucepan, stir together the rice, salt, and milk and bring to a boil over medium heat. Be careful because milk has a tendency to bubble over once it starts boiling. Reduce heat to low and simmer until all milk has been absorbed, about 20 minutes. Stir often to ensure it doesn’t stick to the bottom of the pot. If the rice is not soft and creamy, add a bit more milk. Remove from heat. Add the butter and sugar and stir until the butter has melted and the sugar is incorporated. Sprinkle with cinnamon sugar and serve warm in a bowl with more milk!
Fried Rice with Chicken, Eggs, and Vegetables
Fried rice is best when made with day-old rice. If your rice is coming from the refrigerator, bring it to room temperature before stir-frying it. If you are making the rice the same day, spread it out on a baking sheet to cool for a couple of hours. This recipe works best with a wok.
Stir-frying happens quickly, so be sure to have all ingredients measured out and lined up before you begin.
Servings: 4
Ingredients
3 large eggs
1 1/2 tsp. kosher salt, divided
2 Tbsp. olive oil, divided
1 carrot, peeled and cut into
1/4-inch pieces
4 oz. dark meat chicken, cooked and cut into roughly, 1/2-inch pieces
4 scallions, sliced
4 cups cooked jasmine rice
1/4 tsp. pepper
1/2 cup frozen peas
Instructions
Turn your burner to medium-high and heat the wok. In a bowl, whisk eggs lightly with a fork. Add 2 tsp. of the oil to your hot wok. When the oil is rippling, add the eggs and cook, stirring frequently, until most of the egg is non-liquid, about 30 seconds. Transfer to a plate.
Next, add 1 tsp. oil to the now-empty wok and reduce heat to medium. Add carrot and 1/2 tsp. salt and cook, stirring frequently, until just beginning to brown, 2 to 4 minutes. Add chicken and cook, stirring frequently, until the chicken is warmed through, 1 to 2 minutes. Transfer to the plate with eggs.
Add half of the sliced scallion and remaining 1 Tbsp. oil to the wok. Cook, stirring constantly, for about 30 seconds. Add the rice and stir until combined. Sprinkle pepper and remaining 1 tsp. salt evenly over rice. Continue to cook, stirring frequently while also breaking up clumps, 2 to 5 minutes. Add peas, egg mixture, and remaining scallion, and cook about 2 minutes. Serve and enjoy!
Garden Can Do
A Comprehensive Guide to Hot Water–Canning
Canning is one of those old-world skills that feels a little unnecessary until you’re left with an end-of-the-season bumper crop of tomatoes, beans, or other garden produce that you can’t stand to throw away—then, it’s something you really wish you knew how to do. The good news is, it’s really not that hard to learn.
Once you do, you’ll have healthy, safe food for your family that you can store up for the winter, allowing you to enjoy the fruits of your garden all year long.
There are two home canning methods: hot water–canning and pressure canning. Hot water–canning can only be used on highly acidic foods because the acid prevents the growth of dangerous bacteria, including botulinum, which causes botulism. Many fruits contain high levels of acid, and pickled veggies and tomato sauces can be safely hot water canned. As a rule, don’t use the hot water method for anything with a pH higher than 4.6, and always do research before hot water–canning.
We highly recommend visiting the New London Cannery in Forest to jump in on a canning session. They offer their knowledge to the public starting in mid-summer, while guiding you through the canning process with the produce you bring in. They do charge a small fee of $1 per 28 oz. can, and $0.75 per 14 oz. can, but at the end of the class, you walk out with your very own properly preserved produce. It’s well worth it.
In the meantime, here’s a jump-start guide to hot water–canning:
The Supplies Two Large Pots: To start, you’ll need a big, deep pot with a tight-fitting lid. You don’t have to have an official canning pot, but you’ll need an aluminum pot that’s deep enough to completely submerge your jars with at least an inch of water above the lids. You will also need a second large pot (no lid necessary) to boil your empty jars before the canning process begins.
Rack: The rack keeps the cans in place when boiling and holds the bottoms of the glass jars above the bottom of the pan. If they sit on the bottom, the jars will overheat and crack.
Jars & Lids: Glass jars like the ones made by Mason and Ball come in all shapes and sizes, and you can reuse the jars again and again! That said, you should never reuse the lids; always start with a clean, new lid. You should also never recycle antique jars, store-bought pickle jars, or other collected glass vessels for canning.
Tongs: The jars will be extremely hot when lifted out of the pot, so get yourself a set of canning tongs, which are specially designed to hold onto those jars.
The Steps 1. Boil your empty jars in the large pot that you aren’t using for canning. The lids and bands don’t need to be boiled, but the jars will need to be fully submerged in boiling water for about ten minutes. 2. While the empty jars boil in the other pot, place the rack inside the canning pot. Then, fill the canning pot with water and bring to a simmer. Keep the simmer going as you complete the next steps. 3. Pull your boiled jars out of their bath and dry them. While they are still hot, fill them with your recipe! Leave about a half inch of empty space above the product. 4. Give the product a little swirl with a spoon or spatula to release any air bubbles. 5. Thoroughly wipe down the rims of the jars so that no food residue remains. 6. Place the lids and bands, screwing them snugly but not too tightly. 7. Place the jars into the rack in the canning pot. The jars should be fully submerged and covered by at least an inch of water. Put the lid on the pot. 8. Bring the pot to a boil and allow the jars to bathe in the bubbling water for at least ten minutes. 9. Remove the pot lid and allow the jars to rest in the hot water for another ten minutes. 10. Pull the jars out of the pot and place them on a towel or rack to cool. Do not open or adjust the lids; they’ll need to sit for about a day. 11. Once the jars have cooled after about 24 hours, check to see if they were sealed properly by unscrewing the bands and pressing down gently on the lids. If the lid is taut and doesn’t spring back up when you remove your finger, it has sealed correctly! If the lid does pop back up, the jar didn’t seal. In that case, you’ll want to place the jar in the fridge and eat the contents within a week or two.
Properly sealed jars can be placed in a closet and stored for up to a year! Remember, food safety should always be your Number One concern when preserving your harvests. Do your research to find safe recipes when using the hot water canning method, and always check for signs of botulism. If you see the jar lid bulging, if the jar is under pressure when you open it, or if the food smells or looks bad, it’s best to toss it.
Happy canning! Let us know if you come up with any delicious ways to preserve those bountiful harvests this season.