Festive Treats

That Are On the Nice List

You don’t have to skip the sweets this holiday season to stay focused on your fitness goals. Local blogger Laura Miner, founder of Cook at Home Mom (cookathomemom.com), shares a few of her favorite diet-friendly desserts that are perfect for parties or after a weeknight meal at home.

Chocolate Pumpkin Protein Balls
paleo, grain-free, gluten-free

Who doesn’t love a good no-bake dessert recipe during a busy time of the year? These little bites of fall flavor are easy to whip up and are always crowd pleasers. But Laura prefers to savor them by herself with a steaming hot cup of coffee on a chilly morning. She also likes that they aren’t overly sweet and the pumpkin flavor is subtle.

Servings: 4 (16-18 balls)
Calories: 352

CLICK HERE FOR THE RECIPE!


Snickers-Stuffed Dates
paleo, vegan

These are an absolute must-try if you’re like Laura and love that classic combo of chocolate and peanut/almond butter. With just four ingredients, this no-bake dessert is also a fan favorite due to its convenience.

Servings: 8
Calories: 160

CLICK HERE FOR THE RECIPE!


Sweet Potato Chocolate Mousse
paleo, vegan

Laura came up with this recipe as a way to satisfy her husband’s post-dinner sweet tooth without derailing from their clean-eating habits. It’s a concoction that’s so delicious, no one—including the kids—will ever know it is made with vegetables!

Servings: 4
Calories: 246

CLICK HERE FOR THE RECIPE!


Chocolate Covered Apple Slices

With apples as a base and nuts providing protein, you won’t feel so guilty about snacking on this treat anytime of the year.

Servings: 4-6 (4 slices)
Calories: 198

CLICK HERE FOR THE RECIPE!


Dudes Can Cook

A pep talk from Lynchburg Living’s tried-and-true (and sometimes bearded) food contributor

Anyone calling themselves a Man should be able to cook. No, I’m not talking about grilling a hot dog or microwaving leftovers, but a proper, kitchen-made meal, from scratch. Gone are the days when the kitchen was the realm of women. A modern man should be self-sufficient enough to feed himself without depending on his better half—or on takeout.

The good news for cooking-challenged dudes is that most anyone who can read and follow basic instructions can cook a fully edible meal. Why not make this the day when you step away from the sideline and join the game!

Cooking is not only a skill that will keep you alive and healthy, it will surely also score you some points with the ladies!

The three keys to cooking success:
1. Read the recipe from beginning to end before you start.
2. Make a time plan by counting backwards from the start time of your meal.
3. Measure out all ingredients in separate bowls/cups.

Get great recipes
I’m just going to come out and say it: Most cookbooks are garbage. They may tell fun stories and feature pictures of celebrities, but it’s not unusual that the recipe measurements are off or ingredients are left out altogether. Instead, search online for recipes by Ina Garten and Alton Brown, or get a cookbook from “America’s Test Kitchen” and you will not be disappointed by the outcome.

The truth about knives
Unlike what you’ll hear on an infomercial on late night TV, you seriously don’t need a lot of tools. Instead, use that money to get a good chef’s knife. An 8-inch Victorinox Fibrox will set you back less than $40 but will do the job better than most 15-knife sets that you’ll pay hundreds for.

Pro tip: Don’t fall for the siren song coming from that hand-forged $500 Burlwood and Damascus steel show piece. It might look good in your kitchen, but it won’t make you a better cook.

What about skillets?
You need two basic skillets; one cast iron and one non-stick. Generally speaking, cast iron is your go-to for browning meats, and a great Lodge brand cast iron skillet will only set you back about $35. The second skillet you need is a basic non-stick pan. You use that for fragile things that may stick in cast iron, such as fried eggs or fish. You can even go for the cheapest for about $20.

Pro tip: Replace your non-stick skillet every year or so because they get scratched up and you don’t want pieces of the coating in your food.

Ingredients matter
Splurge on quality ingredients when you can because they taste better and are better for you. Eggs from a local farm have higher nutrient density than factory-farmed eggs. Wild-caught fish from Alaska tastes better than the sewer-farmed stuff from China. And fresh produce from your neighborhood farmers market can’t be beat by the supermarket greens that were picked weeks ago and likely travelled from across the country—or the world!

Pro tip: If you can’t find local produce, explore the frozen veggie section of your supermarket for flavorful, affordable and long-lasting goodness.

Ok, now you know more about cooking than 90 percent of all home cooks, so let’s put your skills to the test with this easy, flavorful and filling Chicken Pot Pie recipe on the following page.

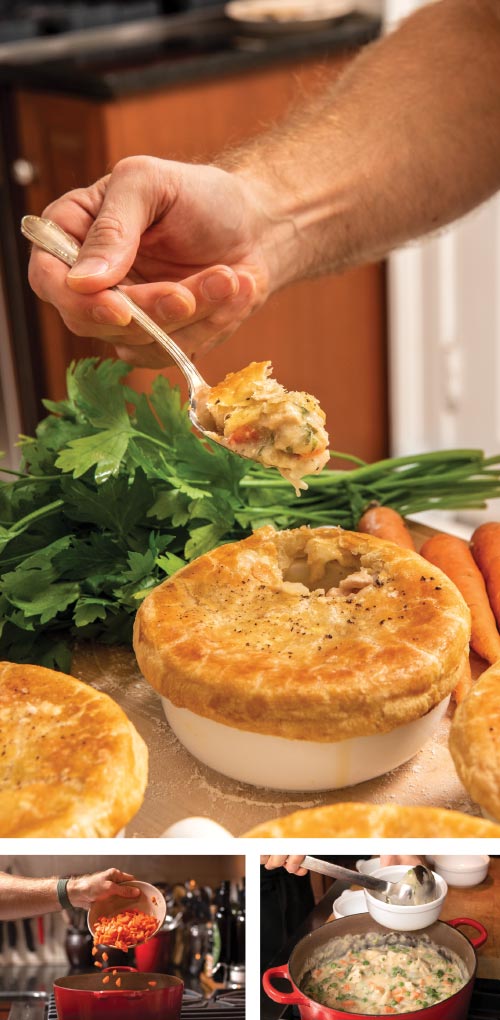
chicken pot pie

Chicken Pot Pie
SERVINGS: Makes 4 individual pot pies

TIME: Takes about 1h 45 min from start to finish
Special equipment: Four oven-safe ramekins, 12-14 oz each

INGREDIENTS:
3 chicken breasts (should make about 3 cups cooked, cubed)
1 sheet of frozen puff pastry, thawed in fridge overnight
1 egg (for egg-wash)
4 cups of chicken stock
1 stick of unsalted butter (that’s 8 tablespoons)
1 large onion (should make about 1.5 cups, chopped)
3/4 cup of all-purpose flour
1/4 cup heavy cream
3 carrots (should make about 1.5 cups, diced)
1.5 cups frozen peas
1.5 cups pearl onions (not critical but great!)
1 bunch parsley (should make 1/2 cup, chopped)
3 teaspoons kosher salt (Diamond Crystal kosher salt is seriously a magic ingredient!)
1 teaspoon black pepper, freshly ground

INSTRUCTIONS:
Preheat oven to 350 degrees. Place chicken breasts on a baking sheet, smooth side up. Rub with olive oil on both sides and sprinkle with a few pinches of salt and pepper. Cook in the middle of the oven until the internal temp reaches 165 degrees, about 30 minutes. Let cool slightly, then dice into half-inch cubes. Set aside.

In a large saucepan, melt the butter over medium heat. Add the chopped onions and cook until translucent, about 5 minutes. Add the flour and stir for about 2 minutes, then add the chicken stock and bring to a simmer. Stir until the stock starts to thicken, then add the salt, pepper, and heavy cream. Add the cubed chicken, carrots, peas, pearl onions and parsley and give everything a good stir to combine. Bring out your four ramekins and fill 90% full with chicken-veg mixture.

Go get your thawed sheet of puff pastry from the fridge. Unfold and place on a slightly floured surface. Using a rolling pin, roll out the dough until the sheet is about 25 percent larger. Cut out four circles, half an inch larger than the top of your ramekins.

In a cup, mix the egg with 1 tablespoon tap water to make an egg wash. Brush the top of each ramekin with the egg wash. Place one dough circle on each ramekin, crimping the edges slightly to seal. Brush the dough with egg wash and cut a few slits in the top to allow steam to escape. Place your pot pies on a baking sheet and cook on middle rack for about an hour or until the top looks golden brown and delicious!


Photos by Ashlee Glen


The Heritage Meal

Humans have been living in the foothills of the Blue Ridge Mountains for thousands of years, yet most of the stories we know about our local heritage tend to begin in the 18th century when a teenager named John Lynch started a small ferry company, helping travelers from local colonies cross the James River.

But what did life look like before Lynchburg grew into a city?

If you were standing at the top of Lynchburg’s Monument Terrace way back then, what would you see? What would you smell? Who would be there? And, most importantly, what would you eat? This story is an imaginary culinary tour of the place we call home.

Meet the Monacans
Picture multiple rows of corn growing as far as the eye could see in the fertile ground on the banks of the James River over by Percival’s Island, almost like a wide fence. Not the large sweet corn variety we are used to today, but a smaller more grass-like ancestor called maize. Vines of beans may have been climbing up the corn stalks and squash plants were growing on the riverside, protected by the wall of corn.

The long, winding garden did not need a fence. Children armed with pebbles would keep rabbits and squirrels away, and if a hungry deer would be foolish enough to approach the crops, it may not have lived long enough to take a bite. The deadly arrow from one of our area’s first permanent inhabitants, the Monacans, would have killed it instantly.

In 1605 when British explorer Captain John Smith surveyed our region for the first map of Virginia, he identified five Monacan villages in the area between Lynchburg and Natural Bridge. As many as 25,000 members of the Monacan tribe called the area home at that time. Sadly, their numbers were decimated when the British settlers arrived, mostly from disease they brought with them. The lands of the Monacans were taken over during those years as well.

Thanks to the Monacans’ skills in making clay pots and building sophisticated woodstoves, you would be smelling a bubbling stew of squash, corn and beans if you lived in the area back then. A bone from a deer helps make a tasty stock, but the meat is from a freshly caught rabbit. The rest of the deer is hanging in the smokehouse for preservation. The stew will be served with a bread made from acorn flour mixed with a little wood ash from the fire—a natural form of baking soda.

West African Influences
Fast forward to the 1730s and the view has changed dramatically. The Monacan lands in the Lynchburg region have been taken over by European (mostly British) settlers, and there are green rows of tobacco growing as far as the eye can see. Stately plantation homes are earning a reputation for their “Southern Hospitality.”

The food you are smelling is being prepared by the plantation’s cook, typically an enslaved black woman who survived the long journey in chains from West Africa. She is literally bound to the fire as she prepares a sweet potato and peanut soup with corn bread in the plantation kitchen. Kitchens often had a dirt floor and an open-flame hearth—and housed the cook’s living quarters.

The first slaves are said to have been brought to Jamestown by the British from West Africa in 1619, although the industrial-scale slave trade came decades later to support plantation farms. We don’t know exactly when the first enslaved Africans were brought to Lynchburg, but considering there was direct access to Jamestown via the James River, they likely came early in the 17th century.

Chef and food historian Michael Twitty in his book The Cooking Gene explains that, “The American plantation wasn’t exactly the quaint village community you saw described in your history textbook. It was a labor camp system for exiled prisoners of war and victims of kidnapping.”

The African cooks brought both skill and taste to America. Black-eyed peas, okra, peanuts, and sweet potatoes were all new flavors they integrated into the fare of European favorites, essentially giving birth to what we today call Southern cooking.

Our Founding Foodie
Founding father Thomas Jefferson may have been known as the “founding foodie” because of his passion for fine foods and drink, but at his retreat home on the Poplar Forest plantation just outside of Lynchburg, the fare was surprisingly simple. When he famously stated that “Lynchburg is the most interesting place in the state,” he probably was not talking about the culinary scene.

Locally grown vegetables with a side of chicken was often served at 3 p.m. as the main meal of the day at Poplar Forest. And although the kitchen garden was the size of a football field, Jefferson complained in letters that his beloved peas didn’t grow well there and all they had was “spinach and scrubby lettuce,” as he put it.
Martha Jefferson inherited the plantation we know as Poplar Forest from her father, and Thomas himself started visiting Lynchburg after his presidential term had ended in 1809. It was much larger than the site we know today, and Jefferson added even more land over time. At one point this tobacco farm stretched all the way to today’s Jefferson Forest High School, or 5,600 acres to be exact.

Jefferson did not have an ice house at Poplar Forest, so his enslaved cook, Hannah, was not able to make his favorite treat, which was ice cream. However, archeologists have found pieces of what appears to be a serving glass for wine jelly at Poplar Forest, another favorite of Jefferson’s. What is wine jelly, you ask? Well, it’s similar in texture to what we call Jell-O today, but it’s made with fortified wine and milk.

Step back in time and taste some of our Virginia heritage recipes, adapted for our modern palates!


sweet potato soup recipe

APPETIZER
West African Peanut & Sweet Potato Soup
This is a family-friendly yet flavorful soup that’s easy to make. For the best result, look for sweet potatoes with red flesh. The peanutty goodness comes from peanut butter and for optimal flavor, go with either fresh ground or “natural” creamy peanut butter.
SERVINGS: 4 to 6

INGREDIENTS:
2 pounds sweet potatoes, peeled and sliced thin
3 tablespoons peanut butter (creamy)
2 tablespoons unsalted butter
1 medium onion, minced
1 teaspoon brown sugar
3 garlic cloves, minced
1/2 teaspoon ground coriander
1/8 teaspoon cayenne pepper
3 cups chicken broth
2 cups water
1 teaspoon salt (and more to taste)
1/4 teaspoon fresh ground black pepper
Serve with fresh cilantro, chopped and a few drops of olive oil

DIRECTIONS:
In a large saucepan, melt the butter over medium heat. Add the minced onion, brown sugar and salt and cook until the onion is starting to turn brown, about
5-6 minutes. Add the garlic, coriander and cayenne and cook for about 30 seconds.

Add the chicken broth, water, peanut butter and sweet potatoes. Bring to a boil over high heat, then cover and turn to low and let cook for 20 minutes or until the sweet potatoes are soft.

Pour the soup into a food processor and blend slowly and carefully until smooth. Return to the saucepan. Ladle into bowls and serve with cilantro and a splash of olive oil.


braised rabbit recipe

MAIN COURSE
Braised Rabbit with Mushrooms
In addition to being farmers, the Monacans knew how to hunt and live off the land. Deer was the most common menu item, but smaller game such as squirrel and rabbit was also common and easy to trap. If you are new to cooking rabbit, this is an easy way to get started. Much like chicken, rabbit doesn’t have a very strong flavor so the key to a good rabbit recipe is to pair it with other flavorful ingredients, in this case the mushrooms and roasted garlic.

Rabbit is available from the Forest Farmers Market (look for Rainbow’s End Farm) as well as from Fresh Market in Lynchburg. However, if you are not in the mood for rabbit, regular chicken (dark meat) works well as a substitute in this recipe.
SERVINGS: 4

INGREDIENTS:
1 rabbit (3-4 pounds)
2 heads of garlic (don’t worry,
it will not taste garlicky!)
1 pound of mixed mushrooms, sliced
1 cup white wine
3 cups chicken stock (or even better, rabbit stock!)
3 large shallots, diced
1 large parsnip, diced large
(sub for carrots if preferred)
2 tablespoons fresh thyme
2 tablespoons fresh parsley
2+2 tablespoons unsalted butter
2 tablespoons olive oil

DIRECTIONS:
Preheat oven to 375 degrees. Cut up the rabbit and season pieces liberally with salt and pepper. Let sit at room temperature for 30 minutes. Be sure to use all parts of the rabbit in the stew; you can fish out ribs and spine before serving but keeping them in during braising since they add valuable flavor.

Slice the top third off the two garlic heads and drizzle with olive oil.

Wrap heads loosely with aluminum foil and bake for about 45 minutes, or until cloves are soft and brown. Set aside to cool.

Add the oil and 2 tablespoons of the butter to a large Dutch oven or saucepan and brown the rabbit pieces on all sides, a few at a time. Take your time to develop proper browning because this is a key step to build flavor in the dish. Remove the rabbit from the pot.

Sautee the onions until translucent. Add the mushrooms and cook until they have released most of their water, about 5-7 minutes. Add the wine and let cook for 2 minutes while scraping the bottom of the pot. Squeeze the soft roasted garlic cloves into the pot and stir to dissolve.

Add back the rabbit and add thyme, parsnip, water and stock to the pot and simmer for 90 minutes, or until the meat is starting to fall off the bone.

Time to thicken the sauce. Carefully fish out all of the rabbit. In a small bowl, melt 2 tablespoons of butter and mix with 2 tablespoons of all-purpose flour. Add the flour paste to the braising liquid and cook for 3-4 minutes over medium heat until the sauce thickens. Add back the rabbit.

Serve on its own or with a side of rice. Sprinkle some chopped parsley on top for garnish and enjoy!


thomas jefferson wine jello recipe

DESSERT
Thomas Jefferson’s Wine Jell-O
This is a modern adaptation of an old recipe for wine jelly, attributed to Thomas Jefferson. It’s a refreshing dessert with a pungent wine flavor and a small serving goes a long way. Keep in mind that since the fortified wine is not boiled, the alcohol is still there—so eat responsibly! Worth noting: This recipe calls for regular gelatin packets from the grocery store, but Jefferson’s cook actually used the hooves from a calf and boiled them to extract the natural gelatin for this dessert.
SERVES: 4

INGREDIENTS:
1 packet of gelatin
3/4 cup fortified wine (Madeira)
1 cup whole milk
1/4 cup water
1 lemon, juiced and strained
3 tablespoons sugar
1 pinch salt

DIRECTIONS:
Soak the gelatin in the water and let sit for 3 minutes. Add the milk to a bowl with a pouring spout, then whisk the gelatin, sugar and salt into the milk until completely dissolved. Add the lemon juice to the wine and then whisk the wine mixture into the milk mixture.
Pour into individual serving glasses, cover with plastic wrap and refrigerate until firm, about 2-3 hours or overnight. Grate a little lemon zest on top and serve!


SPECIAL THANKS: Thank you to the following for their help with this feature: Vicky Ferguson, Sally Latimer and Jennifer Austin from the Monacan Indian Nation; the Stocker family of Rainbow’s End Farm; Dr. Kelley Fanto Deetz, author of Bound to the Fire: How Virginia’s Enslaved Cooks Helped Invent American Cuisine; and Gail Pond, manager of collections at Thomas Jefferson’s Poplar Forest.


The Easiest Homemade Guacamole Recipe Ever

Need to whip up an easy, yet healthy, appetizer? This recipe is for you.

Avocados are an excellent source of healthy fats such as omega-3 fatty acids, which are beneficial to your brain and skin. They are also an excellent source of vitamins C, E, K and B-6, as well as folate, magnesium and potassium. Better yet? Homemade guacamole is a winter-friendly dish. Avocados are typically available year-round, thanks to the hard work of growers in Mexico and parts of South America.

Gluten Free
Paleo | Vegan

Ingredients:
3 avocados, peeled, pitted and diced—dicing gives it a chunkier texture
1 lime, juiced
1 teaspoon sea salt
1 large jalapeño, diced (seeds removed)
1/4 cup of fresh cilantro, chopped
1 teaspoon minced garlic
(or garlic powder)

Directions:

Mix the ingredients together in a bowl (yep, that’s it!) and enjoy with chips or over your favorite tacos or tortilla soup—but do so quickly, because it will go fast!


April Likins lives in Forest and is an Institute for Integrative Nutrition- and Duke Integrative Medicine-trained health coach. Learn more at aprillikins.com.


Next Level Sides

Take everyday dishes up a notch this holiday season
Photos by Jenna McKenney

While very much beloved, those old faithful side dishes can often get the short end of the stick in terms of our creativity. As we prepare to gather around the table with friends or family this time of year, consider spicing up that stuffing or adding a little pizzazz to those mashed potatoes. On the following pages, The Virginian Hotel Catering Team shares four of their tasty favorites.


Cranberry-Apple Cornbread Stuffing

INGREDIENTS:
1/2 cup butter
2 cups celery, chopped
1 yellow onion, chopped
3 medium tart apples, cored and chopped
6 ounces dried cranberries
6 cups dry, unseasoned cornbread cubes
14.5 ounces chicken broth
8 ounces apple juice
1 teaspoon: parsley, rosemary, and thyme, chopped

Directions:
1. Preheat oven to 325°F. Melt butter in a large skillet over medium heat. Add celery and onion. Cook until softened (~5 minutes). Add apple, cranberries, parsley, rosemary, and thyme.
2. Place bread cubes in a large bowl. Add the mixture, broth, and juice. Toss to combine.
3. Place mixture in a greased casserole dish, cover with foil and bake for 15 minutes.
4. Remove foil, bake for 20 more minutes until heated through and lightly browned.


Roasted Butternut Squash Soup
Topped with Toasted Pumpkin Seeds

INGREDIENTS:
One 3 lb butternut squash
(or 4 cups peeled and diced)
2 tablespoons olive oil (or avocado oil)
1-2 shallots, minced
4 cloves garlic, minced
2 teaspoons ginger, freshly grated
1/8 teaspoon cayenne
1 teaspoon nutmeg
Salt to taste
2-3 cups vegetable stock
1 tablespoon brown sugar
1 dash maple syrup
Heavy cream (to finish)
Pumpkin seeds (toasted)

Directions:
1. Preheat oven to 425°F. Slice squash vertically and remove the seeds. Place the halves cut-side down on a parchment-lined baking sheet. Rub the outside with 1 tablespoon of olive oil. Bake for 30 minutes, or until tender.
2. Allow squash to cool. Peel and dice into cubes.
3. In a large stockpot, heat the remaining oil over medium-high heat. Sauté shallots 2-3 minutes. Add the garlic and sauté until lightly browned. Add the nutmeg, salt, ginger, and cayenne. Cook for 1 more minute.
4. Add 2 cups of stock, brown sugar, maple syrup, and squash. Bring to a boil. Cover and reduce heat. Simmer for ~10 minutes (until very tender).
5. Puree with a stick blender, traditional blender, or food processor. Add heavy cream to reach desired consistency. (Use the remaining stock to thin if necessary.)
6. Top with toasted pumpkin seeds, if desired.


Smoked Gouda Mashed Potatoes

INGREDIENTS:
5 lbs Russet potatoes, peeled
and cubed
1 lb butter
1 pint heavy cream
1 pint half and half
1/2 lb smoked gouda, shredded
2 teaspoons white pepper
1 teaspoon smoked paprika
Dash of cayenne pepper
Salt, pepper, & garlic powder to taste

Directions:
1. Peel and dice the potatoes. Boil or steam until fork-tender.
2. In a separate pot, melt butter, add half and half and heavy cream. Mix in cayenne and paprika.
3. Mix in shredded cheese until melted and smooth.
4. Mash the potatoes in a large bowl. Pour in gouda mixture in small batches, mixing until absorbed.
5. Season with white pepper, salt, pepper, and garlic powder to taste. There should be a strong smoky and garlic flavor.


Roasted & Stuffed Delicata Squash

INGREDIENTS:
6 small delicata squash
(~1lb each)
4 tablespoons unsalted butter
2 medium onions, diced
1 bunch of red kale (~1lb), trimmed and chopped
6 ounces whole-grain bread, cut into 3/4-inch cubes (~3 cups)
1/2 cup crumbled bleu cheese
1/2 cup dried cranberries
1/2 cup pecans, rough chop
2 tablespoons maple syrup
2 tablespoons chopped parsley for garnish

Directions:
1. Heat oven to 425°F. Cut one inch off of the top and bottom of the squash. Scrape out the seeds. Sprinkle the inside with salt and pepper and stand upright on an oiled baking sheet.
2. In a large saucepan melt 2 tablespoons of butter over medium heat. When the butter begins to foam add onions and sauté until softened and translucent (~6-8 minutes). Add kale and continue to cook, tossing until kale begins to wilt (~5 minutes). Remove from heat and place in a large bowl.
3. Toast bread cubes on a sheet pan until they begin to crisp (~7-9 minutes). Add to the bowl with the vegetable mixture, then add bleu cheese and cranberries. Mix until combined.
4. Put pecans over medium heat in a dry sauté pan. Heat and toast nuts until they become fragrant (~4-6 minutes). Add syrup and cook for 1 minute, scrape into the veggie mixture and stir to combine. Taste and season the mixture.
5. Lower oven to 400°F. Divide the mixture between the squash. Cut the remaining butter into 6 pieces and top each squash. Roast for ~45 minutes (until the skin of the squash is tender and easily pierced with a fork).
6. Slice stuffed squash into one-inch rings to serve.
7. Sprinkle with parsley.


Next Level Sides

Take everyday dishes up a notch this holiday season
Photos by Jenna McKenney

While very much beloved, those old faithful side dishes can often get the short end of the stick in terms of our creativity. As we prepare to gather around the table with friends or family this time of year, consider spicing up that stuffing or adding a little pizzazz to those mashed potatoes. On the following pages, The Virginian Hotel Catering Team shares four of their tasty favorites.


Cranberry-Apple Cornbread Stuffing

INGREDIENTS:
1/2 cup butter
2 cups celery, chopped
1 yellow onion, chopped
3 medium tart apples, cored and chopped
6 ounces dried cranberries
6 cups dry, unseasoned cornbread cubes
14.5 ounces chicken broth
8 ounces apple juice
1 teaspoon: parsley, rosemary, and thyme, chopped

Directions:
1. Preheat oven to 325°F. Melt butter in a large skillet over medium heat. Add celery and onion. Cook until softened (~5 minutes). Add apple, cranberries, parsley, rosemary, and thyme.
2. Place bread cubes in a large bowl. Add the mixture, broth, and juice. Toss to combine.
3. Place mixture in a greased casserole dish, cover with foil and bake for 15 minutes.
4. Remove foil, bake for 20 more minutes until heated through and lightly browned.


Roasted Butternut Squash Soup
Topped with Toasted Pumpkin Seeds

INGREDIENTS:
One 3 lb butternut squash
(or 4 cups peeled and diced)
2 tablespoons olive oil (or avocado oil)
1-2 shallots, minced
4 cloves garlic, minced
2 teaspoons ginger, freshly grated
1/8 teaspoon cayenne
1 teaspoon nutmeg
Salt to taste
2-3 cups vegetable stock
1 tablespoon brown sugar
1 dash maple syrup
Heavy cream (to finish)
Pumpkin seeds (toasted)

Directions:
1. Preheat oven to 425°F. Slice squash vertically and remove the seeds. Place the halves cut-side down on a parchment-lined baking sheet. Rub the outside with 1 tablespoon of olive oil. Bake for 30 minutes, or until tender.
2. Allow squash to cool. Peel and dice into cubes.
3. In a large stockpot, heat the remaining oil over medium-high heat. Sauté shallots 2-3 minutes. Add the garlic and sauté until lightly browned. Add the nutmeg, salt, ginger, and cayenne. Cook for 1 more minute.
4. Add 2 cups of stock, brown sugar, maple syrup, and squash. Bring to a boil. Cover and reduce heat. Simmer for ~10 minutes (until very tender).
5. Puree with a stick blender, traditional blender, or food processor. Add heavy cream to reach desired consistency. (Use the remaining stock to thin if necessary.)
6. Top with toasted pumpkin seeds, if desired.


Smoked Gouda Mashed Potatoes

INGREDIENTS:
5 lbs Russet potatoes, peeled
and cubed
1 lb butter
1 pint heavy cream
1 pint half and half
1/2 lb smoked gouda, shredded
2 teaspoons white pepper
1 teaspoon smoked paprika
Dash of cayenne pepper
Salt, pepper, & garlic powder to taste

Directions:
1. Peel and dice the potatoes. Boil or steam until fork-tender.
2. In a separate pot, melt butter, add half and half and heavy cream. Mix in cayenne and paprika.
3. Mix in shredded cheese until melted and smooth.
4. Mash the potatoes in a large bowl. Pour in gouda mixture in small batches, mixing until absorbed.
5. Season with white pepper, salt, pepper, and garlic powder to taste. There should be a strong smoky and garlic flavor.


Roasted & Stuffed Delicata Squash

INGREDIENTS:
6 small delicata squash
(~1lb each)
4 tablespoons unsalted butter
2 medium onions, diced
1 bunch of red kale (~1lb), trimmed and chopped
6 ounces whole-grain bread, cut into 3/4-inch cubes (~3 cups)
1/2 cup crumbled bleu cheese
1/2 cup dried cranberries
1/2 cup pecans, rough chop
2 tablespoons maple syrup
2 tablespoons chopped parsley for garnish

Directions:
1. Heat oven to 425°F. Cut one inch off of the top and bottom of the squash. Scrape out the seeds. Sprinkle the inside with salt and pepper and stand upright on an oiled baking sheet.
2. In a large saucepan melt 2 tablespoons of butter over medium heat. When the butter begins to foam add onions and sauté until softened and translucent (~6-8 minutes). Add kale and continue to cook, tossing until kale begins to wilt (~5 minutes). Remove from heat and place in a large bowl.
3. Toast bread cubes on a sheet pan until they begin to crisp (~7-9 minutes). Add to the bowl with the vegetable mixture, then add bleu cheese and cranberries. Mix until combined.
4. Put pecans over medium heat in a dry sauté pan. Heat and toast nuts until they become fragrant (~4-6 minutes). Add syrup and cook for 1 minute, scrape into the veggie mixture and stir to combine. Taste and season the mixture.
5. Lower oven to 400°F. Divide the mixture between the squash. Cut the remaining butter into 6 pieces and top each squash. Roast for ~45 minutes (until the skin of the squash is tender and easily pierced with a fork).
6. Slice stuffed squash into one-inch rings to serve.
7. Sprinkle with parsley.


Healing Vegetable & Beef Soup

If you’re feeling under the weather or are looking for a healing anti-inflammatory soup, you’ll love this recipe! It’s packed with garlic, which is anti-inflammatory, full of antioxidants and vitamins, and it acts like a natural antibiotic.

Turmeric is a powerful antioxidant best known for fighting inflammation. According to Anya Guy, a Mayo Clinic dietitian, “Turmeric has natural anti-inflammatory compounds called curcuminoids, and these curcuminoids have been associated with a positive effect on various diseases.” Onions are rich in antioxidants, in particular quercetin, which is a powerful anti-inflammatory compound that helps your body fight free radical damage. Onions also support your digestion because they are rich in inulin, a prebiotic-like fiber.

Gluten Free | Paleo | Anti-Inflammatory | Low Histamine | Low Oxilates

Ingredients:

1 lb of ground grass-fed beef
(or shredded hormone/antibiotic-free chicken)
8 cups of bone broth
1-2 cups each of chopped carrots and celery
1 large onion, chopped
2 cloves of garlic, diced
1 tbsp Herbs de Provence
1/2 tbsp salt
1/2 tsp white pepper
1/2 tbsp onion powder
1 tbsp garlic powder
1 tbsp basil
1/2 tsp sage
1/2 tsp turmeric

Directions:
If you’re adding protein, sear the beef until brown and add all ingredients to a soup pot or crockpot. I prefer to put all the ingredients in a crockpot for 6-10 hours on low for a richer flavor.

This recipe can also be done in an Instant Pot on the soup setting on high for about 10 minutes or in a stockpot on the stove for 15-20 minutes.


April Likins lives in Forest and is an Institute for Integrative Nutrition- and Duke Integrative Medicine-trained health coach. Learn more at aprillikins.com.


Camp Cuisine

FOR “FOREST FOODIES”
photos by Ashlee Glen

What’s on the menu when you go camping? Are you content with a bucket of cold KFC for breakfast, lunch and dinner? Or do you prefer vacuum-packed, dehydrated veggies for an ultra-light soup? I’ve tried both extremes and honestly, the best option in my view is somewhere in-between. I like to make REAL nutritious food but without fussy recipes, perishable ingredients or a need for too much equipment.

Here are some of my favorites that you can try next time the woods are calling and you must go, whether it’s over a backyard campfire or on a backwoods trail.


Campfire Nachos
Nachos roasted over an open fire are simply delicious! They turn super crispy and take on a smoky, wonderful flavor that can’t be beat.

This dish is geared more toward the “backyard camper” than the thru-hiker because you’ll need a cast iron skillet. Plus, nacho chips tend to turn into nacho crumbs in a backpack, right?

The key to success is to wait until your campfire has died down enough that it will not burn the chips before the cheese has melted. If you do that, you’ll be amazed how special this surprising campfire treat can be!

Equipment:
Cast iron skillet
Aluminum foil

INGREDIENTS:
Corn chips, about half a bag
1 1/2 cups cheese, grated
(cheddar or Monterey Jack is safe up
to 12 hours without refrigeration)
1 tomato, diced
1/2 cup black olives
(Kalamata tastes best), sliced
1/2 cup cilantro, chopped
1/2 cup spring onions, sliced thin
1 jalapeño, diced (optional)
Sour cream, for serving
(optional; requires refrigeration)

Directions:
After your campfire has started dying down (embers only), position two flat stones on opposite sides of the fire so the skillet (or grate, if using) can balance over the embers. Prep the nachos by adding half of the chips to the skillet and sprinkle over 1/3 of the cheese. Avoid cheese falling to the bottom because it tends to burn. Add the second layer of chips and sprinkle tomato, olives, onions and cheese and cover with aluminum foil.

Cook over fire for about 10 minutes or until the cheese has melted. Keep checking under the foil because temperature is unpredictable! Serve with a few dollops of sour cream and plenty of cilantro!


Penne Alla Backwoods

This is our go-to meal for longer hikes because it’s tasty, filling and fast! It’s also reasonably lightweight and portable. The key to bringing prepared pasta sauce is to transfer it to a leak/crush-proof plastic container. Most camping stores sell Nalgene food jars and they are great. The jars only cost a couple of dollars and last forever.

Equipment:
Hiking stove

For two hungry hikers:
Penne Rigate, three servings Water, in bottle or filtered from stream Alfredo sauce, one jar. My favorite brand is Newman’s Own. Fresh parsley, chopped or torn Salt/pepper, to taste

Directions:
Well, there’s not much needed in terms of instructions for this meal! Set up your camp stove, boil the pasta and drain off the water. Add the sauce, sprinkle with parsley, season with salt and pepper to taste, and serve! By the way, bringing fresh parsley and fresh ground pepper with you is easy and totally worth it.

Pro tips:
Bring a glass of wine to make this meal even more special! Most grocery stores sell very packable “juice-box” wines, and some are surprisingly good!


Overnight Oats
Few foods fill up and sustain like oatmeal. This recipe is a great option for hiking since it doesn’t require you to fire up your stove like regular oatmeal, but will fuel you for a long day of hiking. Just be sure to soak the oats in water, rather than dairy, to avoid any health concerns. Adding some peanut butter creates the same creaminess!

Two servings:
1 cup rolled oats
1 cup water
1/2 cup berries, dried fruits and/or seeds
Salt, a pinch
Peanut butter, one single serve container

Directions:
Mix all dry ingredients and water in a container that can be sealed tight enough to keep bugs out and leave overnight. Next morning, stir in fresh berries and peanut butter, if using it.


Trail Mix Balls
Trail mix (or granola bars!) is fantastic pocket-fuel for the journey, and it could not be easier to make. Mix some raisins, nuts and chocolate chips in a bag, and you have the carbs and fat you need on the trail.

This recipe for trail mix balls ups the ante a couple of notches, with fancier ingredients and upgraded presentation. Great for the “backyard camp” or paid campsite, but perhaps not ideal for the overnight hiker since they get sticky after a while.

Core ingredients:
1 cup rolled oats, old fashioned
1/2 cup peanut butter
1/4 cup honey
A pinch of salt
1 tsp vanilla extract
For rolling: sesame seeds, cocoa

Mix-ins of your choice
(should total 1 cup):

1/2 cup of seeds, such as flax, chia, pumpkin, sesame
1/2 cup of dried fruits, such as raisins, cranberries, dates, apricots or mangos

Directions:
Make ahead and mix all core ingredients, plus any mix-ins, in a food processor for about 30 seconds, then scoop and shape. Roll each with the sesame seed or cocoa coating—or, if you prefer, dip them in chocolate! These Trail Mix Balls stay good for two weeks if stored in an airtight container in the refrigerator. You can even freeze them for up to 3 months so they are ready when you go for that camping excursion.


“Baklad”
Baked Bananas with Chocolate

This was a favorite hiking dessert among me and my scout friends when growing up in Sweden. The name, “Baklad,” comes from combining the names of the two ingredients; banana and chocolate. It’s the perfect dessert after your camp dinner and essentially makes itself.

How’s this for easy:
3 bananas
1/2 cup chocolate chips (chips are less likely to melt during transport)
Aluminum foil, for roasting over the fire

Directions:
With a knife, slit the “inner curve” of a banana from top to bottom, about 3/4-inch deep. Push as many chocolate chips into the slit as you can. Wrap in foil and place in the outer edge of the burning-out fire. Bake until very soft, up to 30 minutes if your fire has died down a lot, and eat with a spoon!


LET’S MAKE A BABY!

SIMPLE AND ENDLESSLY VERSATILE, THIS RECIPE COULD BE THE MAIN ATTRACTION OF A STRESS-FREE WEEKNIGHT DINNER PARTY

PHOTOGRAPHY BY RJ GOODWIN

The best parties are the fun ones—the ones you leave with a smile on your face. But if you are the host, there can sometimes be too much to do to enjoy your own event. Take heed—these three tips for stress-free party planning will help you relax and enjoy the night:

1. Weeknight over weekend. Everyone’s weekends are so busy that scheduling becomes a nightmare. Why not pick a weeknight when more of your guests are available? Since nobody expects you to take the day off to cook and clean, expectations are automatically lower, and by having people over on a weeknight, they tend to say goodnight faster.

2. Keep the guest list small. The best parties are often the smaller ones, giving you a chance to have more interesting conversations and get to know your friends on a closer level. Inviting 4-6 guests is a good number for that, without too much work involved.

3. Cook only one thing. It’s tempting to try too hard and attempt more dishes than you should. Keep the menu simple, but make things festive by serving in nice dishes. Plan to make only one thing yourself and assemble the rest. For instance, the recipe below for a savory Dutch Baby makes for a fun, dramatic (but quick) main course. Serve with a Spinach-Strawberry salad and some good ice cream with store-bought pound cake for dessert and you have a party!

Dutch Baby
Makes 4-6 servings per “baby”
Prep time: 20 min
Total time: 45 min

INGREDIENTS
3 extra large eggs
3/4 cup whole milk
2+1 tablespoons unsalted butter, melted
1/2 cup all-purpose flour (I use King Arthur brand)
2 tablespoons cornstarch
3/4 teaspoon kosher salt
1/2 teaspoon black pepper, freshly ground

RECIPE PREPARATION
Place a 12” cast iron skillet in the oven and heat to 450 degrees. Let skillet heat up for 20 minutes while you prepare the batter.

In a regular blender, blend eggs until frothy, about 30 seconds. Add milk and 2 tablespoons of the melted butter and blend for another 10 seconds. Add flour, cornstarch, salt, and pepper and blend just to combine.

Remove the skillet from oven and carefully pour remaining 1 tablespoon of butter into it and swirl quickly to coat. Before the butter burns, pour the blender-batter into the skillet. Bake until settled in the middle and puffy and brown around the edges. Don’t worry if one side is taller than the other; that’s part of the fun (and it will sink down, somewhat).

TOPPING IDEAS
A Dutch Baby lends itself equally well to both savory and sweet toppings without changes to the recipe. It’s a blank canvas for being creative! Here are some of my favorites:

• Mascarpone, berries and powdered sugar (great, make-ahead dessert!)

• Mozzarella, pepperoni and basil (add topping and then bake under broiler for a few minutes to melt cheese)

• Thinly sliced gravlax, sour cream and dill (trust me, it’s delicious!)

• Sautéed kale, crispy bacon, and shaved Parmesan (I like green curly kale because it’s very mild)


Double Chocolate Cake

I have probably made this recipe over 100 times and it is my favorite cake in the world. The unique thing is that it calls for oil instead of butter, which makes for a more soft and moist cake. Recently I made a couple of minor tweaks (slightly less leavening and lower temp) that made it even better because it now bakes more evenly.

OVERVIEW
Total: 1 hr 35 min
Prep: 30 min
Inactive: 30 min
Cook: 35 min
Yield: 12 servings

INGREDIENTS – CAKE
Cooking spray, for greasing the pan
1 3/4 cups all-purpose flour
2 cups sugar
3/4 cups cocoa powder (love Hershey’s Special Dark!)
1 3/4 teaspoon baking soda
3/4 teaspoon baking powder
1 teaspoon salt (Diamond Crystal Kosher)
1 cup full fat buttermilk, shaken
1/2 cup vegetable oil (Canola is ok but Avocado oil is better for you)
2 large eggs
1 teaspoon vanilla extract
1 cup hot brewed coffee

INGREDIENTS – ICING
6 oz semisweet chocolate (Ghirardelli bar is great)
2 sticks unsalted butter (like Kerrigold) at room temp
1 large egg yolk
1 teaspoon vanilla extract
1 1/4 confectioners sugar, sifted

INSTRUCTIONS – CAKE
Preheat the oven to 325 degrees. Grease two round 9” pans with cooking spray and line the bottom with rounds of parchment paper. Sift together flour, sugar, cocoa, baking soda, baking powder and salt by pushing through a fine mesh sieve with a spoon (to avoid lumps). Add flour mixture to the bowl of a stand mixer fitted with a paddle attachment.

In a second bowl, combine buttermilk, oil, eggs and vanilla; whisk to combine. With the mixer on low, add the wet ingredients into the dry ingredients and mix to combine, about 15 seconds. Add the hot coffee and mix until just combined.

Divide batter between pans and bake until a toothpick comes out clean, or about 35 minutes. Let cool for 10 minutes before using a butter knife to release cake from side, then turn out on cooling racks.

INSTRUCTIONS – ICING
Chop chocolate and melt in heatproof bowl over simmering water. When smooth, set aside to let cool.

In the bowl of an electric mixer fitted with a paddle attachment, beat the butter until it gets lighter in color, about 3 minutes. Add the egg yolk and vanilla and beat for another 2 minutes.

With the mixer on low, add the confectioners sugar—1/2 cup at a time (to avoid making a mess). Keep adding until fully incorporated. Spread icing immediately over cooled cake.