Profiteroles

Light and delicate choux pastry puffs filled with ice cream and covered with warm chocolate sauce. This dessert presents well with its height. You can also work on your presentation skills when drizzling the chocolate sauce.

Ingredients
1 cup water
1/2 cup butter
1/4 teaspoon salt
1 cup all-purpose flour
4 eggs
Ice cream flavor of your choice
1 cup heavy cream
9 oz. semisweet chocolate, chopped

Instructions
Preheat oven to 425 degrees. Line a baking sheet with parchment paper.

Bring water to a boil in a saucepan. Stir in butter and salt until butter has melted; reduce heat to low. Vigorously stir in flour until no dry lumps remain and mixture leaves the sides of the pan and begins to form a stiff ball. Take off heat and stir in the eggs, one at a time, adding the next egg only after the last one has been completely incorporated. Drop the profiterole paste onto the prepared baking sheet in evenly spaced dollops.

Bake in preheated oven until pastries have puffed up and turned golden brown (25 to 30 minutes). Remove from baking sheet and cool on a wire rack to room temperature.

Bring 1 cup of heavy cream to a simmer in a small saucepan over medium heat. Remove from heat and stir in chocolate until melted and smooth.

To assemble, slice the puff (not all the way through), and scoop in ice cream. Place the filled profiteroles onto individual serving plates and top with the warm sauce.


Summer Fun Guide 2019

Enjoy every moment!


The Buzz May/June 2019

BEHIND THE SCENES

Two cameras, three lights, one stepladder… even a teenager—it takes a lot of equipment and teamwork to pull off a successful food photo shoot in Lynchburg Living.

Photographer Ashlee Glen, her daughter Tyne and editor Shelley Basinger descended upon Central Virginia Community College’s culinary department in March. Program director Mena Hughes was highly organized and prepared most of the three dishes ahead of time. Ashlee took action shots as Mena assembled each plate.

Ashlee also took the extra step of carrying each dish to the atrium nearby to shoot the dishes in natural light. She learned even her trusty stepladder wasn’t quite high enough so she braved a bar stool to get the perfect angle.

See how the photo shoot turned out in our Taste department on page 78 as well as our This City department on page 35.


BEHIND THE COVER

The cover of the Food Issue was a team effort: Art Director Chris Meligonis made the pie and the accompanying crust words on top, as well as styled the shoot. Angela Blue, wearing a bright summer dress, held the pie while Dave Uhrin took photos in direct sun.

Black & Blueberry Pie
Recipe from the Kitchen of Mena Hughes, Program Director of Central Virginia Community College’s Culinary Department

Ingredients
2 1/2 cups all-purpose flour, plus more for dusting
1/2 cup plus 2 tablespoons sugar
1 1/2 teaspoons kosher salt
2 sticks chilled unsalted butter,
cut into 1/2 inch cubes
4 cups blackberries
2 cups blueberries
3 tablespoons Minute Tapioca pearls
1 egg, lightly beaten

Directions
For the dough: In the bowl of a food processor, combine the flour, 2 tablespoons sugar, 1 teaspoon salt, and the butter. Pulse until the butter forms pea-sized crumbles. Pour in 1/4 cup ice cold water and pulse briefly until dough begins to clump. Scrape the dough onto a work surface, kneed until it just comes together, and mold into a ball. Half the dough and shape each half into a half-inch thick disc. Wrap each disc separately in plastic wrap and refrigerate for 1 hour. (You could also purchase pie dough discs from the grocery store. You will need 2, one for the bottom and one for the top.)

For the filling: In a large bowl, toss the blackberries and blueberries with the remaining 1/2 cup sugar, 1/2 teaspoon salt and the tapioca pearls until evenly combined. Let stand for 20 minutes.

Heat the oven to 400 degrees. On a lightly floured work surface, roll one dough disc into a 14-inch circle and fit it into a 10-inch glass pie dish. Stir the berries to redistribute the juices and the sugar, then scrape into the pie dish. Roll the second dough discs into a 12-inch circle and place over the berries. Trim, seal, and crimp the edges of the dough and cut four slits in the top. Brush the dough all over with the beaten egg.

Place the pie on a parchment paper–lined baking sheet and bake until the crust begins to turn light golden brown, about 15 minutes. Reduce the oven temperature to 325 degrees and continue baking until the berries are bubbling and the crust is golden brown, about 45 minutes. Let the pie cool before serving. Serve with ice cream or a dollop of whipped cream!


The Perfect Plate

A Local Pro Shares Food Presentation Tips that Will Please the Pupils and the Palate

ne of the best parts about going out to a nice restaurant—aside from the fact that you just get to sit there and relax while your meal is prepared—is the way the dish looks when it slides in front of you.

Let’s be honest—we’ve all drooled a little bit.

“Whether you’re at a restaurant or a home dinner party, you want that ‘wow’ factor,” says Mena Hughes, Culinary Arts Program Director at Central Virginia Community College (CVCC). “What I tell my students is we all visualize our meal before we taste it, so plate presentation is very important.”

It’s so important that Hughes incorporates lessons about presentation into her curriculum. She wants to make sure students know how to make meals that taste good… and look good, too. (You can find out more about CVCC’s Culinary Arts Program in our This City department on page 35.)

For those of you who want to step up your game at your next dinner party, we asked Mena to share a few of her top tricks, along with three tasty recipes that will be sure to impress your friends and family.

Prepping
For those who dream about carrying out fancy, impressive dishes to their guests, organization is crucial. “There are a lot of extra details involved when plating special dinners. I would suggest you write down everything you want to do and when you should do it,” Mena says. Translation: You don’t want to have hungry guests standing around while you slice up sprigs of green onion for a garnish—it needs to be ready to go when the food is hot.

When planning your meal, consider foods with different colors and textures, Mena says. “If you decide to have grilled chicken, mashed potatoes and cabbage, that’s pretty blah,” she explains. Try carrots and something green to go along with your chicken instead.

To make the colors of your food really pop, Mena suggests staying neutral with your plate color. “White plates are a great canvas,” she says. But “go crazy” with the shape. To add some interest to the table, consider incorporating square or even rectangular plates into your cupboard.

Use a round plate for the main course and other shapes for salad and dessert.

There are also some tools you can have on hand to make adding those little “extras” much easier. Toothpicks help with larger garnishes. A piping bag can assist you when embellishing desserts. (If you don’t have one, a Ziploc bag with the tip cut off works just fine.) A plastic squeeze bottle can be used—and reused—for drizzling chocolate or fruit sauces. Mena also uses a pastry brush from time to time to brush sauces onto the plate. (Learn more under Accessorizing.)

Assembling
Unless you have a very picky eater, Mena says you want all of your main course ingredients to be very close to, if not touching, each other. “A lot of people make the mistake of spreading it all out,” Mena says. “But it’s much more pleasing to the eye have everything arranged on the plate closely together.”

For example, start by spreading out your sauce or puree, put your protein down on top, and then make sure your veggie or starch is close to or leaning up against your protein. Layering your food items also adds some height to the plate, which you want to do. “Visually interesting dishes are taller,” Mena says.

Choosing the right ingredients will help you add height to your meal. For example, Mena says a chopped salad presents well since it’s taller. She also likes a Mesclun mix because you can make it fluffier.

Accessorizing
Another way to add height to your dish is to use fresh herbs as a garnish. “If you have some parsley or any kind of greenery that complements your dish, place a sprig of that on top of your protein or even your vegetable,” she says. “Fresh herbs just make the plate look finished.”

For those dishes that taste amazing but just don’t look as appealing (think: boeuf bourguignon) herbs can add a pop of color that those plates need. With boeuf bourguignon, adding a dollop of sour cream on top can give the dish a focal point.

Then, sprinkle some herbs on top of the sour cream for an added pop of color.


CHEF’S TIPS: Accessorizing

Keep in mind that less is more. “You don’t want to overdo it. Because then the extras take away from the main event,” Mena says. “You want your guests to be able to see what you made!”

Here are a few more ideas:
Use a pastry brush to swipe sauce onto your plate so that it’s thick on one end and thinner on the other. Then lay your protein on top of the sauce. Mena says it’s subtle but adds visual interest to the plate.

If you are making pies and have a little leftover dough, use it to make shapes, such as leaves, and add them to the top of the pastry with egg wash.
After using a squeeze bottle to drizzle chocolate sauce on a dessert, take a toothpick and run it through the sauce that’s on the plate. Have some fun making shapes or designs.

When dressing up a salad, use your veggie peeler to peel cucumbers into long curly ques. This same technique can be used with carrots.
Consider pulling one of the main ingredients from a dish to use as a garnish. For example, use a toothpick to add a whole shrimp and some herbs on top of jambalaya.


French Onion Tart
By cutting onions into half moons and layering them with cheese and herbs, your guests will be impressed by the effort you put into this tasty tart.

Ingredients
Pastry
Puff pastry sheets, store bought

Onion Topping
1 cup gruyere cheese, shredded (4 oz.)
1 1/2 teaspoons fresh thyme, minced
2 teaspoons fresh chives, minced
1/4 lbs. sweet onions peeled, halved, and very thinly sliced into half moons (keep the moons intact, about 3 medium onions)
1 tablespoon heavy cream
3 tablespoons unsalted butter, diced
1 teaspoon kosher salt

Instructions
Preheat oven to 400 degrees and line a sheet pan with parchment paper.

Roll the dough between two sheets of lightly floured wax paper, slightly larger than 10 x 14 inches. Using a ruler and a small knife, trim the edges. Place the dough on the prepared sheet pan and refrigerate while you prepare the onions.

Sprinkle the rolled pastry with the cheese right to the edges.

Sprinkle with thyme and chives.

Place the onion half moons on the pastry in diagonal lines, just barely overlapping and brush lightly with cream.

Dot with butter and sprinkle with salt.

Bake for 40 minutes or until the tart is golden and browned. Cover the edges with foil if the tart is getting too brown during baking.

Let cool slightly and cut into squares to serve. Serve warm or at room temperature.


2019 Photos and Videos

Videos


2019 Lynchburg Living Garden Feature

Herbal Expertise
A guide to growing your favorite flavorful plants

Herbs have been part of our kitchens and medicine chests since medieval times, when herbal wisdom was abundant in every community and home. Today the appreciation for herbs is rising again.

Herbs are wonderful additions to a landscape—rubbing your hand across rosemary or lavender as you walk by gives a momentary lift to your spirits. Adding herbs to a meal stimulates your digestive system and your appetite preparing you to eat. Herbs also provide a nutritional boost with the vitamins they contain.

Best of all—growing them requires very little effort.

Choosing the Right Spot

The first order of business is deciding where to plant your herbs. They need about five hours of sunlight a day to be their best. If they don’t get enough sun, they get long stalks and few leaves. This makes for an unattractive, unproductive plant.

Also, don’t plant your herbs in a windy environment. Planting near a brick or stone wall can provide both protection and a warm environment for your kitchen herbs. A spot between your driveway and sidewalk could be used for a wonderful raised kitchen garden. Alternatively, you could lay stone paths through the area and let herbs grow over them.

Helping Your Herbs Thrive

The next step to having a successful herb garden is making sure you’re using the right soil. If you don’t know what type of soil you have, you can do a simple test in a mason jar with a twist-on lid. Fill the jar halfway with soil then add water until the jar is full. Shake the jar well. If the water is distributed through the soil or leaves about a third of the water undistributed, it is acceptable. (You can see photos of the Mason Jar Soil Test online.) If needed, you can amend your soil with compost and/or sand to improve the texture.

Basil, chervil, coriander, dill, lovage and sage prefer rich, balanced soils. Sandier soils are preferred by lavender, thyme, tarragon and rosemary. Cultivation information can be found on seed packages, plant tags or from the nurserymen where you are purchasing. It is assumed that most herbs thrive in hot sun with well-draining soil. But some, like lemon balm, parsley and chamomile, need conditions to be a little bit cooler so they don’t wilt in the afternoon sun. The more you know about your plants’ growing conditions and habits, the more successful you’ll be.

Some herbs, such as mint and oregano, spread and get messy over time. You can contain them by planting these herbs in a grid pattern with pavers. Separating them like this also gives you a way to walk through for harvesting.

Herbs like to dry out between watering—none of them want to have wet feet constantly. To be sure it’s time to water again you can stick your index finger in the soil about an inch deep. If it’s dry, water. If it’s damp, wait.

Growing in Pots

One idea for those with limited space is to grow herbs in pots. This will allow you to give your herbs exactly what they need.

When choosing a pot, it is best if it drains into a saucer and is at least 6 inches in diameter. If you want to grow parsley or basil, your pot should be around 20 inches deep because they have long taproots. If your pots don’t have drainage holes, add a layer of stones or clay shards at least two inches deep in the bottom of the pot before planting. If you are buying your herbs from a nursery, make sure you buy, or have on hand, a pot that is twice as big as the pot you purchased them in. Re-pot your herbs quickly in the appropriate soil and give their roots plenty of room. It is better to have your pot too large rather than too small.

You can always combine herbs that require the same conditions in larger pots to simplify. Window boxes are also great choices for growing herbs. Watch for dry soil—potted plants need more water than those planted in the ground.

Herbs in the Off Season

Thyme, rosemary and lavender plants all do fairly well for me overwintering outside. If it’s mild, I sometimes will find mint and oregano still growing near the warm stone wall in my raised bed. What a treat to have fresh mint in hot tea on a cold day!

Other herbs such as parsley and basil will hang on by a thread until spring after I move them inside for the winter. Herbs should be ignored when brought in—give them only the minimum amount of water. For the best chance of survival, move these herbs out to your covered porch when temperatures are mild.

To overwinter your larger pots of herbs, pull them up close to your house and cover with mulch or wrap.

Harvesting and Storing Your Herbs

You can enjoy your herbs even after the growing season by planning ahead. Begin storing your herbs at their peak. And don’t rush. If done incorrectly, your herbs will quickly spoil. Here are a few harvesting tips:

• Their flavor is best when harvested on a dry day after the dew has evaporated and before the sun is hot. Also, keep your herbs from producing flowers, which ruins the taste, by pinching them back.

• Most herbs can be dried by hanging small bunches in a dry room out of the sun. Once they are brittle, you can run your fingers down the stem and store the leaves in a jar with a tight lid.

• Basil, dill and fennel can be frozen on the stalk when they are picked young, small and in perfect shape. Wash them and let them dry. Lay them on a towel on a cookie sheet, flash freeze and store in a freezer container. Fresh dill can be stored in a fridge for two weeks or more in a little water.

• Flowers like borage and calendula can be clipped off the plant leaving no stem and dried on a cookie cooling rack until they feel like tissue paper to the touch. These are also best stored in jars.

Place your herb jars out of direct sunlight to prolong freshness. Your herbs will store well for a year.

All of my favorite herbs are easily started from seeds so don’t be afraid of trying different herbs that can take you on a culinary journey! When you have grown your herbs yourself, you know they are fresh, pesticide-free and have optimal flavor.

My Favorite Performers
Check out a few of the herbs
I love to use in my kitchen.

• Lovage is a striking, perennial herb that tastes like celery. It can grow up to 6 feet tall!

• Rosemary is beautiful and hardy here when planted in a warm spot. It’s a very aromatic herb and it makes a great addition to poultry. It’s a food source for bees when flowering.
You can start new plants easily from cuttings or layering branches.

• Basils can add endless flavors to foods and vinegars because there are so many varieties to grow.

• Dill is beautiful, easy and like most herbs also draws beneficial insects. Keep the blooms “pinched back” to get the most production.

• Parsley adds a nice touch to salads. It will keep in a vase of water by your sink as you use it.


Caring for Cut Flowers
Before bringing those lovely blooms inside, learn the “dos and don’ts” of taking care of your bouquet

Surrounding ourselves with flowers can improve our physical and mental health. Flowers stimulate our dopamine, serotonin, and oxytocin levels—the happy chemicals in our brain. They also remind us to slow down and enjoy them before they are gone. Because as we all know, cut flowers don’t last forever. While that’s part of their charm, there are a few things you should do (and not do) to make them last as long as possible.

Do give your flowers a “spa treatment” before arranging. This is commonly called “conditioning.” I use a Chrysalis floral conditioner during this step. Fill a bucket about a third of the way up with water, making sure every stem reaches the water. Put the bucket with flowers in a cool, dark room for about three hours and allow them to rest. This will lengthen vase life by maybe four days. Follow the directions on your flower food exactly.

Don’t use a dirty container. You should never reuse a vase without washing it first. A good rule is to add a few drops of bleach mixed in water to your vases after each use and let them soak before you wash and then put them away. If your glass vase gets “cloudy” over time you can clean it with vinegar, a dishwasher rinse aid, or a toilet bowl cleaner.

Do pay attention to the water temperature. The water in your vase should be tepid—something you would like to have your feet in! And a caution here to those using a water softener: the added salts in your water will sometimes kill the flowers. If your flowers always die quickly, this may be why.

Don’t obsess over floral “foods.” Using these for cut flowers is fine but not necessary. There are all kinds of tricks people use—a penny in the vase, a shot of gin or vodka, an aspirin, or floral food packs. The best food for your plants is simply keeping the water clean.

Do remove all the leaves that will be below the water line in your vase. Not only do they look ugly, they rot, smell and make your vase water look disgusting.

Don’t use dull clippers when cutting your stems. Stems that look “stringy” when cut show it’s time to sharpen your clippers. After this step do not get distracted by your kids, the phone or your dog. Move them into your prepared water quickly so the stems don’t close.

Do have some fun arranging your flowers. There is no right or wrong—place your flowers in the vase in a way that pleases you!

Don’t spray or mist your arranged flowers. This can cause fungal issues.

Do be prepared to troubleshoot problems. If you notice a flower either not opening or wilting, remove it from your vase. Re-cut the stem and place it in hot water from your tap. Leave it in the hot water until the water temperature has cooled. Also, place flowers out of the direct sun and/or away from heat ducts.

Don’t forget to do some maintenance. Every two to three days, re-cut your stems and change the water so your flowers stay hydrated.

Pro Tips on Some of Lynchburg’s Favorite Blooms:

• Hellebores are the first to bloom and we are anxious for flowers. Resist the urge to cut them too soon. Wait until a seed pod is formed in the center of the flower before you cut it.

• Harvest your peonies when they are soft like a marshmallow and not after they’ve blown open.

• Hydrangeas should feel like paper when you cut them. Strip all the leaves off the stem. Condition them up to their necks in water with a flower food. Cover their heads with damp paper towels and leave them to sit in your basement for a couple hours. Use care when arranging them as they drink water out of a vase much faster than you think.

• If those lilies or roses you bought just won’t open, trim the stems by about an inch and stick them in HOT water. Force the issue!

• Soft necked flowers, like a zinnia, that just won’t stand tall can be made to behave by sticking a toothpick deeply through the center of the flower into the stem. Stick it far enough in that the “trick” is invisible to others.


2019 Lynchburg Living Home Feature

Home Made
When a local actor/artist can’t find the modern décor she craves, she creates it herself
By Jennifer Redmond

This is the declaration of a bona fide creative, Mary Catherine Garrison, who channels her artistic energies into a diverse mix of mediums, colors and shapes. Entering her home just off historic Rivermont Avenue is to step into an artistic statement—each element placed purposefully to continue a theme or elevate the senses.

Though she’s an experienced actor with plenty of Broadway and television credits to her name, Garrison says, “Art has always been my first love.” Today, two years into making a home in Lynchburg along with her husband Marshall and son James, Garrison says she’s “sort of obsessed with interior design; I love it.”

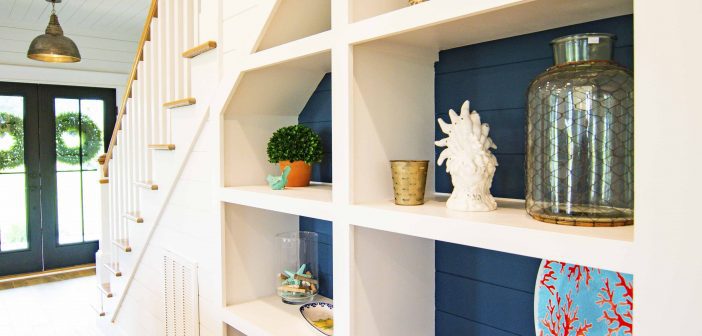
Her eye for design is more than evident; one would be hard-pressed to find a single item that doesn’t contribute to the overall atmosphere. If Garrison didn’t already own the “right item” for a certain spot, she simply made it herself. In fact, only a few minutes into our home tour, I quickly noticed a pattern. Nine times out of 10, when asked, “Oh! Where did you find ‘such and such item’?” Garrison’s response would be: “I made it.” The entryway of their 1922 Stanhope Johnson home prominently features one of her own original oil paintings—the subject a tribute to women and the bonds they share. The living room is flanked by shelves she and Marshall built together; a bench they built that she covered with a woven fabric design; and the chair opposite was reupholstered by Garrison. Like many of her projects, she taught herself how to recover the chair as she went. “Anything you want to learn is on YouTube,” she says. “You just have to start.”

Her own pillows grace the couch, custom linen curtains shade the dining room, and—perhaps the most remarkable for its finished effect—the side hutch in the dining room was also her creative vision. By cutting each geometric shape individually with a jigsaw, adding them in an asymmetrical design to simple Ikea base cabinets, sanding them down for a flush surface and staining them to match, she elevated the piece to a dramatic finished product.

Such creative ability is amazing considering the breadth of her endeavors. From macramé plant hangers and wall décor to oil and acrylic painting and from custom ceramic pieces to furniture upholstery (and even building the furniture itself), Garrison says the only medium she avoids is knitting, simply because she doesn’t like it. (One gets the impression she would soon be a master if she did care for it!) She even creates her own clothes and custom earrings—a collection of handcrafted and thrifted vintage finds that grew so large, she launched an Etsy shop.

Her creative vision has filled their 97-year-old house with a fusion of mid-century, vintage and even “80s’ Italian stuff” such as the solid marble table prominently centered in the home’s spacious dining room.

That table, coincidentally, is the result of an online auction that Garrison didn’t expect to win, but win she did. The result was a silent Marshall when she first told him about the table, explaining, “It’s so beautiful, you’re not going to believe it!” Of course, she also had to share the table’s substantial size and weight, which is close to 2,000 pounds. Three trips to New Jersey and a lot of sweat equity later, they successfully moved the table in. Garrison says Marshall “loves it now!” Plus, they have quite the story to tell about its origin.

Moving from their previous home in the Hudson Valley, where they lived in a modest 900 square feet, Garrison was thrilled to have 2,700 square feet to work with in their new home. Not only can she fit items like their dining table, she has space to expand her style too.

“I love the juxtaposition of new and old,” she says. “And I really wanted all of these details,” Garrison says, noting the wood floors and French doors in their home plus the character of details like wainscoting, decorative trim and transom windows. “I wanted to place that against all of the modern.”

The entry represents that well with a mix of personal art, family heirlooms—the secretary belonged to Marshall’s grandmother— and statement pieces—such as the sculptural side table gifted from local family friends.

“I justify my design by saying the house was built in the Art Deco period, which was super modern,” Garrison says.

She has also incorporated plenty of plants throughout; her preference is for succulents and sculptural plants in the rooms that receive less light because they still thrive and add “visual interest.” But in the rear breakfast nook—a light-filled space—plants of all kinds surround the smaller dining table, bringing nature indoors. She says plants add soul to a room and loves having a variety of them.

Garrison has plenty more home improvement plans up that vintage sleeve of hers—fresh colors for the dining room wall, recovering a chair with leather from Moore & Giles, even making the ceramic tiles to redo the fireplace surround. One thing is for sure, where Garrison is, there will be something wonderful to discover.


Customize It
How to Bring Made-to-Order Fabrics into Your Home
By Jennifer Redmond

As much as we can all appreciate scoring a great sale item or that “too hard to resist” trend of the moment à la “The Big Box Store” down the road, there comes a time when high-quality, custom features have their place in each home. Perhaps you’ve moved into a house that you truly want to settle into and are ready to put your own unique spin on. Maybe you spotted that “one-of-a-kind, fall in love at first sight” pattern and just have to find a way to work it into your décor. Or, like me, perhaps you’ve endured enough bargains that had to be discarded far too soon and are now willing to pay the ticket price for items of quality because they’re built to last.

For all of these reasons, choosing to include some custom fabric in your home can be a wise investment. First, there are plenty of ways to use it,
from a duvet cover to window treatments and from a reupholstered chair to throw pillows.

Local design shop Southern Provisions Company offers customized items that could accommodate any style or color scheme. Clients can select any kind of various fabrics, trims and designs such as French pleats or Roman shades for window treatments.

Rebekah Moody, CEO, says that creamy linen is trending locally, especially for drapes, but it’s also okay to “mix and match patterns and, yes, you want to mix up the scale of pattern,” she says. “Too much of the same thing never looks good.”

In terms of why you would want to pay for custom items, Moody says it will look and fit much better, yielding a high-end finish. So, an investment in custom drapery would be a great choice for a visible window or a room that has more prominence in the home. Store-bought, “standard drapes are too long,” Moody says, plus “the finish is cheap.” If you have a traditional eight-foot ceiling but purchase a 96-inch curtain panel, Moody explains that the result will be a puddle of fabric on the floor.

While linen is all the rage right now, Moody explains that pure linen actually “wrinkles and the folds never come out,” so she recommends a linen blend, which is “about 55% linen [and] 45% poly; it has the look of linen, and the drape of poly.” She says the ideal uses for a linen blend are drapes, bed skirts and pillows.

If you’re considering reupholstering some chairs, Katrina Morris, owner of The Morris Manor, recommends focusing on a side chair if you choose a more delicate fabric so it isn’t worn out too quickly. Moody agrees, saying linen will stretch like “a bad pair of jeans” if used for upholstery—unless it has a backing.

Morris also recommends that you consider functionality. She asks, “Do you have children? Then upgrade and get a nice washable velvet or a performance fabric that’s thicker—there’s no reason to get a thin linen if you have children.” If you like the look of linen (which most do!), consider a performance-based fabric that has the look but will last longer. These kinds of fabric are costly but the quality can be worth the investment.

She also recommends opting for a more timeless color scheme and pattern when choosing pricey fabrics; some can run $30 to $50 per yard. So Morris says her current favorite cheetah print is something “I would get tired of, so it’s not worth the cost for a long term investment. I would go for something more timeless that will last longer” such as a striped fabric.

For throw pillows, an easy and personalized option is a monogramed pillow cover, like the ones offered at Moody’s shop. Or, you can “mix patterns and colors for whatever your favorite look might be,” she says. “The trend is to keep large items neutral and make your ‘pops’ [the] items that are relatively inexpensive,” she explains. Taking this approach means less of a cost investment when you’re ready to switch the look, whether out of preference or to create some variety throughout the seasons of the year.


Make a Statement
Turn Heads with a Ceiling Made to Shine
By Jennifer Redmond | Photography by Tera Janelle Design

Coffered Ceilings

“Adding architectural elements is our favorite way to make that ‘fifth wall’ shine,” says Tera Janelle, owner of Tera Janelle Design. These elements include coffered ceilings, or recessed panels that can be trimmed in a variety of materials to create a grid-like pattern. According to ThisOldHouse.com, one popular style is “bold beams” set in a square or rectangular grid, which then adds “dimension and character to a plain room.”

The depth and size of coffers can affect price and work outlay, and though box beams (hollow wood beams) are larger and more involved to install, they have a more dramatic effect as well.
“To me [box beams] just announce quality, stating ‘this builder took the time and expense to add beautiful detailing’,” Janell Beals writes for Houzz.com. “The millwork adds timeless character and is seen most often in traditionally-styled homes, but [it] does occasionally show up in unexpected places with success.”

Once placed, you can paint the beams and coffers the same color, or, for a more dramatic statement, or especially high ceilings, paint the inside, recessed portions of the grid a darker, more striking hue. One of those “unexpected places” that Beals notes may be using the style in a home with a rustic or farmhouse style.

Katrina Morris, owner of a 100-year-old local farmhouse known as The Morris Manor, says she has been seeing much more bead board in coffered ceilings lately. “It doesn’t have to be wide and overstated,” she says. “It’s more understated…they add a nice element.” Benefits to this look is that it’s less work-intensive, “adds timeless character,” and is less expensive. For a small bedroom, Morris says you would need only 4’x8’ sheets of bead board (these run around $20), which are then trimmed with 1”x4” pieces of wood to create the grid pattern. After install, “painting it white gives it more of a cottage flair,” Morris says. “And, it can actually help the room feel bigger; you can do this on an 8’ ceiling; it doesn’t take up ceiling space and adds great visual interest.”

Colored Ceilings

“Paint and wallpaper are a great, cost-effective way to customize your ceiling,” Janelle says, recommending that you consider darker colors. “Two shades darker than your walls [will make] a cohesive but impactful statement.”

Morris agrees, countering the myth that dark ceilings would make a room feel smaller or closed in. “If you extend the wall color onto the ceiling, you don’t create a visual break,” she explains; this approach actually has an expansive effect. Morris also adds that a room with natural light can handle a darker color—even black or navy! “With great natural light, black makes a room feel cozy but not closed in.”

Janelle adds that using the trim color in a flat finish for the ceiling will “connect your home’s color palette;” in contrast, “traditional ‘ceiling paint’ can sometimes feel cold” and detached.

Wallpaper is also an option with more removable and highly artistic choices hitting the market all of the time from a wide variety of vendors. Price points range widely as does the quality and ease of placement. For a playroom or a kid’s bedroom, a colorful or bold pattern works well to draw attention up and create a fun atmosphere. In a bedroom or larger communal space, a subtle pattern or even textured paper can work quite well to add dimension and character to the room as a whole.

“Look Up!”

In choosing the best place to make your statement, Janelle favors bedrooms. “These are the rooms where we most often lay and stare at the ceilings, making bedrooms especially fun to embrace a ceiling change,” she says.

Powder baths are a great option as well, Morris says, especially for a darker ceiling or the bead board coffers. She’s also seen bead board on ceilings all throughout the main living areas of a home, especially if it has an open layout. Morris has also seen cedar beams used but those should be left unstained or unpainted. “This choice is more for the rustic or farmhouse look,” she explains.

Whatever you choose, remember the words of designer Albert Hadley: “Ceilings must always be considered. They are the most neglected surface in a room.”


Choosing the Perfect Patio Furniture
What to keep in mind before making a big purchase
By Chris Templeton, Owner, CLC Landscaping and Rustic View Home and Garden Center

Your outdoor space can serve as a second family room. Whether you have a porch, patio, or firepit, any outdoor furniture you choose can add comfort and function. You want it to be welcoming and comfortable with beautiful, durable and functional patio furniture of all styles, sizes, colors and materials.

We’ve had our share of cold and rain in Lynchburg this past year, so you are definitely going to want to get outside with family and friends and enjoy the outdoors this spring! The perfect living space can make all the difference, and hey—why not have it look great, too?

Planning

Before selecting your outdoor furniture, you want to be crystal clear about what it is you want. Are you simply looking to add some functional space to your outdoor area? Or do you want to provide a certain aesthetic appeal using your new furniture? Your lifestyle should play a big role in choosing patio furniture, so think about how you live and how you entertain.

Without this level of planning, your outdoor space could soon consist of mismatched pieces that don’t serve any real functional purpose. Done right, however, your yard can offer you the promise of relaxation, entertainment, and fun!

Sizing Issues

Each piece of furniture will occupy space, right? It seems obvious, I know. However, while most homeowners and designers understand this, they don’t always remember to take into consideration how much space they have. For example, a simple patio won’t be able to accommodate an entire backyard’s worth of furniture without looking very cluttered and taking away from its functional use. But a gigantic garden with a couple of benches won’t make use of all the available space you have.

Take detailed measurements of the outdoor spaces you intend to place your new furniture in. This will help with your initial design selections by choosing appropriately sized pieces for each of the areas. It will also help narrow down the available options, since each piece of outdoor furniture will measure differently. It’s good to have a thorough understanding of what’s available to you.

Consider Function

Once you have your plan in place, and you know what size furniture you can accommodate, you need to think about the visual appeal that your furniture can bring to your outdoor space. However, only considering the aesthetics is very short-sighted. Any furniture, especially outdoors, must serve a purpose.

Functionality is best determined by making sure any given piece of outdoor furniture or set will work in your specific outdoor area. Since you’ve already measured the areas, you know what space you need to fill and what’s available. Once you know what furniture may fit where, and what looks good, you want to test for practical function. What do you plan to do there? If you want to be able to eat meals at your outdoor table, make sure it’s stable and sturdy. Or if you plan on hosting parties, make sure your furniture will accommodate enough people!

Don’t forget to sit down and test it out yourself! There’s little point buying several pieces of outdoor furniture that are uncomfortable and unpleasant to use, especially if you plan on sharing your outdoor space with guests.

Consider Materials

The durability of outdoor furniture is often overlooked in favor of aesthetic appeal. Outdoor furniture will be put up against the elements on a regular basis. Make sure you’re getting solid, durable pieces of furniture that can handle our temperamental Lynchburg weather! Weather-resistant cushions should also be a staple purchase when choosing any piece of outdoor furniture.

Quality

Don’t select your outdoor furniture on price alone. While it can be tempting to save money, it will ultimately be costlier if corners are cut in the interest of saving money. Buy the best quality outdoor furniture you can afford. A low-priced set of patio furniture won’t end up saving you money if it falls apart in just a few years. Invest in quality—you will not regret it.

Finally, don’t rush the process of selecting your outdoor furniture. Try to avoid the impulse to buy the first patio set you see sitting out in front of hardware stores when the weather gets nice. Keep these tips in mind and select the right furniture for your outdoor living space. Whether it’s enjoying the sunshine and warm weather outdoors with friends, or gathering by the fire pit, getting the right furniture will make a world of difference!


Lynchburg Living Top Teacher Award Winners 2018-2019


Welcome to Coastal Virginia


The Buzz March/April 2019

BEHIND THE SCENES

This issue’s Artist Profile, 87-year-old Norman Ogden, opened his home to the Lynchburg Living team the end of January. After a sit-down interview with editor Shelley Basinger, he took everyone downstairs to see a room full of his woodworking masterpieces and later to his shop in the garage.

Norman wasn’t used to all of the lights and contraptions used for a feature photo shoot, but he was a great sport, even joking with photographer Ashlee Glen that he “would make a great scarecrow.” He also showed off his “Pawpaw” skills when holding Shelley’s 6-month-old son, Brooks.

On pages 22-23, read a Q&A with Norman that includes his take on the farmhouse craze and even why he’s thankful for his fingers!