Garden Fresh Foods

Herby Recipes that are Full of Flavor

Written & Photographed By: Laura Miner

The first signs of spring are beginning to show, and at my house, that means my little herb garden will be coming back to life soon.
And after a long, dreary winter, it’s a very welcome sight!

There’s really nothing that brightens and livens a dish like fresh herbs. If you take simple ingredients, cook them just right, and make sure to include plenty of fresh herbs, you may be surprised at how much flavor can be packed in every bite.

In the kitchen, I love to be inspired by the fresh flavors and bright scents of the new season. These recipes are quick to make, full of bright flavors, and they’re perfect for any spring meal!

So grab your favorite herbs from the garden or grocery store, and watch what they can do!

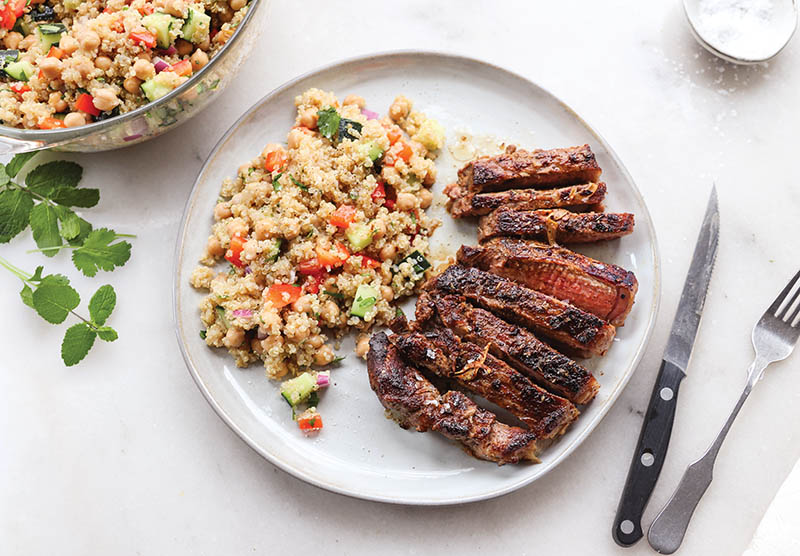
Garlic New York Strip Steak with Viral Quinoa Salad

Serves: 4

This mouthwatering NY Strip Steak is infused with bold, citrusy flavors from a zesty herb marinade, seared to juicy, tender perfection, and paired with the quinoa salad.

Every bite of these dishes delivers! It’s a wonderful pairing of savory steak goodness and fresh, vibrant vegetables and quinoa. The herbs come through on all fronts! It’s simple yet impressive, and absolutely perfect for a restaurant-quality experience right at home!

You might remember this quinoa salad from the way it went absolutely viral last year. But what makes a simple quinoa salad go viral? I think it’s the way all the ingredients work together so beautifully! The quinoa is tossed with crisp cucumbers, bell peppers, onions, chickpeas, and a light dressing, then finished with a medley of fresh herbs.

What I love most about this recipe is that when you make the marinade, you use half to marinate the steak and half doubles as the bright, tangy dressing for the salad. Hello, time saver!

Ingredients:
2 NY Strip steaks, about 1 inch thick
4-5 cloves sliced garlic
1 tsp olive or avocado oil
1 tbsp butter

Marinade/Dressing Ingredients:
1/3 cup extra virgin olive oil
3 tbsp red wine vinegar
2 tbsp lemon juice
3-4 cloves minced garlic
1 tsp minced fresh thyme
1 tsp minced fresh oregano
1 tbsp minced fresh chives
1/4 tsp red pepper flakes (optional)
1/4 tsp salt & pepper

Salad Ingredients:
2 cups quinoa (cooked and cooled)
1 cup chickpeas
2 tbsp minced red onion
2/3 cup diced bell pepper
1 cup diced cucumber
(1/2 large cucumber)
2 tbsp minced fresh mint
2 tbsp minced fresh cilantro

Instructions:
1. Make the marinade/salad dressing by whisking all the ingredients together. You will use half for a steak marinade and half for the salad dressing.
2. Pat the steaks dry and place in a bag or wide rimmed dish. Pour half of the marinade on top, turning to coat. Set the rest of the marinade/dressing aside to use in the salad later. Cover the steaks and set in the refrigerator for at least one hour, up to overnight.
3. Meanwhile, make the quinoa salad. Add half of the salad dressing/marinade to a medium bowl. Add the minced red onion to the marinade and allow it to sit while you prep the rest of the salad ingredients. This will take some of the bite out of the raw onion.
4. Dice the bell pepper and cucumber and mince the mint and cilantro.
5. Add the cucumber, chickpeas, bell pepper, and quinoa to the bowl. Toss to coat. Season to taste with salt and pepper and stir in the mint and cilantro. Keep the salad covered and refrigerated until you’re ready to serve it.
6. Next, cook the steaks. Preheat your oven to 400°F. Heat a large, oven-safe skillet over medium-high heat.
7. To sear the steaks, heat the oil in the pan, then place the steak in the skillet and allow them to cook for about
3 minutes per side without moving them. Add the sliced garlic to the pan and top each steak with half of the butter.
8. Transfer the skillet to the oven to finish cooking for 3-5 minutes for medium rare (135-140F). Remove the skillet from the oven and check the internal temperature of the steaks.
9. Season with a sprinkle of salt and pepper and serve with a generous helping of the quinoa salad.

Herby Spring Vegetable Frittata

Serves: 4

This herb-loaded, veggie-packed frittata is giving all the weekend brunch vibes!

But because frittatas are incredibly simple to make using just one skillet, it’s a simple way to make any morning a whole lot more flavorful.

Mushrooms and thyme give the frittata a deep, earthy flavor, while the chives and dill freshen and brighten every bite. Asparagus adds extra texture and savory Parmesan cheese balances it all out. Even my mushroom-despising kids gobbled up every bite! Serve it up with smashed avocado, crispy potatoes, and toast.

Ingredients:
8 large eggs
1 cup sliced mushrooms (about 4 oz.)
1 cup asparagus, cut into 1-inch pieces
1/3 cup milk
1 tbsp minced fresh chives
1 tbsp minced fresh dill
1 tsp minced fresh thyme
4 tbsp shredded parmesan cheese,
plus more for serving
2 tbsp olive oil, divided
1/2 tsp salt
1/2 tsp black pepper

Instructions:
1. Preheat your oven to 375°F.
2. Meanwhile, prepare the vegetables and herbs. Slice the mushrooms, trim and cut the asparagus into 1-inch pieces, and mince the herbs.
3. Heat 1 Tablespoon of olive oil in a 9-inch, oven-safe skillet over medium heat. Add the mushrooms and cook for about 3 minutes, stirring occasionally. Add the asparagus pieces and cook for another 2-3 minutes until slightly tender.
4. While the vegetables cook, whisk the eggs, milk, salt, and pepper together in a large bowl. Stir in the herbs and Parmesan cheese.
5. Reduce the heat to low and spread the vegetables evenly across the skillet. Drizzle the remaining oil over the vegetables. Pour the egg mixture into the pan.
6. Allow the eggs to cook, gently pulling the mixture from the sides toward the center of the pan, allowing the eggs to fill in the space, about 2-3 minutes.
7. Once the egg mixture slows at filling in the edges, transfer the skillet to the oven.
8. Bake for 8-10 minutes, until the eggs are fluffy and completely set in the center.
9. Remove the skillet from the oven. Carefully slide the frittata out of the pan and allow it to cool slightly. Season with a little more salt and pepper and sprinkle with extra parmesan cheese. Slice into 4-6 pieces and serve.

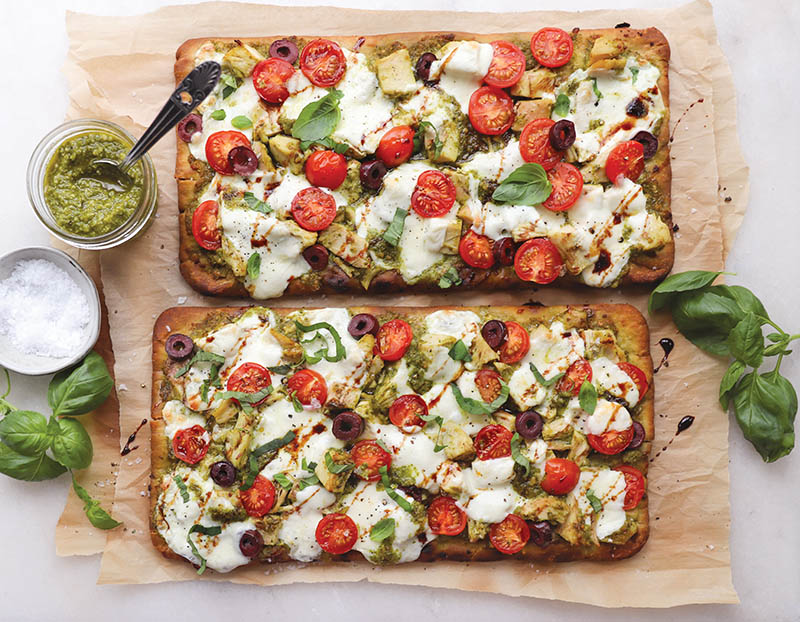
Oven Baked Italian Pesto Chicken Flatbread

Serves: 4-6

Enjoy this flavor-packed flatbread recipe as a shared snack during happy hour, a game-day treat with friends, or as an easy weeknight meal.
The crispy flatbread is topped with homemade pesto, chicken, tomatoes, fresh mozzarella cheese, and olives, and finished with balsamic glaze and more fresh basil. The homemade pesto really brings the flatbread to the next level!

To save time, repurpose leftover chicken or use store-bought rotisserie chicken.

This meal comes together in a snap! Best of all, you can cook in the oven or on the grill, but either way, it’s guaranteed to disappear in minutes!

Pesto Ingredients:
2 bunches of fresh basil, large stems removed (about 2 packed cups)
1/3 cup pine nuts
1/2 cup extra virgin olive oil
1/4 cup grated Parmesan cheese
2 cloves garlic

Flatbread Ingredients:
2 flatbreads (or substitute naan)
1 1/2 cups cherry or grape tomatoes, halved
8 oz. fresh mozzarella
1/4 cup sliced olives
1/2 – 2/3 cup pesto
1 tsp olive oil
2 cups of cooked, cooled chicken
1 tbsp balsamic glaze
Fresh basil, for serving

Instructions:
1. Make the pesto. Add the garlic, basil, pine nuts, and Parmesan to a food processor. Pulse for 30 seconds until broken down into a finer mixture. Turn the food processor on low and slowly drizzle in the oil. Blend just until smooth. Season to taste with salt and pepper.
2. Preheat the oven to 400°F. Slice the tomatoes and olives in half. Cut the cooked chicken into bite-sized pieces. Set them aside.
3. Brush the bread on both sides with the oil. Set it directly on the oven grates or on the grill for 2-3 minutes. Remove from the oven and set on a baking sheet.
4. Spread 1/4 – 1/3 cup of pesto evenly over each flatbread. Arrange the chicken, halved tomatoes, and olives on top. Spread the shredded or sliced cheese on top.
5. Bake in the oven or carefully transfer to a well-oiled grill and cook until the cheese is melted and bubbly, about 7-9 minutes.
6. Sprinkle with salt, pepper, and fresh basil, and drizzle with the balsamic glaze. Cut into individual pieces and serve right away while still hot.

Notes:
• Optional: Toast the pine nuts in a medium-hot skillet for 3-4 minutes, just until fragrant, before making the pesto! It will bring out more of the nutty flavor.
• Add fresh baby spinach and/or thinly sliced red onion to the flatbreads for extra flavor!
• Be careful not to over blend the pesto. It should be smooth, but still have a bit of texture to the consistency.
• You can freeze any leftover pesto for later! Spoon the pesto into a cube tray, freeze for 3-4 hours, then pop out the cubes and transfer to an airtight container or bag. Freeze for 3-4 months, per USDA.


The American Flag Cake

Patriotic Patisserie That is Sure to Impress
Photos by Ashlee Glen

Celebrations are often synonymous with some type of food. Consider the Thanksgiving Turkey, the Christmas Ham—or the spicy chicken wings folks like to eat on Superbowl Sunday.

But there are some special days that are often lacking in the food department. Some of our most beloved celebrations have yet to properly be associated with a special food. Yes, I am looking at you, Independence Day. The 4th of July was meant for so much more than watermelon and hot dogs!

I would like to see this fantastic Flag Cake recipe get a permanent place on America’s birthday table. It’s delicious, surprisingly easy to make, and its dramatic appearance will make your guests gasp when you bring it out. Also, if you don’t have time to decorate, let your guests help out. It’s fun!

I like to serve this cake with a sweet strawberry drink called Saft. Saft is a homemade, fruit flavored syrup with Swedish origins. Mix some of the syrup with water to make a refreshingly sweet, all-natural alternative to Kool-Aid.

AMERICAN FLAG CAKE
Serves: 18-20 People

Cake
2 1/4 sticks (255 grams) of unsalted butter, softened
3 cups sugar
6 large eggs
1 cup sour cream
2 tsp vanilla extract
3 cups (385 grams)
all-purpose flour
1/3 cup corn starch
1 1/4 tsp kosher salt (reduce to
1 tsp if using table salt)
1 tsp baking soda

Icing
4 cups heavy cream
1 tbsp sugar

Decoration
1 pint blueberries (for the number of rows you see in the photo,
you need 72 berries)
1 1/2 pint raspberries (for two long and two short double lines
you need 128 berries)

Directions
Heat the oven to 350 degrees. Butter and flour an 18 x 12 x 1 1/2 inch sheet pan.

In a stand mixer with paddle attachment, cream the butter and sugar until it looks light and fluffy. Reduce the speed and mix in the eggs, one at a time. Add the sour cream and the vanilla and beat another minute until smooth.

In a separate bowl, mix together the flour, corn starch, salt and baking soda. You can sift the dry ingredients if you have the patience, but lightly beating with a hand whisk works, too.

Now, slowly mix the dry ingredients into your stand mixer bowl until just combined.

If you will be serving the cake directly in the pan, just pour the batter into the buttered pan. However, if you are planning to turn out the cake and serve on a board or tray, use a sheet of parchment paper in addition to greasing and flouring the pan.

The batter will be fairly thick, so spread it evenly into the pan and smooth the top with a spatula. Bake in the middle of the oven until a toothpick comes out clean, or about 25 minutes.

When the cake has cooled completely, whip the cold heavy cream along with the sugar on high speed until thick and spread over the cake.

Decorating with berries can be as simple or complicated as you make it. If you go for perfection you may want to set aside around 30 minutes and use a ruler to space the rows of blueberries and raspberries. If you prefer a quicker, more rustic approach, strawberries cut in half make a good alternative to raspberries and you will be done in
10 minutes.


SWEDISH SAFT
Makes: About 1 Pint

Ingredients
1 lb. fresh strawberries, hulled and halved
1 1/4 cup sugar
1 lemon, juiced
1 1/2 cup water

Directions
Add strawberries, sugar, and water to a heavy-bottomed saucepan. Bring to a boil, then reduce to a simmer. Cook until the sugar has dissolved then turn off the heat. Add lemon juice. Let the mixture cool before straining it through cheesecloth to remove the strawberry solids. Store in a snap-top bottle in the refrigerator. Will keep for one month or longer.

To enjoy a glass of saft, mix 1/4 cup of the syrup with 1 cup water. Ice is optional!


FAITH FAMILY AND THE RIGHT FLOUR

THE WOODRUFF’S CAFÉ AND PIE SHOP TEAM SHARES THEIR SECRETS TO SUCCESS

Photos by Ashlee Glen

Darnette Hill sits at a corner table folding boxes for what’s expected to be another bustling day at Woodruff’s Café and Pie Shop in Amherst County.

It’s Wednesday morning—since they’ve been closed since Saturday, they know customers will start rolling in right when the doors open at 10 a.m. The display case is full, and the shop’s ovens are working overtime, filling the tiny cinderblock building with mouthwatering scents of cranberry, sweet potato, and chocolate.

As she folds, Darnette and her twin sister, Darnelle Winston, laugh—with happy tears in their eyes—as they tell stories about “Mama,” who passed away in May of this year at 104 years old. Mary Woodruff, the matriarch of the family pie shop, used to fold boxes at the very same table and loved chatting with customers as they waited for their orders.

“She was here every day, no matter what,” said Winston, who works in the front part of the store and occasionally bakes.

“And Mama was negative about nothing. She was always positive,” added Hill. “We never thought about it until after she was gone just how positive she was.”

It was Mary’s positivity, along with the constant support of the whole family, that has kept Woodruff’s Café and Pie Shop going through the years, explained Angie Scott, owner of the shop and younger sister to Darnelle and Darnette: “‘Just have faith, Angie,’ Mama would always say.”

But it wasn’t always easy.

IN THE BEGINNING

Woodruff’s opened in January 1952 as a general store on land owned by Scott’s grandfather, selling gas and oil, chicken and hog feed, and grocery items. Her father built it with friends out of cinderblock.

“They did very well, the whole community stopped in,” Scott said. “A lot of people didn’t have cars so they would walk to the store.”

Woodruff’s was also home—Scott and her sisters lived with their parents upstairs, above the store. She recalled their unusual alarm clock.

“Mama would be so busy down here that she would take a broom and bang it into the ceiling that was right below our room,” Scott chuckled as she reenacted her mother’s morning ritual.

Thirty years later, the general store closed, unable to compete with big grocery chains. The building sat empty for a while before becoming an apartment and then a fish market for a couple of years.

In the ’90s, Scott’s wheels started turning as she attended a family reunion on her father’s side and learned more about the history of her family in the area near the shuttered store.

“I just really wanted to carry that history on,” she said.

A SLOW REVIVAL

With a 10-year background in the restaurant industry and a community college degree, Scott followed her heart and reopened Woodruff’s in 1998.

“It was small, I wanted it to be a little café,” she explained, adding that the dessert case didn’t come until later when she wanted to offer something sweet for lunchtime customers.

“I started going through cookbooks and finding recipes from family. Of course I used my mom’s sweet potato pie recipe,” Scott said.

By the early 2000s, she was branching out and baking other types of pies—but business was still slow. Scott even got a second job waiting tables to make ends meet. She was starting to feel like her faith in the business was running out.

“But the Lord kind of did some work in those 10 years and sent people that would help me,” said Scott.

One of those people arrived in 2012, a Southern Living writer who happened to be in the area for an assignment about apple orchards. Someone told the writer to stop by Woodruff’s for a slice of pie.

“I was making apple pie that day when she came in. She took a bite and said, ‘This is the best apple pie I’ve ever had’,” Scott said. “We were in their fall issue in 2013. Things started to turn around then.”

Things turned around so much that they had a hard time keeping up with demand, especially with just one oven at the time.

“I was turning people away because at 11 o’clock the pies were gone. So I had to bring in another oven,” she said.

More publicity came in 2015 when PBS produced a show called “A Few Good Pie Places.” Then in early 2020, the pinnacle of media coverage—the Today show came to Amherst County for a feel-good story about Mary and her role at the shop. It’s not uncommon now to have visitors from all over the country.

“We had a gentleman and his mother come from Ohio just this last weekend. They said [our shop] was on their bucket list. So we were able to give them a history and talk to them,” Scott said. “They bought five pies. People do that type of thing all the time.”

They now have five standard ovens, and recently added a dough press machine to save time making crusts. Scott’s next goal is to upgrade the space to a commercial kitchen.

MORE OR LESS

So what makes a Woodruff’s pie so irresistible that it’s worth a six-hour drive? Like many seasoned family cooks who have spent years creating the same recipes—it’s often kind of hard to explain.

“We don’t have many rules, I guess you would say,” Scott said. “Just trial and error.”

One of those trial-and-error experiences was finding the right flour.

“I had bought this expensive flour and it just didn’t work. We ended up using Walmart flour,” she said, adding that a customer offered to test it for them. Turns out, their favorite flour was low in gluten: “If the gluten [in your flour] is too high, you won’t get a good crust.”

The crust is the foundation of a good pie—and you might be surprised who is behind the Woodruff’s batter.

“Larry is the backbone of the kitchen,” explained Scott of her husband, an often unsung hero in all of the shop’s publicity through the years. “He is the best cook out of all of us. He makes all of the pie batter. He makes crumble, which is a big deal. He also makes our chicken salad and pimento cheese. We really couldn’t do this without him.”

Larry and Angie agree—it all comes down to timing. First, don’t overmix your dough when making pie crust. Next, according to Larry, how long you let the dough sit after mixing can affect how easy it is to work with if you are making a lattice top (his specialty).

“If she rolls this out and it sits for a few minutes, it seems to fall apart. If we use it right away, it doesn’t have to be quite as thick,” he explained.

They use a milk wash instead of an egg wash for the tops of their pies. Why? “Because we got tired of cracking so many eggs!” Scott laughed. “Milk does the same thing.”

When it comes to your fillings, follow your favorite recipe (and use fresh, local ingredients if possible) but don’t be afraid to experiment. For example, your family might like the taste of cinnamon a little more or less than a recipe calls for. You’ll actually see “more or less” several times in the pie recipes Scott shared with us on the following pages.

Finally, a little trial-and-error tip about fruit pies: “Put them on the lowest grate in your oven. I finally figured that out,” Scott said. “That will keep them from getting soggy.”

BEING MERRY WITHOUT MARY

Heading into the first holiday season without “Mama” will be an adjustment for this close-knit family. Partly because Mary Woodruff adored Christmas—from the caroling to the decorations—and equally loved a good snow.

But it may be her grateful spirit they remember—and try to emulate—this time of year.

“If someone gave her the smallest gift she would just love it and praise them for it. She was always so grateful for every single thing she received in her life,” said Hill.

Every single thing including that cozy corner table where Mary had the opportunity, every single day, to do what she loved the most—help the family business thrive.

“Even on her death bed and she only had weeks left, she was like, ‘I need to go over to Angie’s and fold some boxes’,” Scott recalled. “It’s been different without her and it always will be, but we are doing okay.”


TRY A PIE
Angie Scott shares a few of their top-selling recipes, but they are keeping their crust concoction under wraps. Use your own recipe or pour these fillings into a store-bought crust for an easy dessert option.

Cherry Pie

Ingredients
4 cups tart cherries
1 1/4 cups sugar
Pinch of salt
Butter
1/3 cup clear gel (a modified food starch found in baking aisle)
Dash of cinnamon or nutmeg

Instructions
Mix or toss ingredients lightly. Spoon into unbaked pie crust. Dot with butter. Top with lattice or regular crust. Brush crust with milk or egg wash. Sprinkle with sugar. Bake at 375 for 40 min.


Apple Cranberry Pie

Ingredients
6 cups apples (your favorite)
1/2 cup fresh cranberries
1 cup sugar (more or less)
2 tablespoons flour
Pinch of salt
3/4 teaspoon cinnamon
1/2 teaspoon nutmeg
1/2 teaspoon orange extract (more or less, optional)
Butter

Instructions
Mix dry ingredients. Dot apples with orange extract or a little fresh zest. Toss all together with cranberries. Spoon into unbaked pie crust. Top with crust or use cookie cutters to decorate. Dot with butter.

Bake at 375 for 55 minutes. When cool drizzle with icing. (You can make your own with confectioner’s sugar and water.)


Mama’s Sweet Potato Pie

Ingredients
2 hand-sized sweet potatoes (about 2 pounds), well cooked
1 1/2 stick butter
2 cups sugar
1 cup whole milk
4 well beaten eggs
1 pinch salt
2 teaspoons vanilla
1 teaspoon lemon extract
2 teaspoons nutmeg

Instructions
Mix well. Pour into two large unbaked, 9-inch, deep dish pie crusts. Bake at 375 degrees for 1 hour.


Pecan Pie

Ingredients
1 cup pecan halves
1/2 cup pecan pieces
1/2 cup sugar
1/2 cup brown sugar
1 cup light corn syrup
3 eggs
1/2 cup butter
1 teaspoon vanilla

Instructions
Layer pecans in pie crust. Mix all other ingredients together and pour over pecans. Bake at 350 degrees for 1 hour.


The Reel Thing (Recipes)

Fresh Catch Summer Salad with Strawberries
Enjoy summertime on a plate with this refreshing, sweet, and delicious salad!

Ingredients:
Fish
1-2 pounds fileted fish
(our favorites are black bass, speckled trout, or any of the fresh catch from Marsh Roots Seafood)
1/4 cup olive oil
1 ounce Key West Blend Seasoning (available at Marsh Roots Seafood)
2 tablespoons butter
1 lemon slice
Pinch of salt and pepper

Salad
1 bag of spring mix
1 bag of arugula
1 pint strawberries, sliced
4 ounces goat cheese, crumbled
1 cup candied pecans, crushed (optional, can be found in stores)
Sunflower sprouts and your favorite microgreens (optional)

Dressing
2/3 cup olive oil
3 teaspoons lemon juice
1 tablespoon honey
1 tablespoon Dijon mustard
1 shallot finely diced
Salt and pepper as needed

Method:
Grab your favorite fish filet from your favorite local seafood market (Read: Marsh Roots Seafood Company). Rinse and pat dry—always make sure while patting dry to feel for bones along the spine of the filet and remove if necessary.

Once patted down, coat evenly with Key West seasoning and salt and pepper on both sides. Drizzle with olive oil. Slice butter and lemon. Add butter directly onto the filet and then add lemon slices. Wrap in foil and cook in the oven at 350º for 20-25 minutes or on the grill. You can also pan roast in a cast iron pan on the stove top with a little olive oil to avoid the filet sticking to the pan.

While the fish is cooking, make your dressing by adding the dressing ingredients to a bowl or mason jar. (We always do this in case there is any left over, then just cap and throw it in the fridge. Ready to pour on tomorrow’s salad!) Once added, whisk together well and add salt and pepper to taste. Set aside.

Assemble your salad with your bed of fresh greens, sliced strawberries, goat cheese, and crushed candied pecans. Add the fish filets and pour the dressing.


Cast Iron Seafood Pasta
This coastal twist on the traditional spaghetti night is easy and flavorful!

Ingredients:
Pantry
1 pound linguine or angel hair pasta

Seafood
1 pound shrimp peeled/deveined
Half pound, 10-20 ct. sea scallops
2 tablespoons butter
2 teaspoons minced garlic

Sun-Dried Tomato Pesto
8 ounces sun-dried tomatoes
4 garlic cloves
1/3 cup basil leaves
1/4 cup parsley
1/3 cup grated parmesan
1/4 cup pine nuts
Olive oil as needed
Salt and pepper as needed

Optional
Cherry tomatoes
Spinach
Basil or parsley for garnish

Method:
Bring 1-2 quarts of water to a boil and salt heavily. Add pasta. While the pasta is cooking make your homemade pesto by adding all the pesto ingredients to a food processor and blending. (If you decide to buy store-bought pesto, pour yourself a glass of wine!) Note: the ingredients should reach a smooth consistency from a slow addition of olive oil as they process, and once you see that fine grain you are good to stop blending. Set aside.

Bring your cast iron pan to low heat. Add butter and garlic, and allow butter to melt. Add shrimp and scallops, evenly spaced, wait about 2 minutes then flip each one to cook on the opposite side. Remember: Scallops should turn white and shrimp should turn pink when cooking. As you cook, make sure everything is getting a nice garlic-butter bath. If you are going to add cherry tomatoes now is the time, and allow them to begin softening.

Drain your pasta and set aside.

Once your shrimp and scallops have cooked for about 2-3 minutes on each side, add the pesto and allow to reach a simmer. If you are adding spinach, now is the time—let it begin to soften and wilt in the sauce. Add your pasta to the simmering seafood and pesto in your cast iron and coat thoroughly through the mixture. Leave on low for another 3-5 minutes covered or uncovered.

Serve with fresh basil and grated parmesan. Enjoy!